JavaFX events
last modified October 18, 2023
GUI applications are event-driven. An application reacts to different event types which are generated during its lifetime. Events are generated by a user (a mouse click), an application (a timer), or the system (a clock).
An event is a notification about a change. It encapsulates the state changes in the event source. Registered event filters and event handlers within the application receive the event and provide a response.
Every event in JavaFX has three properties:
- Event source
- Event target
- Event type
Event source is the object whose state changes; it generates events.
Event target is the destination of the an event. Event type
provides additional classification to events of the same Event class.
Event source object delegates the task of handling an event to the event handler. When the event occurs, the event source creates an event object and sends it to each registered handler.
JavaFX Event handler
EventHandler handles events of a specific class or type. The event
handler is set to the event source. It has a handle method, where
we put the code that is invoked in reaction to the generated event.
package com.zetcode;

import javafx.application.Application;
import javafx.application.Platform;
import javafx.scene.Scene;
import javafx.scene.control.ContextMenu;
import javafx.scene.control.MenuItem;
import javafx.scene.layout.HBox;
import javafx.stage.Stage;

public class EventHandlerEx extends Application {

    @Override
    public void start(Stage stage) {

        initUI(stage);
    }

    private void initUI(Stage stage) {

        var root = new HBox();

        var conMenu = new ContextMenu();
        var noopMi = new MenuItem("No op");
        var exitMi = new MenuItem("Exit");

        conMenu.getItems().addAll(noopMi, exitMi);

        exitMi.setOnAction(event -> Platform.exit());

        root.setOnMousePressed(event -> {
            if (event.isSecondaryButtonDown()) {
                conMenu.show(root, event.getScreenX(),
                        event.getScreenY());
            }
        });

        var scene = new Scene(root, 300, 250);

        stage.setTitle("EventHandler");
        stage.setScene(scene);
        stage.show();
    }

    public static void main(String[] args) {
        launch(args);
    }
}
The example uses two EventHandlers for two different
Events.
var conMenu = new ContextMenu();
ContextMenu is a popup control containing an list of menu items.
var noop = new MenuItem("No op");
var exit = new MenuItem("Exit");
var.getItems().addAll(noop, exit);
Two MenuItems are created and added to the context menu.
exitMi.setOnAction(event -> Platform.exit());
With the setOnAction method, we set an event handler for an
ActionEvent. The EventHandler's handle
method exits the application with the Platform.exit method.
root.setOnMousePressed(event -> {
    if (event.isSecondaryButtonDown()) {
        conMenu.show(root, event.getScreenX(),
                event.getScreenY());
    }
});
With the setOnMousePressed method, we set an event handler for a
MouseEvent. When we click the secondary mouse button (usually the
right one), the context menu is shown on the screen; it is displayed below the x
and y coordinates of the mouse click.
JavaFX Event properties
The following program explores the properties of a MouseEvent.
It is an event that occurs due to the user interacting with a mouse.
package com.zetcode;

import javafx.application.Application;
import javafx.scene.Scene;
import javafx.scene.layout.Pane;
import javafx.scene.shape.Rectangle;
import javafx.stage.Stage;

public class EventSourceEx extends Application {

    @Override
    public void start(Stage stage) {

        initUI(stage);
    }

    private void initUI(Stage stage) {

        var root = new Pane();

        var rect = new Rectangle(30, 30, 80, 80);
        rect.setOnMouseClicked(e -> {

            System.out.println(e.getSource());
            System.out.println(e.getTarget());
            System.out.println(e.getEventType());
            System.out.format("x:%f, y:%f%n", e.getSceneX(), e.getSceneY());
            System.out.format("x:%f, y:%f%n", e.getScreenX(), e.getScreenY());
        });

        root.getChildren().addAll(rect);

        var scene = new Scene(root, 300, 250);

        stage.setTitle("Event properties");
        stage.setScene(scene);
        stage.show();
    }

    public static void main(String[] args) {
        launch(args);
    }
}
In the example, we have a rectangle shape. We add an event handler to the mouse clicked event type.
rect.setOnMouseClicked(e -> {
...
});
The setOnMouseClicked adds an event handler to the mouse clicked
event types. The handler is an anonymous inner class.
System.out.println(e.getSource());
System.out.println(e.getTarget());
System.out.println(e.getEventType());
These three are the generic properties, available for all events.
The getSource method returns an object on which the
event initially occurred. The getTarget method returns
the event target of this event. In our case, the event source and
the event target is the same—the rectangle. The getEventType
method returns the event type of the MouseEvent. In our
case it returns the MOUSE_CLICKED value.
System.out.format("x:%f, y:%f%n", e.getSceneX(), e.getSceneY());
System.out.format("x:%f, y:%f%n", e.getScreenX(), e.getScreenY());
These four properties are specific to this event. We print the x and y coordinates of a mouse click, relative to the scene and to the screen.
JavaFX Generic handler
In the next example, we create a generic event handler that listens for all kinds of events.
package com.zetcode;

import javafx.application.Application;
import javafx.event.Event;
import javafx.event.EventHandler;
import javafx.event.EventType;
import javafx.scene.Scene;
import javafx.scene.control.Button;
import javafx.scene.layout.StackPane;
import javafx.stage.Stage;

public class GenericHandlerEx extends Application {

    @Override
    public void start(Stage stage) {

        initUI(stage);
    }

    private void initUI(Stage stage) {

        var root = new StackPane();

        var btn = new Button("Button");
        btn.addEventHandler(EventType.ROOT, new GenericHandler());

        root.getChildren().add(btn);

        var scene = new Scene(root, 300, 250);

        stage.setTitle("Generic handler");
        stage.setScene(scene);
        stage.show();
    }

    public static void main(String[] args) {
        launch(args);
    }

    private class GenericHandler implements EventHandler<Event> {

        @Override
        public void handle(Event event) {

            System.out.println(event.getEventType());
        }
    }
}
This example has one button control. A generic handler is plugged to the button.
var btn = new Button("Button");
btn.addEventHandler(EventType.ROOT, new GenericHandler());
The addEventHandler method registers an event handler to
the button node for the specified event type. The EventType.ROOT
stands for all event types.
private class GenericHandler implements EventHandler<Event> {

    @Override
    public void handle(Event event) {

        System.out.println(event.getEventType());
    }
}
The handler prints the event type to the console in its handle method.
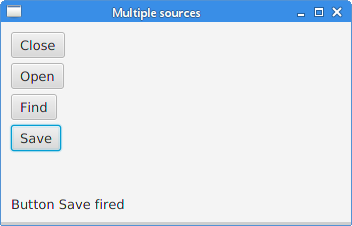
JavaFX Multiple sources
It is possible to add a single event handler to multiple sources.
The source of the event can be determined with the getSource
method.
package com.zetcode;

import javafx.application.Application;
import javafx.event.ActionEvent;
import javafx.event.EventHandler;
import javafx.scene.Scene;
import javafx.scene.control.Button;
import javafx.scene.control.Label;
import javafx.scene.layout.AnchorPane;
import javafx.scene.layout.VBox;
import javafx.stage.Stage;

public class MultipleSourcesEx extends Application {

    private Label lbl;

    @Override
    public void start(Stage stage) {

        initUI(stage);
    }

    private void initUI(Stage stage) {

        var root = new AnchorPane();

        var vbox = new VBox(5);

        var btn1 = new Button("Close");
        var btn2 = new Button("Open");
        var btn3 = new Button("Find");
        var btn4 = new Button("Save");

        var mbh = new MyButtonHandler();

        btn1.setOnAction(mbh);
        btn2.setOnAction(mbh);
        btn3.setOnAction(mbh);
        btn4.setOnAction(mbh);

        vbox.getChildren().addAll(btn1, btn2, btn3, btn4);

        lbl = new Label("Ready");

        AnchorPane.setTopAnchor(vbox, 10d);
        AnchorPane.setLeftAnchor(vbox, 10d);
        AnchorPane.setBottomAnchor(lbl, 10d);
        AnchorPane.setLeftAnchor(lbl, 10d);

        root.getChildren().addAll(vbox, lbl);

        var scene = new Scene(root, 350, 200);

        stage.setTitle("Multiple sources");
        stage.setScene(scene);
        stage.show();
    }

    private class MyButtonHandler implements EventHandler<ActionEvent> {

        @Override
        public void handle(ActionEvent event) {

            var btn = (Button) event.getSource();
            lbl.setText(String.format("Button %s fired", btn.getText()));
        }
    }

    public static void main(String[] args) {
        launch(args);
    }
}
The example has four buttons and a label. One event handler is added to all four buttons. The name of the fired button is displayed in the label.
var btn1 = new Button("Close");
var btn2 = new Button("Open");
var btn3 = new Button("Find");
var btn4 = new Button("Save");
These four buttons will share a single event handler.
var mbh = new MyButtonHandler();
An instance of a MyButtonHandler is created.
It is implemented as a inner named class.
btn1.setOnAction(mbh);
btn2.setOnAction(mbh);
btn3.setOnAction(mbh);
btn4.setOnAction(mbh);
The handler is added to four different buttons with the setOnAction
method.
private class MyButtonHandler implements EventHandler<ActionEvent> {

    @Override
    public void handle(ActionEvent event) {

        var btn = (Button) event.getSource();
        lbl.setText(String.format("Button %s fired", btn.getText()));
    }
}
Inside the handle method of the MyButtonHandler,
we determine the source of the event and build a message using the
source's text label. The message is set to the label control with its
setText method.
The java.util.Timer
The java.util.Timer schedules tasks for future execution in a
background thread. TimerTask is a task that can be scheduled
for one-time or repeated execution by a timer.
package com.zetcode;

import java.util.Timer;
import java.util.TimerTask;
import javafx.application.Application;
import javafx.application.Platform;
import javafx.geometry.Insets;
import javafx.scene.Scene;
import javafx.scene.control.Alert;
import javafx.scene.control.Button;
import javafx.scene.control.Spinner;
import javafx.scene.layout.HBox;
import javafx.stage.Stage;

public class TimerEx extends Application {

    int delay = 0;

    @Override
    public void start(Stage stage) {

        initUI(stage);
    }

    private void initUI(Stage stage) {

        var root = new HBox(10);
        root.setPadding(new Insets(10));

        var timer = new Timer();

        var spinner = new Spinner<>(1, 60, 5);
        spinner.setPrefWidth(80);

        var btn = new Button("Show message");
        btn.setOnAction(event -> {

            delay = (int) spinner.getValue();
            timer.schedule(new MyTimerTask(), delay*1000);
        });

        root.getChildren().addAll(btn, spinner);

        stage.setOnCloseRequest(event -> timer.cancel());

        var scene = new Scene(root);

        stage.setTitle("Timer");
        stage.setScene(scene);
        stage.show();
    }

    private class MyTimerTask extends TimerTask {

        @Override
        public void run() {

            Platform.runLater(() -> {

                var alert = new Alert(Alert.AlertType.INFORMATION);
                alert.setTitle("Information dialog");
                alert.setHeaderText("Time elapsed information");

                String contxt;

                if (delay == 1) {
                    contxt = "1 second has elapsed";
                } else {
                    contxt = String.format("%d seconds have elapsed",
                            delay);
                }

                alert.setContentText(contxt);
                alert.showAndWait();
            });
        }
    }

    public static void main(String[] args) {
        launch(args);
    }
}
The example has two controls: a button and a spinner. The button starts a timer, which shows a message dialog after a delay. The delay is chosen by the spinner control.
var timer = new Timer();
An instance of the Timer is created.
var spinner = new Spinner<>(1, 60, 5);
The Spinner control is used to choose the amount
of the delay. Its parameters are the minimum, maximum, and current
values. The values are in milliseconds.
btn.setOnAction(event -> {

    delay = (int) spinner.getValue();
    timer.schedule(new MyTimerTask(), delay*1000);
});
In the button's event handler, we get the spinner's current value
with the getValue method and schedule the task
with the timer's schedule method.
stage.setOnCloseRequest(event -> timer.cancel());
We cancel the timer when the application is terminated with the
timer's cancel method.
private class MyTimerTask extends TimerTask {

    @Override
    public void run() {

        Platform.runLater(() -> {

            var alert = new Alert(Alert.AlertType.INFORMATION);
            alert.setTitle("Information dialog");
            alert.setHeaderText("Time elapsed information");

            String contxt;

            if (delay == 1) {
                contxt = "1 second has elapsed";
            } else {
                contxt = String.format("%d seconds have elapsed",
                        delay);
            }

            alert.setContentText(contxt);
            alert.showAndWait();
        });
    }
}
The runLater method executes the task on the JavaFX Application Thread.
We show a message dialog informing about the elapsed time.

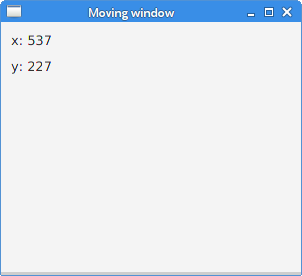
JavaFX Moving a window
The following example shows the position of the application window on the screen.
package com.zetcode;

import javafx.application.Application;
import javafx.beans.value.ChangeListener;
import javafx.beans.value.ObservableValue;
import javafx.geometry.Insets;
import javafx.scene.Scene;
import javafx.scene.control.Label;
import javafx.scene.layout.VBox;
import javafx.stage.Stage;

public class MovingWindowEx extends Application {

    int x = 0;
    int y = 0;
    Label lbl_x;
    Label lbl_y;

    @Override
    public void start(Stage stage) {

        initUI(stage);
    }

    private void initUI(Stage stage) {

        var root = new VBox(10);
        root.setPadding(new Insets(10));

        var txt1 = String.format("x: %d", x);
        lbl_x = new Label(txt1);

        var txt2 = String.format("y: %d", y);
        lbl_y = new Label(txt2);

        root.getChildren().addAll(lbl_x, lbl_y);

        stage.xProperty().addListener(new ChangeListener<>() {

            @Override
            public void changed(ObservableValue<? extends Number> observable,
                                Number oldValue, Number newValue) {

                doChange(newValue);
            }

            private void doChange(Number newValue) {

                x = newValue.intValue();
                updateXLabel();
            }

        });

        stage.yProperty().addListener(new ChangeListener<>() {

            @Override
            public void changed(ObservableValue<? extends Number> observable,
                                Number oldValue, Number newValue) {

                doChange(newValue);
            }

            private void doChange(Number newValue) {

                y = newValue.intValue();
                updateYLabel();
            }

        });

        var scene = new Scene(root, 300, 250);

        stage.setTitle("Moving window");
        stage.setScene(scene);
        stage.show();
    }

    private void updateXLabel() {

        var txt = String.format("x: %d", x);
        lbl_x.setText(txt);
    }

    private void updateYLabel() {

        var txt = String.format("y: %d", y);
        lbl_y.setText(txt);
    }

    public static void main(String[] args) {
        launch(args);
    }
}
The example shows the current window coordinates in two label controls.
To get the window position, we listen for changes of the xProperty
and yProperty of the stage.
var txt1 = String.format("x: %d", x);
lbl_x = new Label(txt1);

var txt2 = String.format("y: %d", y);
lbl_y = new Label(txt2);
These two labels show the x and y coordinates of the top-left corner of the application window.
stage.xProperty().addListener(new ChangeListener<Number>() {

    @Override
    public void changed(ObservableValue<? extends Number> observable,
            Number oldValue, Number newValue) {

        doChange(newValue);
    }

    private void doChange(Number newValue) {

        x = newValue.intValue();
        updateXLabel();
    }

});
The xProperty stores the horizontal location of the stage on the
screen. We add a ChangeListener to listen for changes of the property.
Each time the property is modified, we retrieve the new value and update the label.
private void updateYLabel() {

    var txt = String.format("y: %d", y);
    lbl_y.setText(txt);
}
A label is updated with the setText method.
This part of the JavaFX tutorial was dedicated to JavaFX events.