Python Pillow
last modified November 17, 2026 Python 3.15
In this article we show how to work with images in Python using the Pillow library.
Pillow is the friendly fork of PIL, the Python Imaging Library,
and the de facto standard image processing library for Python. It can open,
manipulate, and save images in many file formats, including JPEG, PNG, GIF,
WebP, AVIF, TIFF, and BMP. It provides operations such as resizing,
cropping, rotating, colour conversion, and filtering, and simple 2D drawing.
The package is installed as pillow, but imported as
PIL, for compatibility with the original library.
The examples were tested with Python 3.15 and Pillow 13.0 on Linux.
$ pip install pillow
The sample image
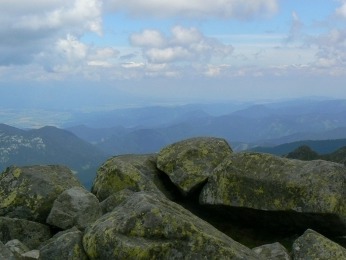
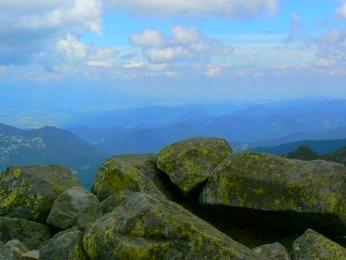
Most examples work with the mountains.jpg file, a photo of
mountains with a size of 346x260 pixels. Save it next to the
examples.
Basic image information
The Image.open function opens an image file and returns an
Image object. Pillow reads the file lazily: open
reads only the header, and the pixel data is loaded when it is first
needed.
from PIL import Image

with Image.open('mountains.jpg') as img:
    print(f'format: {img.format} ({img.format_description})')
    print(f'size: {img.size}')
    print(f'width: {img.width}, height: {img.height}')
    print(f'mode: {img.mode}')
    print(f'bands: {img.getbands()}')
    print(f'info: {img.info}')
The example prints basic information about the image.
with Image.open('mountains.jpg') as img:
We use the image as a context manager, which closes the file at the end of the block. The format is detected from the content of the file, not from its extension.
print(f'size: {img.size}')
print(f'width: {img.width}, height: {img.height}')
print(f'mode: {img.mode}')
The size attribute is a tuple of the width and height in
pixels. The mode defines the type and depth of a pixel:
RGB has three 8-bit colour channels, RGBA adds an
alpha channel, L is 8-bit grayscale, and 1 is
black and white with one bit per pixel.
print(f'info: {img.info}')
The info dictionary holds additional data read from the file;
here it is the JFIF header of the JPEG file.
$ python info.py
format: JPEG (JPEG (ISO 10918))
size: (346, 260)
width: 346, height: 260
mode: RGB
bands: ('R', 'G', 'B')
info: {'jfif': 257, 'jfif_version': (1, 1), 'jfif_unit': 0, 'jfif_density': (1, 1)}
Showing an image
The show method displays an image in an external viewer.
from PIL import Image

with Image.open('mountains.jpg') as img:
    img.show()
The method is intended for debugging. It saves the image into a temporary
file and opens it with a viewer available on the system, such as the default
image viewer on Windows and macOS, or display,
eog, or xdg-open on Linux.
Handling errors
If the file does not exist, Image.open raises
FileNotFoundError. If the file exists but Pillow does not
recognize its format, it raises UnidentifiedImageError.
from PIL import Image, UnidentifiedImageError

for name in ('mountains.jpg', 'missing.jpg', 'info.py'):
    try:
        with Image.open(name) as img:
            print(f'{name}: {img.format} {img.size}')
    except FileNotFoundError:
        print(f'{name}: file not found')
    except UnidentifiedImageError:
        print(f'{name}: not an image')
We try to open an image, a missing file, and a Python source file. The
UnidentifiedImageError is a subclass of OSError,
like FileNotFoundError; older code often catches
IOError, an alias of OSError, which handles both
cases together.
$ python open_error.py
mountains.jpg: JPEG (346, 260)
missing.jpg: file not found
info.py: not an image
Converting image formats
The save method writes an image to a file. The format is
determined from the file extension, or it can be given explicitly in the
second argument. Format-specific options are passed as keyword
arguments.
import os

from PIL import Image

with Image.open('mountains.jpg') as img:
    img.save('mountains.png')
    img.save('mountains.webp', quality=80)
    img.save('mountains_q30.jpg', quality=30)
    img.save('mountains.bmp')

for name in ('mountains.jpg', 'mountains.png', 'mountains.webp',
             'mountains_q30.jpg', 'mountains.bmp'):
    with Image.open(name) as img:
        print(f'{name:<18} {img.format:<5} {os.path.getsize(name):>7} bytes')
The program saves the JPEG image in several formats and prints their sizes.
img.save('mountains.webp', quality=80)
img.save('mountains_q30.jpg', quality=30)
The quality option of the lossy JPEG and WebP formats takes
values from 0 to 100; the default for JPEG is 75. A lower quality gives a
smaller file with more compression artefacts.
PNG is a lossless format, so the PNG file is larger than the JPEG file; it stores the decoded pixels exactly. BMP stores the pixels uncompressed: 260 rows of 346 × 3 bytes, each padded to a multiple of four bytes, plus a 54-byte header.
$ python convert_format.py
mountains.jpg      JPEG    23917 bytes
mountains.png      PNG    123052 bytes
mountains.webp     WEBP     9770 bytes
mountains_q30.jpg  JPEG     5890 bytes
mountains.bmp      BMP    270454 bytes
Resizing images
The resize method returns a resized copy of an image. The
thumbnail method resizes the image in place so that it fits
into the given size while keeping its aspect ratio.
from PIL import Image

with Image.open('mountains.jpg') as img:
    small = img.resize((173, 130))
    print(f'resize: {small.size}')

    wide = img.resize((400, 100), Image.Resampling.LANCZOS)
    print(f'resize: {wide.size}')

    half = img.reduce(2)
    print(f'reduce: {half.size}')

    img.thumbnail((120, 120))
    print(f'thumbnail: {img.size}')
    img.save('thumbnail.jpg')
The example shows several ways to change the size of an image.
wide = img.resize((400, 100), Image.Resampling.LANCZOS)
The resize method uses the given size as it is, even if it
distorts the image. The second argument selects the resampling filter;
LANCZOS gives the best quality for downscaling,
NEAREST is the fastest. The default is BICUBIC.
half = img.reduce(2)
The reduce method shrinks the image by an integer factor; it is
fast and averages the pixels in each block.
img.thumbnail((120, 120))
The thumbnail fits into a 120x120 box. The image is wider than tall, so its
width is 120 and its height is scaled proportionally. Unlike the other
methods, thumbnail modifies the image object itself and never
enlarges the image.
$ python resize.py
resize: (173, 130)
resize: (400, 100)
reduce: (173, 130)
thumbnail: (120, 90)
Grayscale images
The convert method converts an image to another mode. The
L mode produces a grayscale image.
from PIL import Image

with Image.open('mountains.jpg') as img:
    gray = img.convert('L')

print(gray.mode, gray.getbands())
print(gray.getpixel((0, 0)), gray.getextrema())

gray.save('mountains_gray.jpg')

bw = gray.point(lambda v: 255 if v > 128 else 0, mode='1')
print(bw.mode)
bw.save('mountains_bw.png')
The program converts the image to grayscale and then to black and white.
gray = img.convert('L')
Each pixel is computed from the RGB values with the ITU-R 601-2 luma
transform: L = R * 299/1000 + G * 587/1000 + B * 114/1000.
print(gray.getpixel((0, 0)), gray.getextrema())
The getpixel method returns the value of a pixel; for a
grayscale image, it is a single number. The getextrema method
returns the minimum and maximum values.
bw = gray.point(lambda v: 255 if v > 128 else 0, mode='1')
The point method maps each pixel value through a function. We
apply a threshold and create a black and white image.
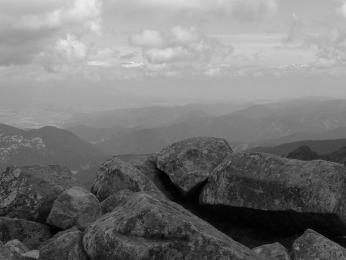
$ python grayscale.py
L ('L',)
195 (0, 235)
1
Cropping images
The crop method returns a rectangular region of an image. It
takes a 4-tuple defining the left, upper, right, and lower pixel
coordinates. The right and lower coordinates are exclusive.
from PIL import Image

with Image.open('mountains.jpg') as img:
    w, h = img.size
    box = (w // 4, h // 2, w * 3 // 4, h)
    cropped = img.crop(box)

print(box, cropped.size)
cropped.save('mountains_cropped.jpg')
We cut out the lower middle part of the image, which shows the rocks in the foreground. The coordinates are computed from the image size, so the program works with images of any size.
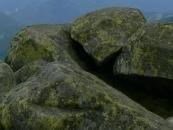
$ python crop.py
(86, 130, 259, 260) (173, 130)
Rotating and flipping images
The rotate method rotates an image by the given number of
degrees counterclockwise. The transpose method flips an image or
rotates it by a multiple of 90 degrees.
from PIL import Image

with Image.open('mountains.jpg') as img:
    r1 = img.rotate(30)
    r2 = img.rotate(30, expand=True, fillcolor='white')
    r3 = img.transpose(Image.Transpose.FLIP_LEFT_RIGHT)
    r4 = img.transpose(Image.Transpose.ROTATE_90)

for name, im in [('rotate', r1), ('rotate expand', r2),
                 ('flip', r3), ('rotate 90', r4)]:
    print(f'{name}: {im.size}')

r2.save('mountains_rotated.jpg')
The program rotates and flips the image.
r1 = img.rotate(30)
r2 = img.rotate(30, expand=True, fillcolor='white')
By default, the rotated image keeps the original size, so the corners are
cut off and the empty areas are black. With expand=True, the
image is enlarged to hold the whole rotated picture; the
fillcolor option sets the colour of the areas outside the
original image.
r3 = img.transpose(Image.Transpose.FLIP_LEFT_RIGHT)
r4 = img.transpose(Image.Transpose.ROTATE_90)
The transpose operations are lossless; they only move pixels.
Rotating by 90 degrees swaps the width and the height.
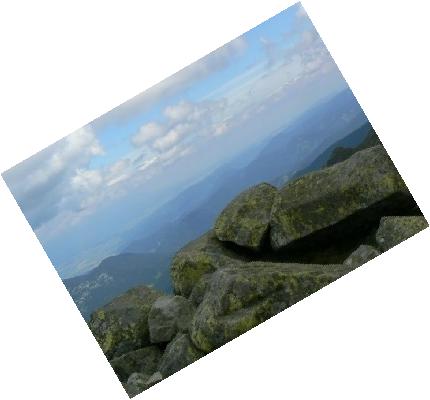
$ python rotate.py
rotate: (346, 260)
rotate expand: (430, 400)
flip: (346, 260)
rotate 90: (260, 346)
Filters
The ImageFilter module contains a set of predefined filters,
which are applied with the filter method. Some filters, such as
CONTOUR and EMBOSS, are constants; others, such as
GaussianBlur, are classes that take parameters.
from PIL import Image, ImageFilter

filters = [
    ImageFilter.GaussianBlur(radius=3),
    ImageFilter.CONTOUR,
    ImageFilter.EMBOSS,
    ImageFilter.UnsharpMask(radius=2, percent=200),
]

with Image.open('mountains.jpg') as img:
    w, h = img.size
    sheet = Image.new('RGB', (w * 2 + 10, h * 2 + 10), 'white')

    for i, f in enumerate(filters):
        result = img.filter(f)
        x, y = (i % 2) * (w + 10), (i // 2) * (h + 10)
        sheet.paste(result, (x, y))
        print(f'{f.name} pasted at {(x, y)}')

sheet.save('filters.jpg')
We apply four filters to the image and paste the results into one picture.
sheet = Image.new('RGB', (w * 2 + 10, h * 2 + 10), 'white')
The Image.new function creates a new image with the given
mode, size, and background colour. It is large enough for four images in two
rows with a 10-pixel gap.
result = img.filter(f)
x, y = (i % 2) * (w + 10), (i // 2) * (h + 10)
sheet.paste(result, (x, y))
Each filter returns a new image. We compute the position of the cell from the index and paste the image at that position.
The GaussianBlur filter blurs the image; a larger radius gives
a stronger blur. The CONTOUR filter finds edges and
EMBOSS makes the image look like a relief. The
UnsharpMask filter sharpens the image.
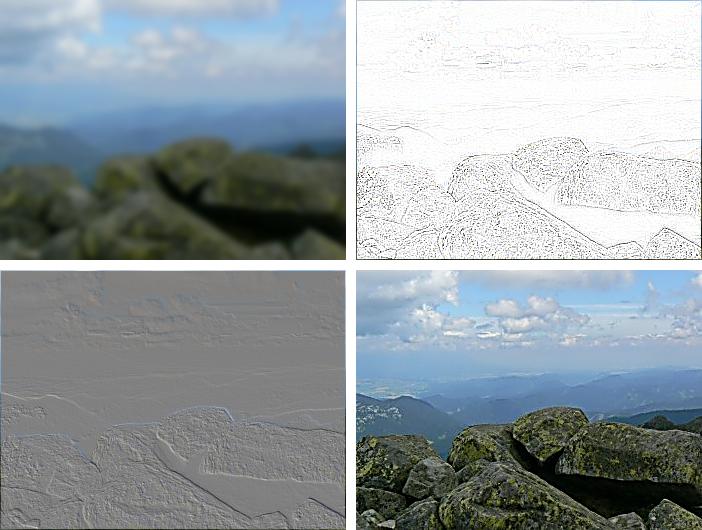
$ python filters.py
GaussianBlur pasted at (0, 0)
Contour pasted at (356, 0)
Emboss pasted at (0, 270)
UnsharpMask pasted at (356, 270)
Enhancing images
The ImageEnhance module adjusts the brightness, contrast,
colour saturation, and sharpness of an image. The enhance
method takes a factor: 1.0 gives the original image, lower values decrease
and higher values increase the property. The ImageOps module
provides ready-made operations, such as autocontrast.
from PIL import Image, ImageEnhance, ImageOps, ImageStat

with Image.open('mountains.jpg') as img:
    brighter = ImageEnhance.Brightness(img).enhance(1.4)
    vivid = ImageEnhance.Color(img).enhance(1.8)
    contrast = ImageOps.autocontrast(img, cutoff=2)

for name, im in [('original', img), ('brighter', brighter),
                 ('vivid', vivid), ('autocontrast', contrast)]:
    mean = [round(v) for v in ImageStat.Stat(im).mean]
    print(f'{name:<13} mean RGB: {mean}')

vivid.save('mountains_vivid.jpg')
We create three adjusted versions of the photo and compare the mean values
of their colour channels, computed with the ImageStat module.
The brightness enhancer raises all channels; the colour enhancer increases
the differences between them, so the blue channel gets higher and the red
channel lower. The autocontrast function stretches the range of
values; the cutoff option ignores the darkest and lightest 2% of
pixels.
$ python enhance.py
original      mean RGB: [106, 125, 134]
brighter      mean RGB: [147, 170, 170]
vivid         mean RGB: [94, 128, 144]
autocontrast  mean RGB: [134, 148, 146]
Drawing on images
The ImageDraw module provides simple 2D graphics for
Image objects. We can create new images, annotate existing
images, or generate graphics on the fly, for instance for a web
application.
from PIL import Image, ImageDraw

img = Image.new('RGB', (320, 220), 'white')
draw = ImageDraw.Draw(img)

draw.rectangle((20, 20, 120, 100), fill='steelblue', outline='navy', width=3)
draw.ellipse((150, 20, 300, 100), fill='gold', outline='darkorange', width=3)
draw.line((20, 130, 300, 130), fill='gray', width=2)
draw.polygon([(60, 150), (110, 200), (10, 200)], fill='seagreen')
draw.rounded_rectangle((150, 150, 300, 200), radius=15, fill='indianred')
draw.text((170, 165), 'Pillow', fill='white', font_size=20)

img.save('shapes.png')
print(img.getpixel((70, 60)), img.getpixel((225, 60)))
The example draws several shapes and a text on a new image.
draw = ImageDraw.Draw(img)
The Draw object draws directly on the image.
draw.rectangle((20, 20, 120, 100), fill='steelblue', outline='navy', width=3)
Shapes are defined by their bounding box or by a list of points. Colours can
be given by names, as RGB tuples, or as hexadecimal strings such as
'#4682b4'.
draw.text((170, 165), 'Pillow', fill='white', font_size=20)
Without a font, Pillow uses its built-in default font. Since Pillow 10.1,
the font_size parameter scales it.
print(img.getpixel((70, 60)), img.getpixel((225, 60)))
We check the colours of pixels inside the rectangle and the ellipse; for an
RGB image, getpixel returns a tuple.
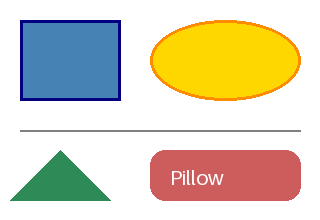
$ python draw_shapes.py
(70, 130, 180) (255, 215, 0)
Creating a watermark
A watermark is a text or logo placed over an image. To make it semi-transparent, we draw it on a transparent layer and composite the layer with the image.
from PIL import Image, ImageDraw, ImageFont

FONT = '/usr/share/fonts/truetype/dejavu/DejaVuSans-Bold.ttf'

with Image.open('mountains.jpg') as img:
    base = img.convert('RGBA')

overlay = Image.new('RGBA', base.size, (0, 0, 0, 0))
draw = ImageDraw.Draw(overlay)

font = ImageFont.truetype(FONT, size=22)
text = 'zetcode.com'

left, top, right, bottom = draw.textbbox((0, 0), text, font=font, anchor='lt')
tw, th = right - left, bottom - top
x, y = base.width - tw - 12, base.height - th - 14

draw.rounded_rectangle((x - 8, y - 6, x + tw + 8, y + th + 10), radius=6,
                       fill=(0, 0, 0, 110))
draw.text((x, y), text, font=font, fill=(255, 255, 255, 220), anchor='lt')

result = Image.alpha_composite(base, overlay).convert('RGB')
result.save('mountains_watermarked.jpg')

print(f'text size: {tw}x{th}, position: {(x, y)}')
The program writes a semi-transparent text on a dark box into the lower right corner of the photo.
base = img.convert('RGBA')
overlay = Image.new('RGBA', base.size, (0, 0, 0, 0))
The image is converted to RGBA, and we create a fully transparent layer of the same size. The fourth value of a colour is its opacity.
font = ImageFont.truetype(FONT, size=22)
We load the DejaVu Sans Bold TrueType font, which is installed on most Linux
systems. On Windows, we can use a font such as
'arial.ttf'; Pillow looks in the system font directory for file
names without a path.
left, top, right, bottom = draw.textbbox((0, 0), text, font=font, anchor='lt')
The textbbox method returns the bounding box of the text, so we
can compute its size and place it in the corner. The lt anchor
means that the given point is the left top corner of the text.
result = Image.alpha_composite(base, overlay).convert('RGB')
The alpha_composite function blends the layer with the image.
JPEG does not support transparency, so we convert the result back to
RGB before saving.
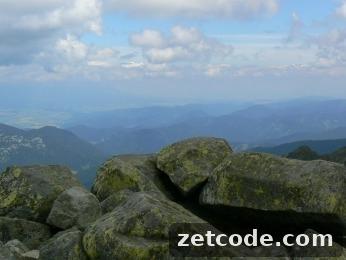
$ python watermark.py
text size: 157x17, position: (177, 229)
Reading an image from a URL
The Image.open function accepts a file object instead of a
file name. We can download an image and open it from memory with
io.BytesIO. In the example, we use the requests
library.
from io import BytesIO

import requests
from PIL import Image

url = 'https://www.python.org/static/img/python-logo.png'

resp = requests.get(url, timeout=10)
resp.raise_for_status()

with Image.open(BytesIO(resp.content)) as img:
    print(img.format, img.size, img.mode)

    bg = Image.new('RGBA', img.size, 'white')
    flat = Image.alpha_composite(bg, img.convert('RGBA')).convert('RGB')
    flat.save('python-logo.jpg')
The example downloads the Python logo, a PNG image with transparency, and saves it as a JPEG file.
resp = requests.get(url, timeout=10)
resp.raise_for_status()
We download the image and raise an exception for an error status code; otherwise we would try to open an HTML error page as an image.
with Image.open(BytesIO(resp.content)) as img:
The BytesIO object wraps the downloaded bytes in a file-like
object.
bg = Image.new('RGBA', img.size, 'white')
flat = Image.alpha_composite(bg, img.convert('RGBA')).convert('RGB')
JPEG has no alpha channel. Converting an RGBA image directly to RGB would drop the alpha values, and the transparent pixels would get the colours stored in them, often black. We put the logo on a white background first.
$ python from_url.py
PNG (580, 164) RGBA
Creating an animated GIF
The GIF format can store multiple frames. When saving, the
save_all option writes all frames given in
append_images.
from PIL import Image, ImageDraw

frames = []

for i in range(12):
    frame = Image.new('RGB', (120, 120), 'white')
    draw = ImageDraw.Draw(frame)
    start = i * 30
    draw.pieslice((10, 10, 110, 110), start, start + 270, fill='steelblue')
    frames.append(frame)

frames[0].save('spinner.gif', save_all=True, append_images=frames[1:],
               duration=80, loop=0)

with Image.open('spinner.gif') as gif:
    print(gif.format, gif.n_frames, gif.info['duration'], gif.info['loop'])
We draw twelve frames of a spinning pie slice and save them as an animated GIF.
frames[0].save('spinner.gif', save_all=True, append_images=frames[1:],
               duration=80, loop=0)
The first frame saves the others. The duration option sets the
display time of each frame in milliseconds, and loop=0 repeats
the animation forever.
print(gif.format, gif.n_frames, gif.info['duration'], gif.info['loop'])
When we open the file again, the n_frames attribute tells the
number of frames; we can move between them with the seek
method.

$ python animation.py
GIF 12 80 0
Displaying an image in Tkinter
The ImageTk module creates Tkinter-compatible images from
Pillow images. Tkinter itself supports only a few formats, such as PNG and
GIF; with Pillow, we can show any image Pillow can read.
import tkinter as tk

from PIL import Image, ImageTk

root = tk.Tk()
root.title('Mountains')

with Image.open('mountains.jpg') as img:
    photo = ImageTk.PhotoImage(img)

label = tk.Label(root, image=photo)
label.pack()

root.mainloop()
The program displays the photo in a Label widget. The
PhotoImage object must stay referenced as long as the image is
displayed; if it is garbage collected, the label becomes empty. Here the
photo variable keeps it alive; when we create images inside a
function or method, we store them in an attribute, for instance
label.image = photo.
Source
In this article we have processed images in Python with the Pillow library. See also Python Requests and Python Matplotlib.
Author
List all Python tutorials.