Python Gtk
last modified January 29, 2024
Python Gtk tutorial shows how to create GUI applications in Python using the Gtk module. This tutorial covers GTK 4.
GTK
GTK is a multi-platform toolkit for creating graphical user interfaces. It is created in C language. GTK has been designed from the ground up to support a range of languages, including Python, Ruby, and Perl.
The GTK library is also called the GIMP Toolkit. Originally, the library was created while developing the GIMP image manipulation program. Since then, GTK became one of the most popular toolkits under Linux and BSD Unix.
#!/usr/bin/python

import gi
gi.require_version('Gtk', '4.0')
from gi.repository import Gtk

print(f'{Gtk.MAJOR_VERSION}.{Gtk.MINOR_VERSION}.{Gtk.MICRO_VERSION}')
We access the GTK library via language introspection. PyGObject is
a language interface to the C library.
import gi
gi.require_version('Gtk', '4.0')
from gi.repository import Gtk
We import the Gtk module. The require_version method ensures the
namespace gets loaded with the given version. The gi.repository is
the Python module for PyGObject. PyGObject (Python
GObject introspection) contains Python bindings and support for GObject, GLib,
GTK and other libraries.
$ ./version.py
4.6.5
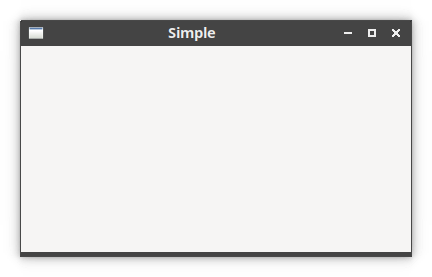
Python Gtk simple example
In the first application, we display a window on the screen.
Gtk.Window is a toplevel window which can contain other widgets. In
other words, it is a container. Windows normally have decorations that are under
the control of the windowing system and allow the user to manipulate the window.
#!/usr/bin/python

import gi
gi.require_version('Gtk', '4.0')
from gi.repository import Gtk


def on_activate(app):

    win = Gtk.ApplicationWindow(application=app)
    win.set_title('Simple')
    win.present()


app = Gtk.Application(application_id='com.zetcode.Simple')
app.connect('activate', on_activate)
app.run(None)
The example shows a small window on the screen.
def on_activate(app):

    win = Gtk.ApplicationWindow(application=app)
    win.set_title('Simple')
    win.present()
We create the main application window inside the on_activate
function. We set the application's title with set_title and present
it to the user with present.
app = Gtk.Application(application_id='com.zetcode.Simple')
app.connect('activate', on_activate)
app.run(None)
We create a new Gtk.Application. To set up the application, we
connect to the activate signal, which is emitted when the
application activation occurs. The run function runs the
application.
In the next example, we rewrite the example in OOP style.
#!/usr/bin/python

import gi
gi.require_version('Gtk', '4.0')
from gi.repository import Gtk

class AppWindow(Gtk.ApplicationWindow):

    def __init__(self, app):

        super(AppWindow, self).__init__(application=app)

        self.init_ui()

    def init_ui(self):

        self.set_title('Simple')
        self.set_default_size(350, 250)


def on_activate(app):

    win = AppWindow(app)
    win.present()


app = Gtk.Application(application_id='com.zetcode.Simple')
app.connect('activate', on_activate)
app.run(None)
We create a class that inherits from Gtk.ApplicationWindow. We
build the UI in the init_ui library.
self.set_default_size(350, 250)
With set_default_size function, we set the default size of the
application window.
Python Gtk.Image
Gtk.Image dispalys an image. If the file is not loaded
successfully, the image will contain a "broken image" icon.
#!/usr/bin/python

import gi
gi.require_version('Gtk', '4.0')
from gi.repository import Gtk

class AppWindow(Gtk.ApplicationWindow):

    def __init__(self, app):

        super(AppWindow, self).__init__(application=app)

        self.init_ui()

    def init_ui(self):

        self.set_title('Image')

        image = Gtk.Image.new_from_file('sid.png')

        self.set_child(image)
        self.set_default_size(450, 350)


def on_activate(app):

    win = AppWindow(app)
    win.present()


app = Gtk.Application(application_id='com.zetcode.Image')
app.connect('activate', on_activate)
app.run(None)
The example displays a PNG image on the window.
image = Gtk.Image.new_from_file('sid.png')
Gtk.Image is created from a file.
self.set_child(image)
We set the image to the main container of the application window.
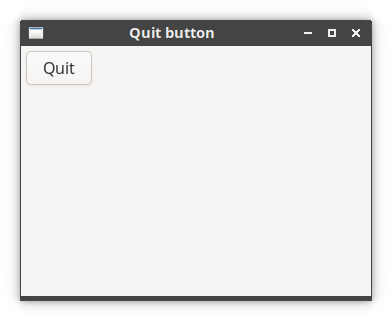
Python Gtk.Button
The Gtk.Button is used to trigger a callback function that
is called when the button is pressed.
#!/usr/bin/python

import gi
gi.require_version('Gtk', '4.0')
from gi.repository import Gtk


class AppWindow(Gtk.ApplicationWindow):

    def __init__(self, app):

        super(AppWindow, self).__init__(application=app)

        self.init_ui()

    def init_ui(self):

        self.set_title('Quit button')

        box = Gtk.Box.new(Gtk.Orientation.VERTICAL, 0)
        box.set_margin_start(5)
        box.set_margin_top(5)

        btn = Gtk.Button(label="Quit")
        btn.connect('clicked', lambda _: self.close())

        btn.set_halign(Gtk.Align.START)
        box.append(btn)

        self.set_default_size(350, 250)
        self.set_child(box)


def on_activate(app):

    win = AppWindow(app)
    win.present()


app = Gtk.Application(application_id='com.zetcode.QuitButton')
app.connect('activate', on_activate)
app.run(None)
In the example, we have a button. When we press the button, the application terminates.
box = Gtk.Box.new(Gtk.Orientation.VERTICAL, 0)
box.set_margin_start(5)
box.set_margin_top(5)
We create a vertical box. We put some margin to the left and top of the box.
Gtk.Box is a simple layout widget that arranges widgets in a row
or a column.
btn = Gtk.Button(label="Quit")
A Gtk.Button is created.
btn.connect('clicked', lambda _: self.close())
When the button is clicked, it emits a clicked signal.
With the connect method we bind the signal to the
self.close method.
btn.set_halign(Gtk.Align.START)
box.append(btn)
We align the button to the left of the box and add it to the vertical box.
self.set_default_size(350, 250)
self.set_child(box)
Finally, we set the default size of the application window and add the vertical box to the window container.
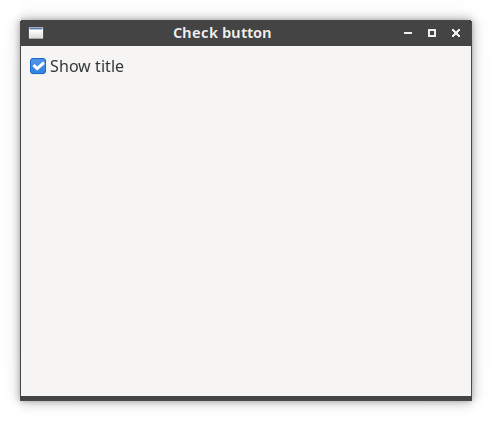
Python Gtk.CheckButton
Gtk.CheckButton a widget that has two states: on and off. The on
state is visualised by a check mark.
#!/usr/bin/python

import gi
gi.require_version('Gtk', '4.0')
from gi.repository import Gtk


class AppWindow(Gtk.ApplicationWindow):

    def __init__(self, app):

        super(AppWindow, self).__init__(application=app)

        self.init_ui()

    def init_ui(self):

        self.set_title('Check button')

        box = Gtk.Box.new(Gtk.Orientation.VERTICAL, 0)
        box.set_margin_start(5)
        box.set_margin_top(5)

        cbtn = Gtk.CheckButton.new_with_label('Show title')
        cbtn.set_active(True)
        cbtn.connect('toggled', self.on_toggle)

        box.append(cbtn)

        self.set_child(box)
        self.set_default_size(450, 350)

    def on_toggle(self, wid):

        if wid.get_active():
            self.set_title('CheckButton')
        else:
            self.set_title('')


def on_activate(app):

    win = AppWindow(app)
    win.present()


app = Gtk.Application(application_id='com.zetcode.CheckButton')
app.connect('activate', on_activate)
app.run(None)
The example displays a title in the titlebar of the window depending on the
state of the Gtk.CheckButton.
cbtn = Gtk.CheckButton.new_with_label('Show title')
cbtn.set_active(True)
The Gtk.CheckButton is created. Since by default the title
of the window is visible, we activate the button with set_active.
cbtn.connect('toggled', self.on_toggle)
When we check or uncheck the Gtk.CheckButton, the
toggled signal is emitted. We plug the on_toggle
handler to the signal.
def on_toggle(self, wid):

    if wid.get_active():
        self.set_title('CheckButton')
    else:
        self.set_title('')
We determine the state of the Gtk.CheckButton with
get_active and set the title accordingly.
Key pressed event
The next example reacts to a key-pressed event.
#!/usr/bin/python

import gi
from gi.repository import Gtk
gi.require_version("Gtk", "4.0")

class AppWindow(Gtk.ApplicationWindow):

    def __init__(self, app):

        super(AppWindow, self).__init__(application=app)

        self.init_ui()

    def init_ui(self):

        self.set_title('Key press')

        keycont = Gtk.EventControllerKey()
        keycont.connect('key-pressed', self.on_key_pressed)
        self.add_controller(keycont)

        self.set_default_size(350, 250)

    # keyval, keycode, state, user_data
    def on_key_pressed(self, keyval, keycode, *_):

        if keycode == ord('q'):
            self.close()


def on_activate(app):

    win = AppWindow(app)
    win.present()


app = Gtk.Application(application_id='com.zetcode.KeyPress')
app.connect('activate', on_activate)
app.run(None)
The application listens to key-pressed events. If the user enters the q key, the application terminates.
keycont = Gtk.EventControllerKey()
keycont.connect('key-pressed', self.on_key_pressed)
self.add_controller(keycont)
We create and register the Gtk.EventControllerKey. We connect
to the key-pressed signal.
# keyval, keycode, state, user_data
def on_key_pressed(self, keyval, keycode, *_):

    if keycode == ord('q'):
        self.close()
We check the keycode. If it is q, we close the application.
Python Gtk.Entry
Gtk.Entry widget is a single line text entry widget. Many key
bindings are supported by default. If the entered text is longer than the
allocation of the widget, the widget will scroll so that the cursor position is
visible.
#!/usr/bin/python

import gi
gi.require_version('Gtk', '4.0')
from gi.repository import Gtk


class AppWindow(Gtk.ApplicationWindow):

    def __init__(self, app):

        super(AppWindow, self).__init__(application=app)

        self.init_ui()

    def init_ui(self):

        self.set_title('Quit button')

        vbox = Gtk.Box.new(Gtk.Orientation.VERTICAL, 8)
        hbox = Gtk.Box.new(Gtk.Orientation.HORIZONTAL, 8)

        vbox.set_margin_start(5)
        vbox.set_margin_top(5)

        self.entry = Gtk.Entry()
        hbox.append(self.entry)

        keycont = Gtk.EventControllerKey()
        keycont.connect('key-released', self.on_key_released)
        self.add_controller(keycont)

        self.label = Gtk.Label.new('...')
        hbox.append(self.label)

        self.set_title('Entry')
        self.set_default_size(450, 350)

        vbox.append(hbox)
        self.set_child(vbox)


    def on_key_released(self, *_):
        self.label.set_text(self.entry.get_text())


def on_activate(app):

    win = AppWindow(app)
    win.present()


app = Gtk.Application(application_id='com.zetcode.QuitButton')
app.connect('activate', on_activate)
app.run(None)
In the example, we have an entry widget and a label. The text entered into the entry is displayed in the label.
vbox = Gtk.Box.new(Gtk.Orientation.VERTICAL, 8)
hbox = Gtk.Box.new(Gtk.Orientation.HORIZONTAL, 8)
The layout is created with the combination of a vertical and a horizontal box.
self.entry = Gtk.Entry()
We create the Gtk.Entry widget.
keycont = Gtk.EventControllerKey()
keycont.connect('key-released', self.on_key_released)
self.add_controller(keycont)
To be able to process key events, we create a
Gtk.EventControllerKey. We react to the on_key_released
events.
def on_key_released(self, *_):
    self.label.set_text(self.entry.get_text())
In the on_key_released event handler, we get the text from the
entry with get_text and set it to the label with
set_text.
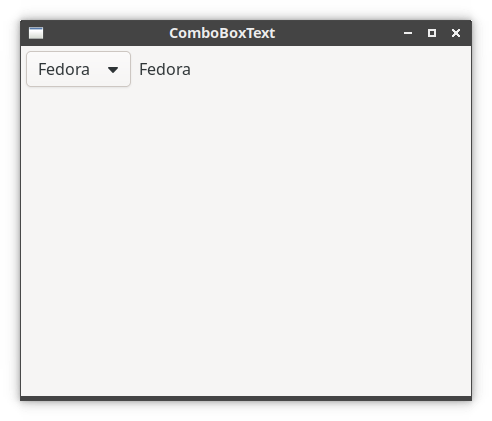
Python Gtk.ComboBoxText
Gtk.ComboBoxText is a simple variant of Gtk.ComboBox
that hides the model-view complexity for simple text-only use cases.
#!/usr/bin/python

import gi
gi.require_version('Gtk', '4.0')
from gi.repository import Gtk


class AppWindow(Gtk.ApplicationWindow):

    def __init__(self, app):

        super(AppWindow, self).__init__(application=app)

        self.init_ui()

    def init_ui(self):

        self.set_title('Quit button')

        vbox = Gtk.Box.new(Gtk.Orientation.VERTICAL, 8)
        hbox = Gtk.Box.new(Gtk.Orientation.HORIZONTAL, 8)

        combo = Gtk.ComboBoxText()

        vbox.set_margin_start(5)
        vbox.set_margin_top(5)
        hbox.append(combo)

        combo.connect('changed', self.on_changed)

        combo.append_text('Arch')
        combo.append_text('Fedora')
        combo.append_text('Redhat')
        combo.append_text('Gentoo')
        combo.append_text('Xubuntu')

        self.label = Gtk.Label.new('')
        hbox.append(self.label)

        self.set_title('ComboBoxText')
        self.set_default_size(450, 350)

        vbox.append(hbox)
        self.set_child(vbox)

    def on_changed(self, wid):

        self.label.set_label(wid.get_active_text())


def on_activate(app):

    win = AppWindow(app)
    win.present()


app = Gtk.Application(application_id='com.zetcode.ComboBoxText')
app.connect('activate', on_activate)
app.run(None)
In the example, we have a Gtk.ComboBoxText and a label.
The selected item from the combo box is displayed in the label widget.
combo = Gtk.ComboBoxText()
Gtk.ComboBoxText is created.
combo.connect('changed', self.on_changed)
When the active item is changed, the changed signal is emitted.
combo.append_text('Arch')
combo.append_text('Fedora')
combo.append_text('Redhat')
combo.append_text('Gentoo')
combo.append_text('Xubuntu')
We add five text items to the combo box.
def on_changed(self, wid):

    self.label.set_label(wid.get_active_text())
In the on_changed event handler, we get the active text with
get_active_text and set it to the label with
set_label.
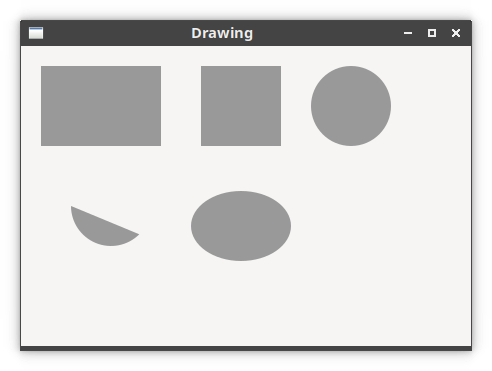
Drawing
Drawing is done on a Gtk.DrawingArea widget.
#!/usr/bin/python

import gi
gi.require_version('Gtk', '4.0')
import math
from gi.repository import Gtk


class AppWindow(Gtk.ApplicationWindow):

    def __init__(self, app):

        super(AppWindow, self).__init__(application=app)

        self.init_ui()

    def init_ui(self):

        self.set_title('Drawing')

        area = Gtk.DrawingArea.new()
        area.set_draw_func(self.on_draw)

        self.set_default_size(450, 300)
        self.set_child(area)


    def on_draw(self, da, ctx, w, h):

        ctx.set_source_rgb(0.6, 0.6, 0.6)

        ctx.rectangle(20, 20, 120, 80)
        ctx.rectangle(180, 20, 80, 80)
        ctx.fill()

        ctx.arc(330, 60, 40, 0, 2*math.pi)
        ctx.fill()

        ctx.arc(90, 160, 40, math.pi/4, math.pi)
        ctx.fill()

        ctx.translate(220, 180)

        ctx.scale(1, 0.7)
        ctx.arc(0, 0, 50, 0, 2*math.pi)
        ctx.fill()


def on_activate(app):

    win = AppWindow(app)
    win.present()


app = Gtk.Application(application_id='com.zetcode.Drawing')
app.connect('activate', on_activate)
app.run(None)
The example draws a few basic shapes.
area = Gtk.DrawingArea.new()
area.set_draw_func(self.on_draw)
We create the Gtk.DrawingArea and set the drawing function with
set_draw_func.
def on_draw(self, da, ctx, w, h):
    ...
The second parameter of on_draw is the drawing area, the third is
the drawing context. The context is an object that is used to draw on all
drawable objects. The last two parameters are the width and height of the area.
ctx.set_source_rgb(0.6, 0.6, 0.6)
The set_source_rgb method sets a colour for the drawing context.
The three parameters of the method are the colour intensity values. The values
are from 0 to 1.
ctx.rectangle(20, 20, 120, 80)
ctx.rectangle(180, 20, 80, 80)
ctx.fill()
We paint two rectangles. The fill method paints the interior of the
rectangles in the previously set colour.
ctx.arc(330, 60, 40, 0, 2*math.pi)
ctx.fill()
With the arc method, we paint a full circle.
ctx.translate(220, 180)
The translate method moves the user-space origin by
delta x and delta y.
ctx.scale(1, 0.7)
ctx.arc(0, 0, 50, 0, 2*math.pi)
ctx.fill()
If we want to draw an oval, we do some scaling first. Here the
scale method shrinks the y axis.
Python Gtk.Menu
In the next example, we create an application with a menubar.
#!/usr/bin/python

import gi
gi.require_version('Gtk', '4.0')
from gi.repository import Gtk, Gio


class AppWindow(Gtk.ApplicationWindow):

    def __init__(self, app):

        super(AppWindow, self).__init__(application=app)

        self.init_ui(app)

    def init_ui(self, app):

        self.set_title('Simple menu')

        main = Gio.Menu.new()
        fmi = Gio.MenuItem.new('File')

        menu = Gio.Menu.new()
        emi = Gio.MenuItem.new('Exit', 'app.quit')
        menu.append_item(emi)

        fmi.set_submenu(menu)
        main.append_item(fmi)

        app.set_menubar(main)

        act_quit = Gio.SimpleAction.new('quit', None)
        Gio.ActionMap.add_action(app, act_quit)
        act_quit.connect('activate', self.on_close, app)

        self.set_show_menubar(True)
        self.set_default_size(350, 250)

    def on_close(self, *_):
        self.close()


def on_activate(app):

    win = AppWindow(app)
    win.present()


app = Gtk.Application(application_id='com.zetcode.SimpleMenu')
app.connect('activate', on_activate)
app.run(None)
The menubar has a one menu item, which terminates the application.
main = Gio.Menu.new()
fmi = Gio.MenuItem.new('File')

menu = Gio.Menu.new()
emi = Gio.MenuItem.new('Exit', 'app.quit')
menu.append_item(emi)

fmi.set_submenu(menu)
main.append_item(fmi)
We set up the menus and menu items. The app.quit string refers to
an action registered with the application object.
app.set_menubar(main)
We set the menubar with set_menubar.
act_quit = Gio.SimpleAction.new('quit', None)
Gio.ActionMap.add_action(app, act_quit)
act_quit.connect('activate', self.on_close, app)
A simple action is created; the action calls on_close, which
terminates the application.
self.set_show_menubar(True)
We show the menubar with set_show_menubar.
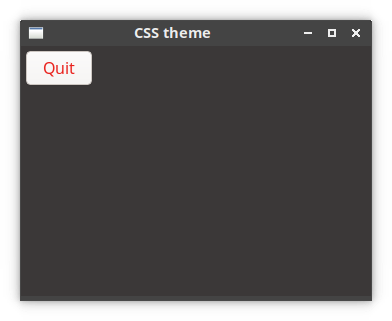
CSS theme
We can theme our applications with CSS.
window {
    background-color: rgb(59, 56, 56);
}

button {
    color: rgb(233, 32, 27);
}
In the CSS, we set a custom background colour for the window and a custom foreground colour for the button.
#!/usr/bin/python

import gi
gi.require_version('Gtk', '4.0')
from gi.repository import Gtk, Gio


class AppWindow(Gtk.ApplicationWindow):

    def __init__(self, app):

        super(AppWindow, self).__init__(application=app)

        self.init_ui()

    def init_ui(self):

        self.set_title('CSS theme')

        box = Gtk.Box.new(Gtk.Orientation.VERTICAL, 0)

        btn = Gtk.Button(label="Quit")
        btn.connect('clicked', lambda _: self.close())

        btn.set_margin_start(5)
        btn.set_margin_top(5)
        btn.set_halign(Gtk.Align.START)

        box.append(btn)

        self.set_child(box)
        self.set_default_size(350, 250)


def on_activate(app):

    win = AppWindow(app)

    display = Gtk.Widget.get_display(win)
    provider = Gtk.CssProvider.new()
    fname = Gio.file_new_for_path('theme.css')
    provider.load_from_file(fname)
    Gtk.StyleContext.add_provider_for_display(display, provider,
        Gtk.STYLE_PROVIDER_PRIORITY_APPLICATION)

    win.present()


app = Gtk.Application(application_id='com.zetcode.CheckButton')
app.connect('activate', on_activate)
app.run(None)
Themes are created with Gtk.CssProvider. In this example, we load
the CSS from a file.
display = Gtk.Widget.get_display(win)
provider = Gtk.CssProvider.new()
fname = Gio.file_new_for_path('theme.css')
provider.load_from_file(fname)
Gtk.StyleContext.add_provider_for_display(display, provider,
    Gtk.STYLE_PROVIDER_PRIORITY_APPLICATION)
We create a CSS provider, load the theme, and apply the provider to the display.
Source
In this article we have created basic GUI applications with Python Gtk.
Author
List all Python tutorials.