Painting in PyQt6
last modified January 10, 2023
PyQt6 painting system is able to render vector graphics, images, and outline font-based text. Painting is needed in applications when we want to change or enhance an existing widget, or if we are creating a custom widget from scratch. To do the drawing, we use the painting API provided by the PyQt6 toolkit.
QPainter
QPainter performs low-level painting on widgets and other paint
devices. It can draw everything from simple lines to complex shapes.
The paintEvent method
The painting is done within the paintEvent method. The painting
code is placed between the begin and
end methods of the QPainter object.
It performs low-level painting on widgets and other paint devices.
PyQt6 draw text
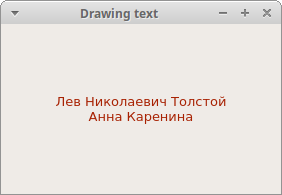
We begin with drawing some Unicode text on the client area of a window.
#!/usr/bin/python

"""
ZetCode PyQt6 tutorial

In this example, we draw text in Russian Cylliric.

Author: Jan Bodnar
Website: zetcode.com
"""

import sys
from PyQt6.QtWidgets import QWidget, QApplication
from PyQt6.QtGui import QPainter, QColor, QFont
from PyQt6.QtCore import Qt


class Example(QWidget):

    def __init__(self):
        super().__init__()

        self.initUI()


    def initUI(self):

        self.text = "Лев Николаевич Толстой\nАнна Каренина"

        self.setGeometry(300, 300, 350, 300)
        self.setWindowTitle('Drawing text')
        self.show()


    def paintEvent(self, event):

        qp = QPainter()
        qp.begin(self)
        self.drawText(event, qp)
        qp.end()


    def drawText(self, event, qp):

        qp.setPen(QColor(168, 34, 3))
        qp.setFont(QFont('Decorative', 10))
        qp.drawText(event.rect(), Qt.Alignment.AlignCenter, self.text)


def main():

    app = QApplication(sys.argv)
    ex = Example()
    sys.exit(app.exec())


if __name__ == '__main__':
    main()
In our example, we draw some text in Cylliric. The text is vertically and horizontally aligned.
def paintEvent(self, event):
...
Drawing is done within the paint event.
qp = QPainter()
qp.begin(self)
self.drawText(event, qp)
qp.end()
The QPainter class is responsible for all the low-level painting.
All the painting methods go between begin and end methods.
The actual painting is delegated to the drawText method.
qp.setPen(QColor(168, 34, 3))
qp.setFont(QFont('Decorative', 10))
Here we define a pen and a font which are used to draw the text.
qp.drawText(event.rect(), Qt.Alignment.AlignCenter, self.text)
The drawText method draws text on the window. The rect
method of the paint event returns the rectangle that needs to be updated. With
the Qt.Alignment.AlignCenter we align the text in both dimensions.
PyQt6 draw points
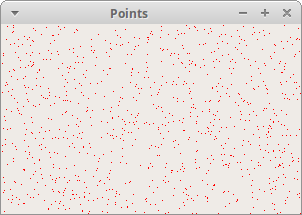
A point is the most simple graphics object that can be drawn. It is a small spot on the window.
#!/usr/bin/python

"""
ZetCode PyQt6 tutorial

In the example, we draw randomly 1000 red points
on the window.

Author: Jan Bodnar
Website: zetcode.com
"""

from PyQt6.QtWidgets import QWidget, QApplication
from PyQt6.QtGui import QPainter
from PyQt6.QtCore import Qt
import sys, random


class Example(QWidget):

    def __init__(self):
        super().__init__()

        self.initUI()


    def initUI(self):

        self.setMinimumSize(50, 50)
        self.setGeometry(300, 300, 350, 300)
        self.setWindowTitle('Points')
        self.show()


    def paintEvent(self, e):

        qp = QPainter()
        qp.begin(self)
        self.drawPoints(qp)
        qp.end()


    def drawPoints(self, qp):

        qp.setPen(Qt.GlobalColor.red)
        size = self.size()

        for i in range(1000):

            x = random.randint(1, size.width() - 1)
            y = random.randint(1, size.height() - 1)
            qp.drawPoint(x, y)


def main():

    app = QApplication(sys.argv)
    ex = Example()
    sys.exit(app.exec())


if __name__ == '__main__':
    main()
In our example, we draw randomly 1000 red points on the client area of the window.
qp.setPen(Qt.GlobalColor.red)
We set the pen to red colour. We use a predefined
Qt.GlobalColor.red colour constant.
size = self.size()
Each time we resize the window, a paint event is generated. We get the current
size of the window with the size method. We use the size of the
window to distribute the points all over the client area of the window.
qp.drawPoint(x, y)
We draw the point with the drawPoint method.
PyQt6 colours
A colour is an object representing a combination of Red, Green, and Blue (RGB) intensity values. Valid RGB values are in the range from 0 to 255. We can define a colour in various ways. The most common are RGB decimal values or hexadecimal values. We can also use an RGBA value which stands for Red, Green, Blue, and Alpha. Here we add some extra information regarding transparency. Alpha value of 255 defines full opacity, 0 is for full transparency, e.g. the colour is invisible.
#!/usr/bin/python

"""
ZetCode PyQt6 tutorial

This example draws three rectangles in three
different colours.

Author: Jan Bodnar
Website: zetcode.com
"""

from PyQt6.QtWidgets import QWidget, QApplication
from PyQt6.QtGui import QPainter, QColor
import sys


class Example(QWidget):

    def __init__(self):
        super().__init__()

        self.initUI()


    def initUI(self):

        self.setGeometry(300, 300, 350, 100)
        self.setWindowTitle('Colours')
        self.show()


    def paintEvent(self, e):

        qp = QPainter()
        qp.begin(self)
        self.drawRectangles(qp)
        qp.end()


    def drawRectangles(self, qp):

        col = QColor(0, 0, 0)
        col.setNamedColor('#d4d4d4')
        qp.setPen(col)

        qp.setBrush(QColor(200, 0, 0))
        qp.drawRect(10, 15, 90, 60)

        qp.setBrush(QColor(255, 80, 0, 160))
        qp.drawRect(130, 15, 90, 60)

        qp.setBrush(QColor(25, 0, 90, 200))
        qp.drawRect(250, 15, 90, 60)


def main():

    app = QApplication(sys.argv)
    ex = Example()
    sys.exit(app.exec())


if __name__ == '__main__':
    main()
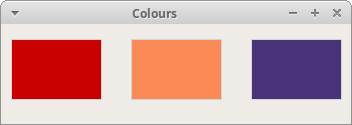
In our example, we draw three coloured rectangles.
color = QColor(0, 0, 0)
color.setNamedColor('#d4d4d4')
Here we define a colour using a hexadecimal notation.
qp.setBrush(QColor(200, 0, 0))
qp.drawRect(10, 15, 90, 60)
Here we define a brush and draw a rectangle. A brush is an elementary
graphics object which is used to draw the background of a shape. The
drawRect method accepts four parameters. The first two are x and y
values on the axis. The third and fourth parameters are the width and height of
the rectangle. The method draws the rectangle using the current pen and brush.
PyQt6 QPen
The QPen is an elementary graphics object. It is used to draw
lines, curves and outlines of rectangles, ellipses, polygons, or other shapes.
#!/usr/bin/python

"""
ZetCode PyQt6 tutorial

In this example we draw 6 lines using
different pen styles.

Author: Jan Bodnar
Website: zetcode.com
"""

from PyQt6.QtWidgets import QWidget, QApplication
from PyQt6.QtGui import QPainter, QPen
from PyQt6.QtCore import Qt
import sys


class Example(QWidget):

    def __init__(self):
        super().__init__()

        self.initUI()


    def initUI(self):

        self.setGeometry(300, 300, 280, 270)
        self.setWindowTitle('Pen styles')
        self.show()


    def paintEvent(self, e):

        qp = QPainter()
        qp.begin(self)
        self.drawLines(qp)
        qp.end()


    def drawLines(self, qp):

        pen = QPen(Qt.GlobalColor.black, 2, Qt.PenStyle.SolidLine)

        qp.setPen(pen)
        qp.drawLine(20, 40, 250, 40)

        pen.setStyle(Qt.PenStyle.DashLine)
        qp.setPen(pen)
        qp.drawLine(20, 80, 250, 80)

        pen.setStyle(Qt.PenStyle.DashDotLine)
        qp.setPen(pen)
        qp.drawLine(20, 120, 250, 120)

        pen.setStyle(Qt.PenStyle.DotLine)
        qp.setPen(pen)
        qp.drawLine(20, 160, 250, 160)

        pen.setStyle(Qt.PenStyle.DashDotDotLine)
        qp.setPen(pen)
        qp.drawLine(20, 200, 250, 200)

        pen.setStyle(Qt.PenStyle.CustomDashLine)
        pen.setDashPattern([1, 4, 5, 4])
        qp.setPen(pen)
        qp.drawLine(20, 240, 250, 240)


def main():

    app = QApplication(sys.argv)
    ex = Example()
    sys.exit(app.exec())


if __name__ == '__main__':
    main()
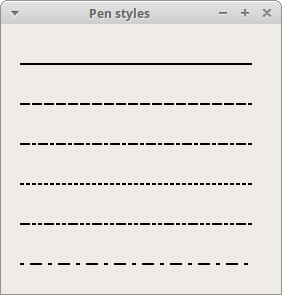
In our example, we draw six lines. The lines are drawn in six different pen styles. There are five predefined pen styles. We can create also custom pen styles. The last line is drawn using a custom pen style.
pen = QPen(Qt.GlobalColor.black, 2, Qt.PenStyle.SolidLine)
We create a QPen object. The colour is black. The width is set to 2
pixels so that we can see the differences between the pen styles.
Qt.SolidLine is one of the predefined pen styles.
pen.setStyle(Qt.PenStyle.CustomDashLine)
pen.setDashPattern([1, 4, 5, 4])
qp.setPen(pen)
Here we define a custom pen style. We set a
Qt.PenStyle.CustomDashLine pen style and call the
setDashPattern method. The list of numbers defines a style. There
must be an even number of numbers. Odd numbers define a dash, even numbers
space. The greater the number, the greater the space or the dash. Our pattern is
1 px dash, 4 px space, 5 px dash, 4 px space etc.
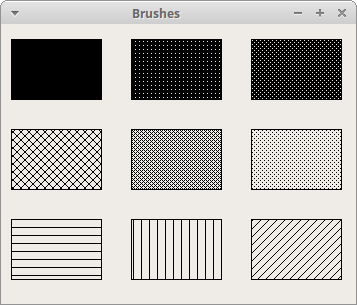
PyQt6 QBrush
QBrush is an elementary graphics object. It is used to paint the
background of graphics shapes, such as rectangles, ellipses, or polygons. A
brush can be of three different types: a predefined brush, a gradient, or a
texture pattern.
#!/usr/bin/python

"""
ZetCode PyQt6 tutorial

This example draws nine rectangles in different
brush styles.

Author: Jan Bodnar
Website: zetcode.com
"""

from PyQt6.QtWidgets import QWidget, QApplication
from PyQt6.QtGui import QPainter, QBrush
from PyQt6.QtCore import Qt
import sys


class Example(QWidget):

    def __init__(self):
        super().__init__()

        self.initUI()


    def initUI(self):

        self.setGeometry(300, 300, 355, 280)
        self.setWindowTitle('Brushes')
        self.show()


    def paintEvent(self, e):

        qp = QPainter()
        qp.begin(self)
        self.drawBrushes(qp)
        qp.end()


    def drawBrushes(self, qp):

        brush = QBrush(Qt.BrushStyle.SolidPattern)
        qp.setBrush(brush)
        qp.drawRect(10, 15, 90, 60)

        brush.setStyle(Qt.BrushStyle.Dense1Pattern)
        qp.setBrush(brush)
        qp.drawRect(130, 15, 90, 60)

        brush.setStyle(Qt.BrushStyle.Dense2Pattern)
        qp.setBrush(brush)
        qp.drawRect(250, 15, 90, 60)

        brush.setStyle(Qt.BrushStyle.DiagCrossPattern)
        qp.setBrush(brush)
        qp.drawRect(10, 105, 90, 60)

        brush.setStyle(Qt.BrushStyle.Dense5Pattern)
        qp.setBrush(brush)
        qp.drawRect(130, 105, 90, 60)

        brush.setStyle(Qt.BrushStyle.Dense6Pattern)
        qp.setBrush(brush)
        qp.drawRect(250, 105, 90, 60)

        brush.setStyle(Qt.BrushStyle.HorPattern)
        qp.setBrush(brush)
        qp.drawRect(10, 195, 90, 60)

        brush.setStyle(Qt.BrushStyle.VerPattern)
        qp.setBrush(brush)
        qp.drawRect(130, 195, 90, 60)

        brush.setStyle(Qt.BrushStyle.BDiagPattern)
        qp.setBrush(brush)
        qp.drawRect(250, 195, 90, 60)


def main():

    app = QApplication(sys.argv)
    ex = Example()
    sys.exit(app.exec())


if __name__ == '__main__':
    main()
In our example, we draw nine different rectangles.
brush = QBrush(Qt.BrushStyle.SolidPattern)
qp.setBrush(brush)
qp.drawRect(10, 15, 90, 60)
We define a brush object. We set it to the painter object and draw the
rectangle by calling the drawRect method.
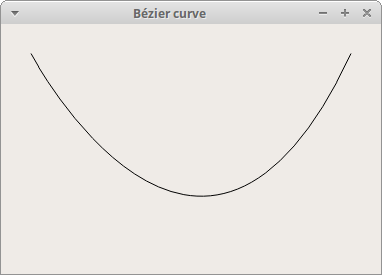
Bézier curve
Bézier curve is a cubic line. Bézier curve in PyQt6 can be created with
QPainterPath. A painter path is an object composed of a number of
graphical building blocks, such as rectangles, ellipses, lines, and curves.
#!/usr/bin/python

"""
ZetCode PyQt6 tutorial

This program draws a Bézier curve with
QPainterPath.

Author: Jan Bodnar
Website: zetcode.com
"""

import sys

from PyQt6.QtGui import QPainter, QPainterPath
from PyQt6.QtWidgets import QWidget, QApplication


class Example(QWidget):

    def __init__(self):
        super().__init__()

        self.initUI()


    def initUI(self):

        self.setGeometry(300, 300, 380, 250)
        self.setWindowTitle('Bézier curve')
        self.show()


    def paintEvent(self, e):

        qp = QPainter()
        qp.begin(self)
        qp.setRenderHint(QPainter.RenderHints.Antialiasing)
        self.drawBezierCurve(qp)
        qp.end()


    def drawBezierCurve(self, qp):

        path = QPainterPath()
        path.moveTo(30, 30)
        path.cubicTo(30, 30, 200, 350, 350, 30)

        qp.drawPath(path)


def main():

    app = QApplication(sys.argv)
    ex = Example()
    sys.exit(app.exec())


if __name__ == '__main__':
    main()
This example draws a Bézier curve.
path = QPainterPath()
path.moveTo(30, 30)
path.cubicTo(30, 30, 200, 350, 350, 30)
We create a Bézier curve with QPainterPath path. The curve is
created with cubicTo method, which takes three points: starting
point, control point, and ending point.
qp.drawPath(path)
The final path is drawn with drawPath method.
In this part of the PyQt6 tutorial, we did some basic painting.