PyQt6 events and signals
last modified January 10, 2023
In this part of the PyQt6 programming tutorial, we explore events and signals occurring in applications.
Events in PyQt6
GUI applications are event-driven. Events are generated mainly by the
user of an application. But they can be generated by other means as well; e.g. an
Internet connection, a window manager, or a timer.
When we call the application's exec() method, the application enters
the main loop. The main loop fetches events and sends them to the objects.
In the event model, there are three participants:
- event source
- event object
- event target
The event source is the object whose state changes. It generates events. The event object (event) encapsulates the state changes in the event source. The event target is the object that wants to be notified. Event source object delegates the task of handling an event to the event target.
PyQt6 has a unique signal and slot mechanism to deal with events. Signals and slots are used for communication between objects. A signal is emitted when a particular event occurs. A slot can be any Python callable. A slot is called when its connected signal is emitted.
PyQt6 signals and slots
This is a simple example demonstrating signals and slots in PyQt6.
#!/usr/bin/python

"""
ZetCode PyQt6 tutorial

In this example, we connect a signal
of a QSlider to a slot of a QLCDNumber.

Author: Jan Bodnar
Website: zetcode.com
"""

import sys
from PyQt6.QtCore import Qt
from PyQt6.QtWidgets import (QWidget, QLCDNumber, QSlider,
        QVBoxLayout, QApplication)


class Example(QWidget):

    def __init__(self):
        super().__init__()

        self.initUI()


    def initUI(self):

        lcd = QLCDNumber(self)
        sld = QSlider(Qt.Orientation.Horizontal, self)

        vbox = QVBoxLayout()
        vbox.addWidget(lcd)
        vbox.addWidget(sld)

        self.setLayout(vbox)
        sld.valueChanged.connect(lcd.display)

        self.setGeometry(300, 300, 350, 250)
        self.setWindowTitle('Signal and slot')
        self.show()


def main():

    app = QApplication(sys.argv)
    ex = Example()
    sys.exit(app.exec())


if __name__ == '__main__':
    main()
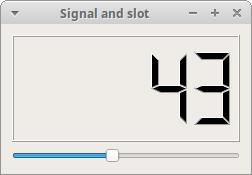
In our example, we display a QtGui.QLCDNumber and a
QtGui.QSlider. We change the lcd number by dragging
the slider knob.
sld.valueChanged.connect(lcd.display)
Here we connect a valueChanged signal of the slider to the
display slot of the lcd number.
The sender is an object that sends a signal. The receiver is the object that receives the signal. The slot is the method that reacts to the signal.
PyQt6 reimplementing event handler
Events in PyQt6 are processed often by reimplementing event handlers.
#!/usr/bin/python

"""
ZetCode PyQt6 tutorial

In this example, we reimplement an
event handler.

Author: Jan Bodnar
Website: zetcode.com
"""

import sys
from PyQt6.QtCore import Qt
from PyQt6.QtWidgets import QWidget, QApplication


class Example(QWidget):

    def __init__(self):
        super().__init__()

        self.initUI()


    def initUI(self):

        self.setGeometry(300, 300, 350, 250)
        self.setWindowTitle('Event handler')
        self.show()


    def keyPressEvent(self, e):

        if e.key() == Qt.Key.Key_Escape.value:
            self.close()


def main():

    app = QApplication(sys.argv)
    ex = Example()
    sys.exit(app.exec())


if __name__ == '__main__':
    main()
In our example, we reimplement the keyPressEvent event handler.
def keyPressEvent(self, e):

    if e.key() == Qt.Key.Key_Escape.value:
        self.close()
If we click the Escape button, the application terminates.
PyQt6 event object
Event object is a Python object that contains a number of attributes describing the event. Event object is specific to the generated event type.
#!/usr/bin/python
"""
ZetCode PyQt6 tutorial
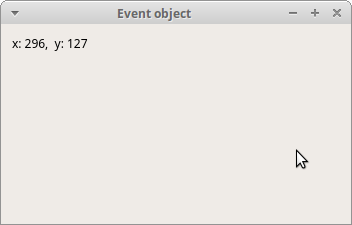
In this example, we display the x and y
coordinates of a mouse pointer in a label widget.
Author: Jan Bodnar
Website: zetcode.com
"""
import sys
from PyQt6.QtCore import Qt
from PyQt6.QtWidgets import QWidget, QApplication, QGridLayout, QLabel
class Example(QWidget):
def __init__(self):
super().__init__()
self.initUI()
def initUI(self):
grid = QGridLayout()
x = 0
y = 0
self.text = f'x: {x}, y: {y}'
self.label = QLabel(self.text, self)
grid.addWidget(self.label, 0, 0, Qt.AlignmentFlag.AlignTop)
self.setMouseTracking(True)
self.setLayout(grid)
self.setGeometry(300, 300, 450, 300)
self.setWindowTitle('Event object')
self.show()
def mouseMoveEvent(self, e):
x = int(e.position().x())
y = int(e.position().y())
text = f'x: {x}, y: {y}'
self.label.setText(text)
def main():
app = QApplication(sys.argv)
ex = Example()
sys.exit(app.exec())
if __name__ == '__main__':
main()
In this example, we display the x and y coordinates of a mouse pointer in a label widget.
self.setMouseTracking(True)
Mouse tracking is disabled by default, so the widget only receives mouse move events when at least one mouse button is pressed while the mouse is being moved. If mouse tracking is enabled, the widget receives mouse move events even if no buttons are pressed.
def mouseMoveEvent(self, e):

    x = int(e.position().x())
    y = int(e.position().y())
    ...
The e is the event object; it contains data about the event that
was triggered. In our case it is mouse move event. With the
position().x() and e.position().y() methods we
determine the x and y coordinates of the mouse pointer.
self.text = f'x: {x},  y: {y}'
self.label = QLabel(self.text, self)
The x and y coordinates are displayd in a QLabel widget.
PyQt6 event sender
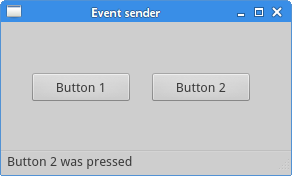
Sometimes it is convenient to know which widget is the sender of a signal.
For this, PyQt6 has the sender method.
#!/usr/bin/python

"""
ZetCode PyQt6 tutorial

In this example, we determine the event sender
object.

Author: Jan Bodnar
Website: zetcode.com
"""

import sys
from PyQt6.QtWidgets import QMainWindow, QPushButton, QApplication


class Example(QMainWindow):

    def __init__(self):
        super().__init__()

        self.initUI()


    def initUI(self):

        btn1 = QPushButton("Button 1", self)
        btn1.move(30, 50)

        btn2 = QPushButton("Button 2", self)
        btn2.move(150, 50)

        btn1.clicked.connect(self.buttonClicked)
        btn2.clicked.connect(self.buttonClicked)

        self.statusBar()

        self.setGeometry(300, 300, 450, 350)
        self.setWindowTitle('Event sender')
        self.show()


    def buttonClicked(self):

        sender = self.sender()

        msg = f'{sender.text()} was pressed'
        self.statusBar().showMessage(msg)


def main():

    app = QApplication(sys.argv)
    ex = Example()
    sys.exit(app.exec())


if __name__ == '__main__':
    main()
We have two buttons in our example. In the buttonClicked method we
determine which button we have clicked by calling the sender
method.
btn1.clicked.connect(self.buttonClicked)
btn2.clicked.connect(self.buttonClicked)
Both buttons are connected to the same slot.
def buttonClicked(self):

    sender = self.sender()

    msg = f'{sender.text()} was pressed'
    self.statusBar().showMessage(msg)
We determine the signal source by calling the sender method. In the
statusbar of the application, we show the label of the button being pressed.
PyQt6 emit signal
Objects created from a QObject can emit signals. The following
example shows how we to emit custom signals.
#!/usr/bin/python

"""
ZetCode PyQt6 tutorial

In this example, we show how to
emit a custom signal.

Author: Jan Bodnar
Website: zetcode.com
"""

import sys
from PyQt6.QtCore import pyqtSignal, QObject
from PyQt6.QtWidgets import QMainWindow, QApplication


class Communicate(QObject):

    closeApp = pyqtSignal()


class Example(QMainWindow):

    def __init__(self):
        super().__init__()

        self.initUI()


    def initUI(self):

        self.c = Communicate()
        self.c.closeApp.connect(self.close)

        self.setGeometry(300, 300, 450, 350)
        self.setWindowTitle('Emit signal')
        self.show()


    def mousePressEvent(self, e):

        self.c.closeApp.emit()


def main():

    app = QApplication(sys.argv)
    ex = Example()
    sys.exit(app.exec())


if __name__ == '__main__':
    main()
We create a new signal called closeApp. This signal is emitted
during a mouse press event. The signal is connected to the close
slot of the QMainWindow.
class Communicate(QObject):

    closeApp = pyqtSignal()
A signal is created with the pyqtSignal as a class attribute of the
external Communicate class.
self.c = Communicate()
self.c.closeApp.connect(self.close)
The custom closeApp signal is connected to the close
slot of the QMainWindow.
def mousePressEvent(self, event):

    self.c.closeApp.emit()
When we click on the window with a mouse pointer, the closeApp
signal is emitted. The application terminates.
In this part of the PyQt6 tutorial, we have covered signals and slots.