Displaying image in Java
last modified January 27, 2024
Displaying image in Java tutorial shows how to display an image in Java.
Beginner programmers often have problems with displaying an image in a project. The problem lies in correctly identifying the path to the image file. The key part is to realize that the relative path to the image file starts from the project directory. This tutorial was created to make things clear.
Display image example
Here we provide the source code for displaying an image in Java.
package com.zetcode;

import java.awt.Container;
import java.awt.EventQueue;
import javax.swing.GroupLayout;
import javax.swing.ImageIcon;
import javax.swing.JComponent;
import javax.swing.JFrame;
import javax.swing.JLabel;

public class DisplayImage extends JFrame {

    public DisplayImage() {

        initUI();
    }

    private void initUI() {

        ImageIcon ii = loadImage();

        JLabel label = new JLabel(ii);

        createLayout(label);

        setTitle("Image");
        setLocationRelativeTo(null);
        setDefaultCloseOperation(EXIT_ON_CLOSE);
    }

    private ImageIcon loadImage() {

        var ii = new ImageIcon("src/main/resources/sid.png");
        return ii;
    }

    private void createLayout(JComponent... arg) {

        Container pane = getContentPane();
        var gl = new GroupLayout(pane);
        pane.setLayout(gl);

        gl.setAutoCreateContainerGaps(true);

        gl.setHorizontalGroup(gl.createSequentialGroup()
                .addComponent(arg[0])
        );

        gl.setVerticalGroup(gl.createParallelGroup()
                .addComponent(arg[0])
        );

        pack();
    }

    public static void main(String[] args) {

        EventQueue.invokeLater(() -> {

            var ex = new DisplayImage();
            ex.setVisible(true);
        });
    }
}
The example creates a Java Swing application and uses an ImageIcon
component to display the image.
private ImageIcon loadImage() {

    var ii = new ImageIcon("src/main/resources/sid.png");
    return ii;
}
The important part is here. The ImageIcon takes the file path to the
image. This file path depends on the build tool we use.
Displaying image with command line tools
The first example builds the Java application with command line tools.
src
└── main
    ├── java
    │   └── com
    │       └── zetcode
    │           └── DisplayImage.java
    └── resources
        └── sid.png
This is the project structure.
$ javac src/main/java/com/zetcode/DisplayImage.java -d bin
The application is compiled with the javac tool.
bin
│ └── com
│     └── zetcode
│         └── DisplayImage.class
└── src
    └── main
        ├── java
        │   └── com
        │       └── zetcode
        │           └── DisplayImage.java
        └── resources
            └── sid.png
After compiling the source code, we have a Java class file created in the
bin/com/zetcode subdirectory.
$ java -cp bin com.zetcode.DisplayImage
We run the application with the java command.
Using Ant to build the project
In this section, we use the Ant build tool to create the project.
build.xml
src
└── main
    ├── java
    │   └── com
    │       └── zetcode
    │           └── DisplayImage.java
    └── resources
        └── sid.png
This is the project structure.
<?xml version="1.0"?>
<project name="DisplayImage" default="compile">

  <target name="init">
        <mkdir dir="build/classes"/>
  </target>

  <target name="compile" depends="init">
        <javac includeantruntime="false" srcdir="src" destdir="build/classes"/>
  </target>

  <target name="clean">
        <delete dir="build"/>
  </target>
</project>
This is the Ant build file. We have tasks for creating directories, compiling source code, and cleaning up.
$ ant
Buildfile: /home/jano/Documents/prog/java/display-image/ant-ver/build.xml

init:
    [mkdir] Created dir: /home/jano/Documents/prog/java/display-image/ant-ver/build/classes

compile:
    [javac] Compiling 1 source file to /home/jano/Documents/prog/java/display-image/ant-ver/build/classes

BUILD SUCCESSFUL
Total time: 0 seconds
We build the project.
$ java -cp build/classes/ com.zetcode.DisplayImage
We run the program.
Using IntelliJ IDEA
We create a Maven/Gradle application and copy the image into the
resources folder.
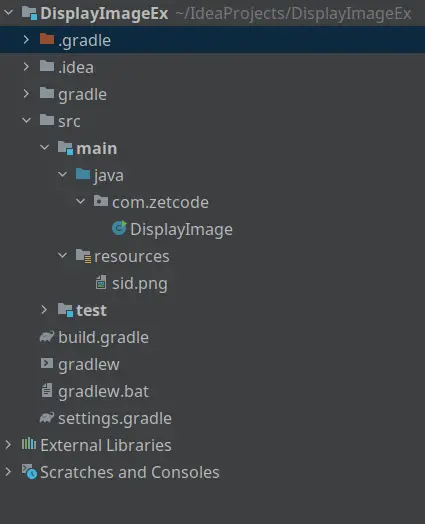
After creating the source file and copying the image, we can run the program.
Source
java Reading/Loading an Image - tutorial
In this article we have showed how to display an image in Java.
Author
List all Java tutorials.