First programs in Qt4
last modified October 18, 2023
In this part of the Qt4 C++ programming tutorial, we create our first programs.
We display an application icon, a tooltip, and various mouse cursors. We center a window on the screen and introduce the signal and slot mechanism.
Simple example
We start with a very simple example.
#include <QApplication>
#include <QWidget>

int main(int argc, char *argv[]) {

    QApplication app(argc, argv);

    QWidget window;

    window.resize(250, 150);
    window.setWindowTitle("Simple example");
    window.show();

    return app.exec();
}
The example shows a basic window on the screen.
#include <QApplication>
#include <QWidget>
We include necessary header files.
QApplication app(argc, argv);
This is the application object. Each Qt4 application must create this object. (Except for console applications.)
QWidget window;
This is our main widget.
window.resize(250, 150);
window.setWindowTitle("Simple example");
window.show();
Here we resize the widget and set a title for our main window. In this case,
the QWidget is our main window. And finally, we show
the widget on the screen.
return app.exec();
The exec method stars the main loop of the application.

Centering the window
If we do not position the window ourselves, the window manager will position it for us. In the next example, we center the window.
#include <QApplication>
#include <QDesktopWidget>
#include <QWidget>

int main(int argc, char *argv[]) {

  int WIDTH = 250;
  int HEIGHT = 150;

  int screenWidth;
  int screenHeight;

  int x, y;

  QApplication app(argc, argv);

  QWidget window;

  QDesktopWidget *desktop = QApplication::desktop();

  screenWidth = desktop->width();
  screenHeight = desktop->height();

  x = (screenWidth - WIDTH) / 2;
  y = (screenHeight - HEIGHT) / 2;

  window.resize(WIDTH, HEIGHT);
  window.move( x, y );
  window.setWindowTitle("Center");
  window.show();

  return app.exec();
}
There are plenty of monitor sizes and resolution types. In order to
center a window, we must determine the desktop width and height.
For this, we use the QDesktopWidget class.
QDesktopWidget *desktop = QApplication::desktop();

screenWidth = desktop->width();
screenHeight = desktop->height();
Here we determine the screen width and height.
x = (screenWidth - WIDTH) / 2;
y = (screenHeight - HEIGHT) / 2;
Here we compute the upper left point of our centered window.
window.resize(WIDTH, HEIGHT);
window.move( x, y );
We resize the widget and move it to the computed position. Note that we must first resize the widget. We move it afterwards.
A tooltip
A tooltip is a specific hint about an item in an application. The following example will demonstrate, how we can create a tooltip in Qt4 programming library.
#include <QApplication>
#include <QWidget>

int main(int argc, char *argv[]) {

  QApplication app(argc, argv);

  QWidget window;

  window.resize(250, 150);
  window.move(300, 300);
  window.setWindowTitle("ToolTip");
  window.setToolTip("QWidget");
  window.show();

  return app.exec();
}
The example shows a tooltip for the main QWidget.
window.setWindowTitle("ToolTip");
We set a tooltip for the QWidget widget with the setToolTip
method.

The application icon
In the next example, we show the application icon. Most window managers display the icon in the left corner of the titlebar and also on the taskbar.
#include <QApplication>
#include <QWidget>
#include <QIcon>

int main(int argc, char *argv[]) {

  QApplication app(argc, argv);

  QWidget window;

  window.resize(250, 150);
  window.setWindowTitle("Icon");
  window.setWindowIcon(QIcon("web.png"));
  window.show();

  return app.exec();
}
An icon is shown in the upper left corner of the window.
window.setWindowIcon(QIcon("web.png"));
To display an icon, we use the setWindowIcon
method and a QIcon class. The icon is a small
PNG file located in the current working directory.

Cursors
A cursor is a small icon that indicates the position of the mouse pointer. In the next example will show various cursors that we can use in our programs.
#include <QApplication>
#include <QWidget>
#include <QFrame>
#include <QGridLayout>

class Cursors : public QWidget
{
 public:
     Cursors(QWidget *parent = 0);
};

Cursors::Cursors(QWidget *parent)
    : QWidget(parent) {

  QFrame *frame1 = new QFrame(this);
  frame1->setFrameStyle(QFrame::Box);
  frame1->setCursor(Qt::SizeAllCursor);

  QFrame *frame2 = new QFrame(this);
  frame2->setFrameStyle(QFrame::Box);
  frame2->setCursor(Qt::WaitCursor);

  QFrame *frame3 = new QFrame(this);
  frame3->setFrameStyle(QFrame::Box);
  frame3->setCursor(Qt::PointingHandCursor);

  QGridLayout *grid = new QGridLayout(this);
  grid->addWidget(frame1, 0, 0);
  grid->addWidget(frame2, 0, 1);
  grid->addWidget(frame3, 0, 2);

  setLayout(grid);
}

int main(int argc, char *argv[]) {

  QApplication app(argc, argv);

  Cursors window;

  window.resize(350, 150);
  window.setWindowTitle("Cursors");
  window.show();

  return app.exec();
}
In this example, we use three frames. Each of the frames has a different cursor set.
QFrame *frame1 = new QFrame(this);
A QFrame widget is created.
frame1->setFrameStyle(QFrame::Box);
We set a frame style with the setFrameStyle method.
This way we can see the boundaries of the frames.
frame1->setCursor(Qt::SizeAllCursor);
A cursor is set to the frame with the setCursor method.
QGridLayout *grid = new QGridLayout(this);
grid->addWidget(frame1, 0, 0);
grid->addWidget(frame2, 0, 1);
grid->addWidget(frame3, 0, 2);
setLayout(grid);
This will group all the frames into one row. We talk more about this in the layout management chapter.
QPushButton
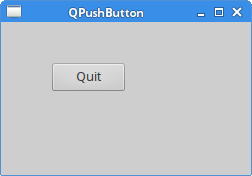
In the next code example, we display a push button on the window. By clicking on the button we close the application.
#include <QApplication>
#include <QWidget>
#include <QPushButton>

class MyButton : public QWidget {

 public:
     MyButton(QWidget *parent = 0);
};

MyButton::MyButton(QWidget *parent)
    : QWidget(parent) {

  QPushButton *quitBtn = new QPushButton("Quit", this);
  quitBtn->setGeometry(50, 40, 75, 30);

  connect(quitBtn, SIGNAL(clicked()), qApp, SLOT(quit()));
}

int main(int argc, char *argv[]) {

  QApplication app(argc, argv);

  MyButton window;

  window.resize(250, 150);
  window.setWindowTitle("QPushButton");
  window.show();

  return app.exec();
}
In this code example, we use the concept of the signals and slots for the first time.
QPushButton *quitBtn = new QPushButton("Quit", this);
quitBtn->setGeometry(50, 40, 75, 30);
We create a new QPushButton. We manually resize it and place it
on the window with the setGeometry method.
connect(quitBtn, SIGNAL(clicked()), qApp, SLOT(quit()));
When we click on the button, a clicked signal is
generated. The slot is the method which reacts to the signal.
In our case it is the quit slot of the main
application object. The qApp is a global pointer
to the application object. It is defined in the
QApplication header file.

Plus minus
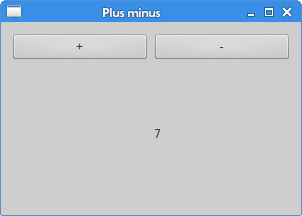
We finish this section showing how widgets can communicate. The code is split into three files.
#pragma once

#include <QWidget>
#include <QApplication>
#include <QPushButton>
#include <QLabel>

class PlusMinus : public QWidget {

  Q_OBJECT

  public:
    PlusMinus(QWidget *parent = 0);

  private slots:
    void OnPlus();
    void OnMinus();

  private:
    QLabel *lbl;
};
This is the header file of the example. In this file, we define two slots and a label widget.
class PlusMinus : public QWidget {

  Q_OBJECT
...
The Q_OBJECT macro must be included in classes that
declare their own signals and slots.
#include "plusminus.h"
#include <QGridLayout>

PlusMinus::PlusMinus(QWidget *parent)
    : QWidget(parent) {

  QPushButton *plsBtn = new QPushButton("+", this);
  QPushButton *minBtn = new QPushButton("-", this);
  lbl = new QLabel("0", this);

  QGridLayout *grid = new QGridLayout(this);
  grid->addWidget(plsBtn, 0, 0);
  grid->addWidget(minBtn, 0, 1);
  grid->addWidget(lbl, 1, 1);

  setLayout(grid);

  connect(plsBtn, SIGNAL(clicked()), this, SLOT(OnPlus()));
  connect(minBtn, SIGNAL(clicked()), this, SLOT(OnMinus()));
}

void PlusMinus::OnPlus() {

  int val = lbl->text().toInt();
  val++;
  lbl->setText(QString::number(val));
}

void PlusMinus::OnMinus() {

  int val = lbl->text().toInt();
  val--;
  lbl->setText(QString::number(val));
}
We have two push buttons and a label widget. We increase or decrease the number displayed by the label with the buttons.
connect(plsBtn, SIGNAL(clicked()), this, SLOT(OnPlus()));
connect(minBtn, SIGNAL(clicked()), this, SLOT(OnMinus()));
Here we connect the clicked signals to the slots.
void PlusMinus::OnPlus() {

  int val = lbl->text().toInt();
  val++;
  lbl->setText(QString::number(val));
}
In the OnPlus method, we determine the current
value of the label. The label widget displays a string value, so we must
convert it to the integer. We increase the number and set a new text
for the label. We convert a number to the string value.
#include "plusminus.h"

int main(int argc, char *argv[]) {

  QApplication app(argc, argv);

  PlusMinus window;

  window.resize(300, 190);
  window.setWindowTitle("Plus minus");
  window.show();

  return app.exec();
}
This is the main file of the code example.

In this chapter, we created our first programs in Qt4.