Widgets II in PyGTK
last modified October 18, 2023
In this part of the PyGTK programming tutorial, we continue introducing PyGTK widgets.
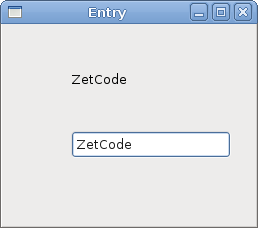
Entry
The Entry is a single line text entry field.
This widget is used to enter textual data.
#!/usr/bin/python

# ZetCode PyGTK tutorial
#
# This example demonstrates the Entry widget
#
# author: jan bodnar
# website: zetcode.com
# last edited: February 2009

import gtk

class PyApp(gtk.Window):

    def __init__(self):
        super(PyApp, self).__init__()

        self.set_title("Entry")
        self.set_size_request(250, 200)
        self.set_position(gtk.WIN_POS_CENTER)

        fixed = gtk.Fixed()

        self.label = gtk.Label("...")
        fixed.put(self.label, 60, 40)

        entry = gtk.Entry()
        entry.add_events(gtk.gdk.KEY_RELEASE_MASK)
        fixed.put(entry, 60, 100)

        entry.connect("key-release-event", self.on_key_release)

        self.connect("destroy", gtk.main_quit)
        self.add(fixed)
        self.show_all()

    def on_key_release(self, widget, event):
        self.label.set_text(widget.get_text())

PyApp()
gtk.main()
This example shows an entry widget and a label. The text that we key in the entry is displayed immediately in the label control.
entry = gtk.Entry()
Entry widget is created.
entry.connect("key-release-event", self.on_key_release)
If the text in the Entry widget is changed,
we call the on_key_release method.
def on_key_release(self, widget, event):
    self.label.set_text(widget.get_text())
We get the text from the Entry widget and
set it to the label.
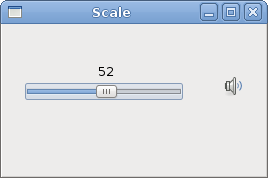
HScale
The HScale is It is a horizontal slider that lets
the user graphically select a value by sliding a knob within a bounded interval.
Our example will show a volume control.
#!/usr/bin/python

# ZetCode PyGTK tutorial
#
# This example demonstrates the HScale widget
#
# author: jan bodnar
# website: zetcode.com
# last edited: February 2009


import gtk
import sys


class PyApp(gtk.Window):

    def __init__(self):
        super(PyApp, self).__init__()

        self.set_title("Scale")
        self.set_size_request(260, 150)
        self.set_position(gtk.WIN_POS_CENTER)

        scale = gtk.HScale()
        scale.set_range(0, 100)
        scale.set_increments(1, 10)
        scale.set_digits(0)
        scale.set_size_request(160, 35)
        scale.connect("value-changed", self.on_changed)

        self.load_pixbufs()

        self.image = gtk.Image()
        self.image.set_from_pixbuf(self.mutp)

        fix = gtk.Fixed()
        fix.put(scale, 20, 40)
        fix.put(self.image, 219, 50)

        self.add(fix)

        self.connect("destroy", lambda w: gtk.main_quit())
        self.show_all()

    def load_pixbufs(self):

        try:
            self.mutp = gtk.gdk.pixbuf_new_from_file("mute.png")
            self.minp = gtk.gdk.pixbuf_new_from_file("min.png")
            self.medp = gtk.gdk.pixbuf_new_from_file("med.png")
            self.maxp = gtk.gdk.pixbuf_new_from_file("max.png")

        except Exception, e:
            print "Error reading Pixbufs"
            print e.message
            sys.exit(1)


    def on_changed(self, widget):
        val = widget.get_value()

        if val == 0:
            self.image.set_from_pixbuf(self.mutp)
        elif val > 0 and val <= 30:
            self.image.set_from_pixbuf(self.minp)
        elif val > 30 and val < 80:
            self.image.set_from_pixbuf(self.medp)
        else:
            self.image.set_from_pixbuf(self.maxp)


PyApp()
gtk.main()
In the example above, we have HScale and
Image widgets. By dragging the scale we change the image
on the Image widget.
scale = gtk.HScale()
HScale widget is created.
scale.set_range(0, 100)
We set the lower and upper boundaries of the scale.
scale.set_increments(1, 10)
The set_increments method sets the step and page sizes
for the range.
scale.set_digits(0)
We want to have integer values on the scale, so we set the number of decimal places to zero.
if val == 0:
    self.image.set_from_pixbuf(self.mutp)
elif val > 0 and val <= 30:
    self.image.set_from_pixbuf(self.minp)
elif val > 30 and val < 80:
    self.image.set_from_pixbuf(self.medp)
else:
    self.image.set_from_pixbuf(self.maxp)
Depending on the obtained value, we change the picture in the image widget.
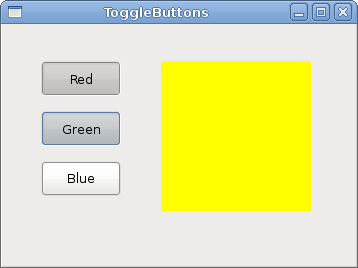
ToggleButton
ToggleButton is a button that has two states. Pressed and not pressed.
You toggle between these two states by clicking on it. There are situations where
this functionality fits well.
#!/usr/bin/python

# ZetCode PyGTK tutorial
#
# This example demonstrates the ToggleButton widget
#
# author: jan bodnar
# website: zetcode.com
# last edited: February 2009

import gtk

class PyApp(gtk.Window):
    def __init__(self):
        super(PyApp, self).__init__()

        self.color = [0, 0, 0]

        self.set_title("ToggleButtons")
        self.resize(350, 240)
        self.set_position(gtk.WIN_POS_CENTER)
        self.connect("destroy", gtk.main_quit)

        red = gtk.ToggleButton("Red")
        red.set_size_request(80, 35)
        red.connect("clicked", self.onred)
        green = gtk.ToggleButton("Green")
        green.set_size_request(80, 35)
        green.connect("clicked", self.ongreen)
        blue = gtk.ToggleButton("Blue")
        blue.set_size_request(80, 35)
        blue.connect("clicked", self.onblue)

        self.darea = gtk.DrawingArea()
        self.darea.set_size_request(150, 150)
        self.darea.modify_bg(gtk.STATE_NORMAL, gtk.gdk.color_parse("black"))

        fixed = gtk.Fixed()
        fixed.put(red, 30, 30)
        fixed.put(green, 30, 80)
        fixed.put(blue, 30, 130)
        fixed.put(self.darea, 150, 30)

        self.add(fixed)

        self.show_all()

    def onred(self, widget):
        if widget.get_active():
            self.color[0] = 65535
        else: self.color[0] = 0

        self.darea.modify_bg(gtk.STATE_NORMAL, gtk.gdk.Color(self.color[0],
            self.color[1], self.color[2]))

    def ongreen(self, widget):
        if (widget.get_active()):
            self.color[1] = 65535
        else: self.color[1] = 0

        self.darea.modify_bg(gtk.STATE_NORMAL, gtk.gdk.Color(self.color[0],
            self.color[1], self.color[2]))

    def onblue(self, widget):
        if (widget.get_active()):
            self.color[2] = 65535
        else: self.color[2] = 0

        self.darea.modify_bg(gtk.STATE_NORMAL, gtk.gdk.Color(self.color[0],
            self.color[1], self.color[2]))


PyApp()
gtk.main()
In our example, we show three toggle buttons and a DrawingArea.
We set the background colour of the area to black. The togglebuttons will
toggle the red, green and blue parts of the colour value. The background colour
will depend on which togglebuttons we have pressed.
self.color = [0, 0, 0]
This is the colour value that is going to be updated with the toggle buttons.
red = gtk.ToggleButton("Red")
red.set_size_request(80, 35)
red.connect("clicked", self.onred)
The ToggleButton widget is created. We set its size
to 80x35 pixels. Each of the toggle buttons has its own handler method.
self.darea = gtk.DrawingArea()
self.darea.set_size_request(150, 150)
self.darea.modify_bg(gtk.STATE_NORMAL, gtk.gdk.color_parse("black"))
The DrawingArea widget is the widget that
displays the colour, mixed by the toggle buttons. At start, it shows
black colour.
if widget.get_active():
    self.color[0] = 65535
else: self.color[0] = 0
If the toggle button is pressed, we change the R, G or B part of the colour accordingly.
self.darea.modify_bg(gtk.STATE_NORMAL, gtk.gdk.Color(self.color[0],
           self.color[1], self.color[2]))
We update the colour of the DrawingArea widget.
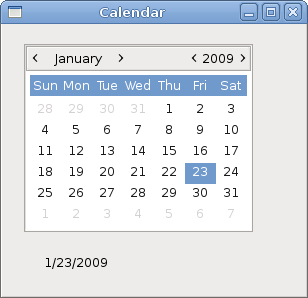
Calendar
Our final widget is the Calendar widget. It is used to
work with dates.
#!/usr/bin/python

# ZetCode PyGTK tutorial
#
# This example demonstrates the Calendar widget
#
# author: jan bodnar
# website: zetcode.com
# last edited: February 2009


import gtk

class PyApp(gtk.Window):

    def __init__(self):
        super(PyApp, self).__init__()

        self.set_title("Calendar")
        self.set_size_request(300, 270)
        self.set_position(gtk.WIN_POS_CENTER)
        self.set_border_width(2)

        self.label = gtk.Label("...")

        calendar = gtk.Calendar()
        calendar.connect("day_selected", self.on_day_selected)

        fix = gtk.Fixed()
        fix.put(calendar, 20, 20)
        fix.put(self.label, 40, 230)

        self.add(fix)

        self.connect("destroy", gtk.main_quit)
        self.show_all()

    def on_day_selected(self, widget):
        (year, month, day) = widget.get_date()
        self.label.set_label(str(month) + "/" + str(day) + "/" + str(year))


PyApp()
gtk.main()
We have the Calendar widget and a Label.
The selected day from the calendar is shown in the label.
calendar = gtk.Calendar()
Calendar widget is created.
(year, month, day) = widget.get_date()
self.label.set_label(str(month) + "/" + str(day) + "/" + str(year))
In the on_day_selected method we retrieve the
currently selected date, and update the label.
In this chapter of the PyGTK tutorial, we finished talking about the PyGTK widgets.