Menus in GTK#
last modified October 18, 2023
In this part of the GTK# programming tutorial, we work with menus.
A menubar is one of the most common parts of the GUI application. It is a group of commands located in various menus. While in console applications we have to remember various arcane commands, here we have most of the commands grouped into logical parts. These are accepted standards that further reduce the amount of time spending to learn a new application.
Simple menu
In our first example, we create a menubar with one file menu. The menu will have only one menu item. By selecting the item the application quits.
using Gtk;
using System;

class SharpApp : Window {


    public SharpApp() : base("Simple menu")
    {
        SetDefaultSize(250, 200);
        SetPosition(WindowPosition.Center);
        DeleteEvent += delegate { Application.Quit(); };

        MenuBar mb = new MenuBar();

        Menu filemenu = new Menu();
        MenuItem file = new MenuItem("File");
        file.Submenu = filemenu;

        MenuItem exit = new MenuItem("Exit");
        exit.Activated += OnActivated;
        filemenu.Append(exit);

        mb.Append(file);

        VBox vbox = new VBox(false, 2);
        vbox.PackStart(mb, false, false, 0);

        Add(vbox);

        ShowAll();
    }

    void OnActivated(object sender, EventArgs args)
    {
        Application.Quit();
    }

    public static void Main()
    {
        Application.Init();
        new SharpApp();
        Application.Run();
    }
}
This is a small example with minimal menubar functionality.
MenuBar mb = new MenuBar();
MenuBar widget is created.
Menu filemenu = new Menu();
MenuItem file = new MenuItem("File");
file.Submenu = filemenu;
Toplevel MenuItem is created.
MenuItem exit = new MenuItem("Exit");
exit.Activated += OnActivated;
filemenu.Append(exit);
Exit MenuItem is created and appended to the
File MenuItem.
mb.Append(file);
Toplevel MenuItem is appended to the MenuBar
widget.
VBox vbox = new VBox(false, 2);
vbox.PackStart(mb, false, false, 0);
Unlike in other toolkits, we have to take care of the layout management ourselves. We put the menubar into the vertical box.
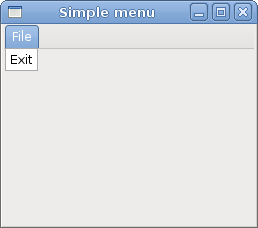
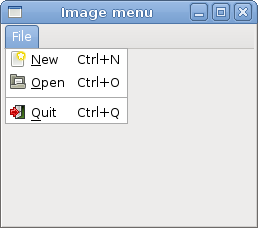
Image menu
In the next example, we further explore the menus. We add images and accelerators to our menu items. Accelerators are keyboard shortcuts for activating a menu item.
using Gtk;
using System;

class SharpApp : Window {


    public SharpApp() : base("Image menu")
    {
        SetDefaultSize(250, 200);
        SetPosition(WindowPosition.Center);
        DeleteEvent += delegate { Application.Quit(); };

        MenuBar mb = new MenuBar();

        Menu filemenu = new Menu();
        MenuItem file = new MenuItem("File");
        file.Submenu = filemenu;

        AccelGroup agr = new AccelGroup();
        AddAccelGroup(agr);

        ImageMenuItem newi = new ImageMenuItem(Stock.New, agr);
        newi.AddAccelerator("activate", agr, new AccelKey(
            Gdk.Key.n, Gdk.ModifierType.ControlMask, AccelFlags.Visible));
        filemenu.Append(newi);

        ImageMenuItem open = new ImageMenuItem(Stock.Open, agr);
        open.AddAccelerator("activate", agr, new AccelKey(
            Gdk.Key.n, Gdk.ModifierType.ControlMask, AccelFlags.Visible));
        filemenu.Append(open);

        SeparatorMenuItem sep = new SeparatorMenuItem();
        filemenu.Append(sep);

        ImageMenuItem exit = new ImageMenuItem(Stock.Quit, agr);
        exit.AddAccelerator("activate", agr, new AccelKey(
            Gdk.Key.q, Gdk.ModifierType.ControlMask, AccelFlags.Visible));

        exit.Activated += OnActivated;
        filemenu.Append(exit);

        mb.Append(file);

        VBox vbox = new VBox(false, 2);
        vbox.PackStart(mb, false, false, 0);
        vbox.PackStart(new Label(), false, false, 0);

        Add(vbox);

        ShowAll();
    }

    void OnActivated(object sender, EventArgs args)
    {
        Application.Quit();
    }


    public static void Main()
    {
        Application.Init();
        new SharpApp();
        Application.Run();
    }
}
Our example shows a toplevel menu item with three sublevel menu items. Each of the menu items has a image and an accelerator. The accelerator for the quit menu item is active.
AccelGroup agr = new AccelGroup();
AddAccelGroup(agr);
To work with accelerators, we create a global AccelGroup
object. It will be used later.
ImageMenuItem newi = new ImageMenuItem(Stock.New, agr);
ImageMenuItem is created. The image comes from the stock
of images.
exit.AddAccelerator("activate", agr, new AccelKey(
    Gdk.Key.q, Gdk.ModifierType.ControlMask, AccelFlags.Visible));
This creates an Ctrl+Q accelerator for the exit menu item.
SeparatorMenuItem sep = new SeparatorMenuItem();
filemenu.Append(sep);
These lines create a separator. It is used to group menu items into logical groups.
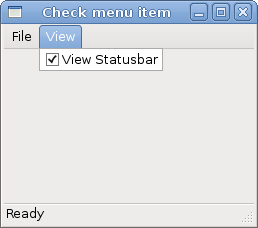
CheckMenuItem
A CheckMenuItem is a menu item with a check box.
It can be used to work with boolean properties.
using Gtk;
using System;

class SharpApp : Window {

    private Statusbar statusbar;

    public SharpApp() : base("Check menu item")
    {
        SetDefaultSize(250, 200);
        SetPosition(WindowPosition.Center);
        DeleteEvent += delegate { Application.Quit(); };

        MenuBar mb = new MenuBar();

        Menu filemenu = new Menu();
        MenuItem file = new MenuItem("File");
        file.Submenu = filemenu;

        Menu viewmenu = new Menu();
        MenuItem view = new MenuItem("View");
        view.Submenu = viewmenu;

        CheckMenuItem stat = new CheckMenuItem("View Statusbar");
        stat.Toggle();
        stat.Toggled += OnStatusView;
        viewmenu.Append(stat);

        MenuItem exit = new MenuItem("Exit");
        exit.Activated += OnActivated;
        filemenu.Append(exit);

        mb.Append(file);
        mb.Append(view);

        statusbar = new Statusbar();
        statusbar.Push(1, "Ready");

        VBox vbox = new VBox(false, 2);
        vbox.PackStart(mb, false, false, 0);
        vbox.PackStart(new Label(), true, false, 0);
        vbox.PackStart(statusbar, false, false, 0);

        Add(vbox);

        ShowAll();
    }

    void OnStatusView(object sender, EventArgs args)
    {
        CheckMenuItem item = (CheckMenuItem) sender;

        if (item.Active) {
            statusbar.Show();
        } else {
            statusbar.Hide();
        }
    }

    void OnActivated(object sender, EventArgs args)
    {
        Application.Quit();
    }

    public static void Main()
    {
        Application.Init();
        new SharpApp();
        Application.Run();
    }
}
In our code example we show a check menu item. If the check box is activated, the statusbar widget is shown. If not, the statusbar is hidden.
CheckMenuItem stat = new CheckMenuItem("View Statusbar");
CheckMenuItem widget is created.
stat.Toggle();
The Toggle method checks/unchecks the
check menu item.
if (item.Active) {
    statusbar.Show();
} else {
    statusbar.Hide();
}
Depending on the state of the CheckMenuItem,
we show or hide the statusbar widget.
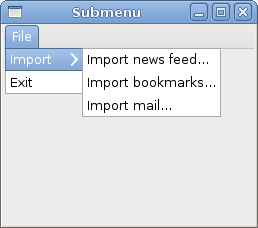
Submenu
Our final example demonstrates how to create a submenu in GTK#.
using Gtk;
using System;

class SharpApp : Window {


    public SharpApp() : base("Submenu")
    {
        SetDefaultSize(250, 200);
        SetPosition(WindowPosition.Center);
        DeleteEvent += delegate { Application.Quit(); };

        MenuBar mb = new MenuBar();

        Menu filemenu = new Menu();
        MenuItem file = new MenuItem("File");
        file.Submenu = filemenu;

        // submenu creation
        Menu imenu = new Menu();

        MenuItem import = new MenuItem("Import");
        import.Submenu = imenu;

        MenuItem inews = new MenuItem("Import news feed...");
        MenuItem ibookmarks = new MenuItem("Import bookmarks...");
        MenuItem imail = new MenuItem("Import mail...");

        imenu.Append(inews);
        imenu.Append(ibookmarks);
        imenu.Append(imail);

        // exit menu item
        MenuItem exit = new MenuItem("Exit");
        exit.Activated += OnActivated;

        filemenu.Append(import);
        filemenu.Append(exit);
        mb.Append(file);

        VBox vbox = new VBox(false, 2);
        vbox.PackStart(mb, false, false, 0);
        vbox.PackStart(new Label(), false, false, 0);

        Add(vbox);

        ShowAll();
    }

    void OnActivated(object sender, EventArgs args)
    {
        Application.Quit();
    }

    public static void Main()
    {
        Application.Init();
        new SharpApp();
        Application.Run();
    }
}
Submenu creation.
Menu imenu = new Menu();
A submenu is a Menu.
MenuItem import = new MenuItem("Import");
import.Submenu = imenu;
It is a submenu of a menu item, which belogs to toplevel file menu.
MenuItem inews = new MenuItem("Import news feed...");
MenuItem ibookmarks = new MenuItem("Import bookmarks...");
MenuItem imail = new MenuItem("Import mail...");

imenu.Append(inews);
imenu.Append(ibookmarks);
imenu.Append(imail);
Submenu has its own menu items.
In this chapter of the GTK# programming library, we showed, how to work with menus.