Derby with NetBeans
last modified July 6, 2020
In this chapter, we will work with the Derby database inside the NetBeans IDE. NetBeans has a built-in support for the Derby database in its basic Java SE bundle.
So far we have worked with the Apache Derby distribution. In this chapter, we will work with Java DB. It is the same database, only under a different name. Java DB is shipped with Java distribution from Java 6 version.

In the Services window, we expand the Databases node. We can see two nodes. The Java DB node and the Drivers node. In the Java DB node we have all databases. In the drivers node, we can see various JDBC drivers that we can use to connect to RDBMS. These database drivers come with the NetBeans IDE. We have Java DB drivers for both embedded and server modes.

The above figure is the Java DB Properties dialog window. The window is shown when we right click on the Java DB node and select the Properties option. In this dialog we can set two important settings. The Java DB Installation directory and the Java DB system directory.
Creating a database
First thing to do is to create a new database. We will create testdb
database.
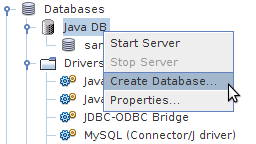
When we right click on the Java DB node, a context menu appears. It has four options: Start server, Stop server, Create Database and Properties. We choose the Create Database item to create a new database.
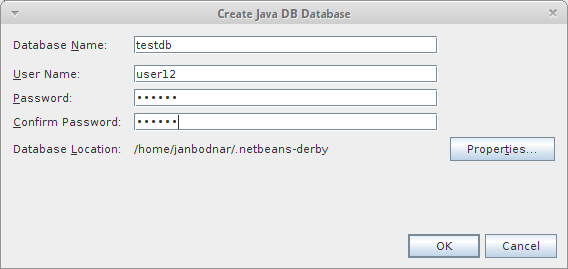
A dialog pops up. In this dialog window we provide a database name, user name
and password. Note the database location string. It is the Java DB system directory,
where our database files will be created. The default Java DB system directory is the
.netbeans-derby directory located in the home directory.

At this moment, we have a new database created. It is visually indicated by a new database icon under the Java DB node.
Database connection
After the database is created, we create a database connection.
NetBeans uses these icons for connection objects. The first icon is for disconnected database connection object, the second for an established database connection object.

The above connection is a Java DB connection created with a
Java DB server driver. Note that when we have created the testdb database,
a Java DB server was automatically started and a connection created.
New database connections can be created by right clicking on the Java DB driver
and choosing the Connect Using option.
We are going to create an embedded Java DB database connection. Before creating the connection, we need to stop the Java DB server if it is running. Java DB database cannot be booted by a Java DB server and connected to by an embedded driver at the same time. Note that we did not have to start the server explicitly. The server could be started behind the scenes. For example by connecting to the Java DB server connection object or creating a new database.
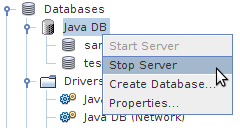
We click on the Java DB node with a right mouse button. If the Stop Server option is enabled it means that the server is running. We select it to stop the server.

To create an embedded connection, we right click on Java DB Embedded driver and select the Connect Using option. Similarly, we create a server connection by choosing a Java DB Server driver.
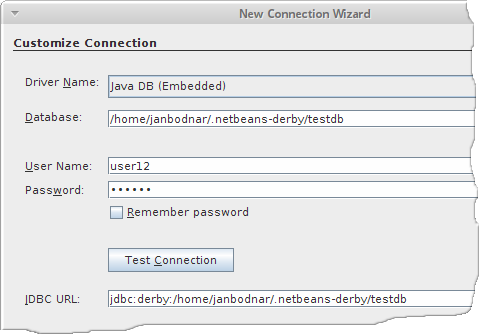
We have a New Connection Wizard dialog. In this dialog, we fill in the database
name and user credentials. The JDBC URL is created from this data. We have specified
the full path to the testdb database. The Java DB system directory
seems not to be taken into account here.
After successfully creating the embedded database connection, we see the above icon in the NetBeans Services window.
Creating a table
The database connection is created. The next thing we do is to create
a new database table. We will create a simple table called FRIENDS
with two columns: Id and Name. The Id will be
INTEGER and Name VARCHAR(30).
We expand the Database Connection node and further expand the
USER12 schema. We right click on the Table icon and choose
Create Table option.

A Create Table dialog appears. We create two columns. Id and Name.
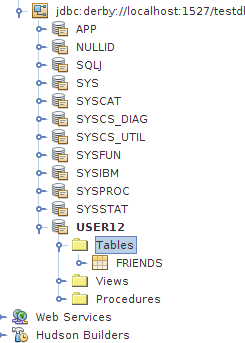
The FRIENDS table has been created. Now the Tables node is
expandable and we see a new table icon.
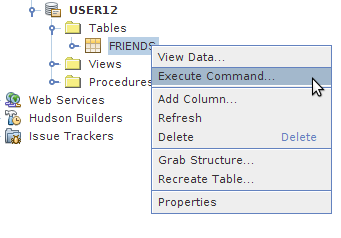
Next we are going to execute some SQL statements. We right click on the
FRIENDS table icon and select Execute Command option. A new SQL Command
window appears in NetBeans.

In the SQL Command window we write several INSERT INTO SQL statements.
We execute the statements by clicking on the Run SQL icon. The icon is
a brown oval object with a green triangle. We can execute SQL statements
with a Ctrl+Shift+E shortcut too.
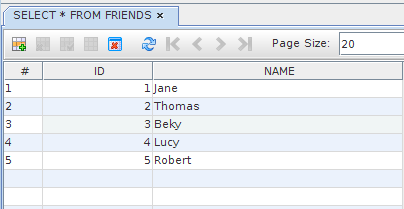
Running SELECT * FROM FRIENDS in the SQL Command window we
see a new window pop up. In this window we have a table widget with our data
organized in columns and rows. We have icons to modify data in this gui component.
The above picture shows the icons to work with the data in the table. The first two icons are used to insert a new record and delete a selected record, respectively. We can delete multiple records if we select more rows with a mouse pointer and pressing the Shift key simultaneously. If the data was modified, the Commit Record(s) icon is enabled. The data is saved only after we commit it with this action. Except for the SQL statements, we can modify data with GUI tools. By double clicking on a record a line widget appears. In this widget, we can change the data. The changes are saved by clicking on the Commit Record(s) action.
In the chapter, we have worked with Java DB inside the NetBeans IDE.