Creating custom widgets
last modified January 10, 2023
Toolkits usually provide only the most common widgets like buttons, text widgets, scrollbars, sliders etc. No toolkit can provide all possible widgets. wxPython has many widgets; more specialised widgets are created by client programmers.
Custom widgets are created in two ways: either we modify or enhance an existing widget, or we create a custom widget from scratch.
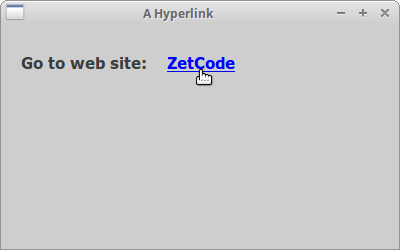
A hyperlink widget
The first example will create a hyperlink. The hyperlink widget will be based
on an existing wx.lib.stattext.GenStaticText widget.
#!/usr/bin/env python

"""
ZetCode wxPython tutorial

This program creates a Hyperlink widget.

author: Jan Bodnar
website: zetcode.com
last edited: May 2018
"""

import wx
from wx.lib.stattext import GenStaticText
import webbrowser


class Link(GenStaticText):

    def __init__(self, *args, **kw):
        super(Link, self).__init__(*args, **kw)

        self.font1 = wx.Font(11, wx.SWISS, wx.NORMAL, wx.BOLD, True, 'Verdana')
        self.font2 = wx.Font(11, wx.SWISS, wx.NORMAL, wx.BOLD, False, 'Verdana')

        self.SetFont(self.font2)
        self.SetForegroundColour('#0000ff')

        self.Bind(wx.EVT_MOUSE_EVENTS, self.OnMouseEvent)
        self.Bind(wx.EVT_MOTION, self.OnMouseEvent)

    def SetUrl(self, url):

        self.url = url


    def OnMouseEvent(self, e):

        if e.Moving():

            self.SetCursor(wx.Cursor(wx.CURSOR_HAND))
            self.SetFont(self.font1)

        elif e.LeftUp():

            webbrowser.open_new(self.url)

        else:
            self.SetCursor(wx.NullCursor)
            self.SetFont(self.font2)

        e.Skip()


class Example(wx.Frame):

    def __init__(self, *args, **kw):
        super(Example, self).__init__(*args, **kw)

        self.InitUI()

    def InitUI(self):

        panel = wx.Panel(self)

        vbox = wx.BoxSizer(wx.VERTICAL)
        hbox = wx.BoxSizer(wx.HORIZONTAL)

        st = GenStaticText(panel, label='Go to web site:')
        st.SetFont(wx.Font(11, wx.SWISS, wx.NORMAL, wx.BOLD, False, 'Verdana'))
        hbox.Add(st, flag=wx.LEFT, border=20)

        link_wid = Link(panel, label='ZetCode')
        link_wid.SetUrl('http://www.zetcode.com')
        hbox.Add(link_wid, flag=wx.LEFT, border=20)

        vbox.Add(hbox, flag=wx.TOP, border=30)
        panel.SetSizer(vbox)

        self.SetTitle('A Hyperlink')
        self.Centre()


def main():

    app = wx.App()
    ex = Example(None)
    ex.Show()
    app.MainLoop()


if __name__ == '__main__':
    main()
This hyperlink widget is based on an existing widget. In this example we do not draw anything, we just use an existing widget, which we modify a bit.
from wx.lib.stattext import GenStaticText
import webbrowser
Here we import the base widget from which we derive our hyperlink widget and the webbrowser module. The webbrowser module is a standard Python module. We will use it to open links in a default browser.
self.SetFont(self.font2)
self.SetForegroundColour('#0000ff')
The idea behind creating a hyperlink widget is simple. We inherit from a
base wx.lib.stattext.GenStaticText widget class. So we have a text
widget. Then we modify it a bit. We change the font and the colour of the text.
if e.Moving():

    self.SetCursor(wx.Cursor(wx.CURSOR_HAND))
    self.SetFont(self.font1)
If we hover a mouse pointer over the link, we change the font to underlined and also change the mouse pointer to a hand cursor.
elif e.LeftUp():

    webbrowser.open_new(self.url)
If we left click on the link, we open the link in a default browser.
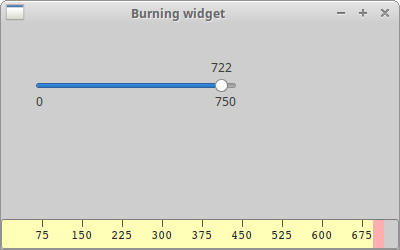
Burning widget
This is an example of a widget that we create from a ground up. We put a
wx.Panel on the bottom of the window and draw the entire widget manually.
If you have ever burned a CD or a DVD, you already saw this kind of widget.
#!/usr/bin/env python

"""
ZetCode wxPython tutorial

This program creates a Burning widget.

author: Jan Bodnar
website: zetcode.com
last edited: May 2018
"""

import wx

class Burning(wx.Panel):
    def __init__(self, parent):
        wx.Panel.__init__(self, parent, size=(-1, 30), style=wx.SUNKEN_BORDER)

        self.parent = parent
        self.font = wx.Font(9, wx.FONTFAMILY_DEFAULT, wx.FONTSTYLE_NORMAL,
            wx.FONTWEIGHT_NORMAL, False, 'Courier 10 Pitch')

        self.Bind(wx.EVT_PAINT, self.OnPaint)
        self.Bind(wx.EVT_SIZE, self.OnSize)


    def OnPaint(self, e):

        num = range(75, 700, 75)
        dc = wx.PaintDC(self)
        dc.SetFont(self.font)
        w, h = self.GetSize()

        self.cw = self.parent.GetParent().cw

        step = int(round(w / 10.0))

        j = 0

        till = (w / 750.0) * self.cw
        full = (w / 750.0) * 700

        if self.cw >= 700:

            dc.SetPen(wx.Pen('#FFFFB8'))
            dc.SetBrush(wx.Brush('#FFFFB8'))
            dc.DrawRectangle(0, 0, full, 30)
            dc.SetPen(wx.Pen('#ffafaf'))
            dc.SetBrush(wx.Brush('#ffafaf'))
            dc.DrawRectangle(full, 0, till-full, 30)
        else:

            dc.SetPen(wx.Pen('#FFFFB8'))
            dc.SetBrush(wx.Brush('#FFFFB8'))
            dc.DrawRectangle(0, 0, till, 30)


        dc.SetPen(wx.Pen('#5C5142'))

        for i in range(step, 10*step, step):

            dc.DrawLine(i, 0, i, 6)
            width, height = dc.GetTextExtent(str(num[j]))
            dc.DrawText(str(num[j]), i-width/2, 8)
            j = j + 1

    def OnSize(self, e):

        self.Refresh()


class Example(wx.Frame):

    def __init__(self, *args, **kwargs):
        super(Example, self).__init__(*args, **kwargs)

        self.InitUI()

    def InitUI(self):

        self.cw = 75

        panel = wx.Panel(self)
        CenterPanel = wx.Panel(panel)

        self.sld = wx.Slider(CenterPanel, value=75, maxValue=750, size=(200, -1),
            style=wx.SL_LABELS)

        vbox = wx.BoxSizer(wx.VERTICAL)
        hbox = wx.BoxSizer(wx.HORIZONTAL)
        hbox2 = wx.BoxSizer(wx.HORIZONTAL)
        hbox3 = wx.BoxSizer(wx.HORIZONTAL)

        self.wid = Burning(panel)
        hbox.Add(self.wid, 1, wx.EXPAND)

        hbox2.Add(CenterPanel, 1, wx.EXPAND)
        hbox3.Add(self.sld, 0, wx.LEFT|wx.TOP, 35)

        CenterPanel.SetSizer(hbox3)

        vbox.Add(hbox2, 1, wx.EXPAND)
        vbox.Add(hbox, 0, wx.EXPAND)

        self.Bind(wx.EVT_SCROLL, self.OnScroll)

        panel.SetSizer(vbox)

        self.sld.SetFocus()

        self.SetTitle("Burning widget")
        self.Centre()

    def OnScroll(self, e):

        self.cw = self.sld.GetValue()
        self.wid.Refresh()


def main():

    app = wx.App()
    ex = Example(None)
    ex.Show()
    app.MainLoop()


if __name__ == '__main__':
    main()
This widget shows graphically the total capacity of a medium and the free space available to us. The widget is controlled by a slider. The minimum value of our custom widget is 0, the maximum is 750. If we reach value 700, we began drawing in red colour. This normally indicates overburning.
w, h = self.GetSize()
self.cw = self.parent.GetParent().cw
...
till = (w / 750.0) * self.cw
full = (w / 750.0) * 700
We draw the widget dynamically. The greater the window, the greater the
burning widget. And vice versa. That is why we must calculate the size of
the wx.Panel onto which we draw the custom widget.
The till parameter determines the total size to be drawn. This value comes from
the slider widget. It is a proportion of the whole area. The full parameter
determines the point, where we begin to draw in red colour.
Notice the use of floating point arithmetics. This is to achieve greater precision.
The actual drawing consists of three steps. We draw the yellow or red and yellow rectangle. Then we draw the vertical lines, which divide the widget into several parts. Finally, we draw the numbers, which indicate the capacity of the medium.
def OnSize(self, e):

    self.Refresh()
Every time the window is resized, we refresh the widget. This causes the widget to repaint itself.
def OnScroll(self, e):

    self.cw = self.sld.GetValue()
    self.wid.Refresh()
If we scroll the thumb of the slider, we get the actual value and save it into the
self.cw parameter. This value is used, when the burning widget is drawn.
Then we cause the widget to be redrawn.
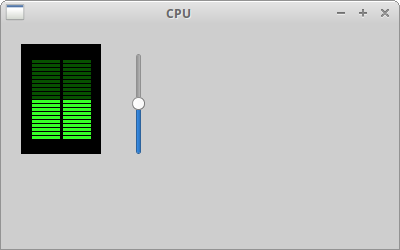
The CPU widget
There are system applications that measure system resources such as temperature, memory, or CPU consuption. Specialized widgets are created to make the application more appealing.
The following widget is often used in system applications.
#!/usr/bin/env python

"""
ZetCode wxPython tutorial

This program creates a CPU widget.

author: Jan Bodnar
website: zetcode.com
last edited: May 2018
"""

import wx


class CPU(wx.Panel):

    def __init__(self, parent):
        wx.Panel.__init__(self, parent, size=(80, 110))

        self.parent = parent
        self.SetBackgroundColour('#000000')
        self.Bind(wx.EVT_PAINT, self.OnPaint)


    def OnPaint(self, e):

        dc = wx.PaintDC(self)

        dc.SetDeviceOrigin(0, 100)
        dc.SetAxisOrientation(True, True)

        pos = self.parent.GetParent().GetParent().sel
        rect = pos / 5

        for i in range(1, 21):

            if i > rect:

                dc.SetBrush(wx.Brush('#075100'))
                dc.DrawRectangle(10, i*4, 30, 5)
                dc.DrawRectangle(41, i*4, 30, 5)

            else:
                dc.SetBrush(wx.Brush('#36ff27'))
                dc.DrawRectangle(10, i*4, 30, 5)
                dc.DrawRectangle(41, i*4, 30, 5)


class Example(wx.Frame):

    def __init__(self, *args, **kwargs):
        super(Example, self).__init__(*args, **kwargs)

        self.InitUI()

    def InitUI(self):

        self.sel = 0

        panel = wx.Panel(self)
        centerPanel = wx.Panel(panel)

        self.cpu = CPU(centerPanel)

        hbox = wx.BoxSizer(wx.HORIZONTAL)

        self.slider = wx.Slider(panel, value=self.sel, maxValue=100, size=(-1, 100),
		      style=wx.VERTICAL | wx.SL_INVERSE)
        self.slider.SetFocus()

        hbox.Add(centerPanel, 0,  wx.LEFT | wx.TOP, 20)
        hbox.Add(self.slider, 0, wx.LEFT | wx.TOP, 30)

        self.Bind(wx.EVT_SCROLL, self.OnScroll)

        panel.SetSizer(hbox)

        self.SetTitle("CPU")
        self.Centre()


    def OnScroll(self, e):

        self.sel = e.GetInt()
        self.cpu.Refresh()


def main():

    app = wx.App()
    ex = Example(None)
    ex.Show()
    app.MainLoop()


if __name__ == '__main__':
    main()
We create a black panel. Then we draw small rectangles onto this panel. The colour of the rectangles depends on the value of the slider. The colour can be dark green or bright green.
dc.SetDeviceOrigin(0, 100)
dc.SetAxisOrientation(True, True)
Here we change the default coordinate system to cartesian. This is to make the drawing intuitive.
pos = self.parent.GetParent().GetParent().sel
rect = pos / 5
Here we get the value of the sizer. We have 20 rectangles in each column. The slider has 100 numbers. The rect parameter makes a convertion from slider values into rectangles that will be drawn in bright green colour.
for i in range(1, 21):

    if i > rect:
        dc.SetBrush(wx.Brush('#075100'))
        dc.DrawRectangle(10, i*4, 30, 5)
        dc.DrawRectangle(41, i*4, 30, 5)

    else:
        dc.SetBrush(wx.Brush('#36ff27'))
        dc.DrawRectangle(10, i*4, 30, 5)
        dc.DrawRectangle(41, i*4, 30, 5)
Here we draw 40 rectangles, 20 in each column. If the number of the rectangle being drawn is greater than the converted rect value, we draw it in a dark green colour; otherwise in bright green.
In this chapter, we have created custom widgets in wxPython.