jQuery tutorial
last modified January 10, 2023
In this tutorial, we are going to learn the basics of jQuery. We will present the jQuery library, show how to download and include jQuery, explain various jQuery selectors, show how to bind events, show various jQuery effects, an work with asynchronous events.
When we want to create a website, we need to use specific technologies. HTML creates the structure of a web page. CSS is responsible for the look of the web page. JavaScript brings dynamicity to the web page.
HyperText Markup Language (HTML), Cascading Style Sheets (CSS), and JavaScript form a triad of cornerstone technologies for the World Wide Web. jQuery is an abstraction of JavaScript; it makes the work with JavaScript much more easier.
HTML Document
A website consists of multiple web pages. Each web page is an HTML document.
An HTML document is a textual document whose structure is defined by the
HyperText Markup Language. To create a document structure, we use HTML
tags such as <div>, <h2>,
or <body>. HTML documents have a .html or
.htm extension.
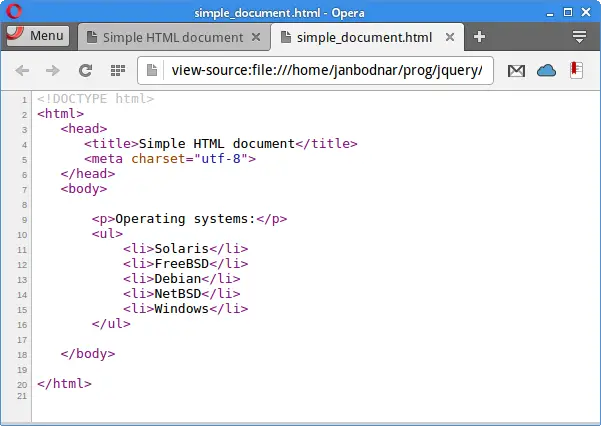
Web browsers allow us to see the HTML source of each of the HTML documents. A HTML document consists of two parts: head and body. HTML elements are organized in a hierarchical structure — HTML tags have their parents, children, and siblings.
Document Object Model (DOM)
The Document Object Model (DOM) is a programming interface for HTML documents. It defines functions for manipulating the document structure, style, and content. The DOM represents an HTML document as a tree structure of nodes, wherein each node is an object representing a part of the document. The nodes are objects that have properties and methods. These entities can be accessed via JavaScript and its libraries such as jQuery.
jQuery
jQuery is a JavaScript library which is used to manipulate DOM. With jQuery, we can find, select, traverse, and manipulate parts of a HTML document. These parts are also called DOM elements. jQuery is the most popular JavaScript library in use today. It is estimated that it is used on two-thirds of the top 10 million websites. jQuery was originally created by John Resig. jQuery is free, open-source software licensed under the MIT License.
The principles of developing with jQuery are:
- Separation of JavaScript and HTML.
- Brevity and clarity.
- Elimination of cross-browser incompatibilities.
- Extensibility.
Choosing jQuery Library
jQuery library is essentially a small file. In order to use jQuery in our projects, we either dowload the file from the project's website or use a Content Delivery Network (CDN).
There are several options to choose from. Firstly, there are multiple versions
of jQuery available. The version of the library is mentioned in the name of
the file. There are currently three version branches: 1.x, 2.x, and 3.x.
For educational purposes, it is best to choose the most recent version of
jQuery library. Then we need to choose between the production and development
version of the library. The production version is compressed and has a
min word in the name of the library. The compressed or minified
versions have their size reduced but otherwise provide the same functionality.
The development versions are human-readable with comments.
jquery-3.1.1.js
jquery-3.1.1.min.js
The first file is a development version of jQuery library version 3.1.1. The second file is a production version of jQuery library version 3.1.1.
In addition, there are so called slim versions of the library. The slim versions
have a slim word in the name of the library. They exclude
AJAX functionality, effects, and currently deprecated code.
jquery-3.1.1.slim.js
jquery-3.1.1.slim.min.js
The first file is a slim, development version of jQuery library version 3.1.1. The second file is a slim, production version of jQuery library version 3.1.1.
In this tutorial, are are going to use a minified version of jQuery 3.1.1.
Including jQuery in HTML Document
jQuery library can be included in a document by linking to a local copy or to one of
the versions available from public servers. To include the jQuery library, we use
the <script> tag. The file is included in the head of the document,
or at the bottom, usually before the </body> tag.
<script src="jquery-3.1.1.min.js"></script>
In this case, we include a local copy of the jQuery library.
<script src="https://code.jquery.com/jquery-3.1.1.min.js"></script>
Here, we include the library from a publicly available repository on code.jquery.com.
There are several well-known public repositories for jQuery; these repositories are also known as Content Delivery Networks (CDNs). Using CDNs can bring some performance benefits.
<script src="https://code.jquery.com/jquery-3.1.1.min.js"></script>
<script src="http://ajax.aspnetcdn.com/ajax/jQuery/jquery-3.1.1.min.js"></script>
<script src="https://ajax.googleapis.com/ajax/libs/jquery/3.1.1/jquery.min.js"></script>
Here we have jQuery, Google, and Microsoft CDNs.
Choosing a Text Editor
A good text editor will help us write code efficiently. Text editors provide syntax highlighting, code completion, automatic indentation and much more. Text editors that support jQuery include Brackets, Sublime Text, Kwrite, Gedit, Notepad++, PSPad, or TextMate.
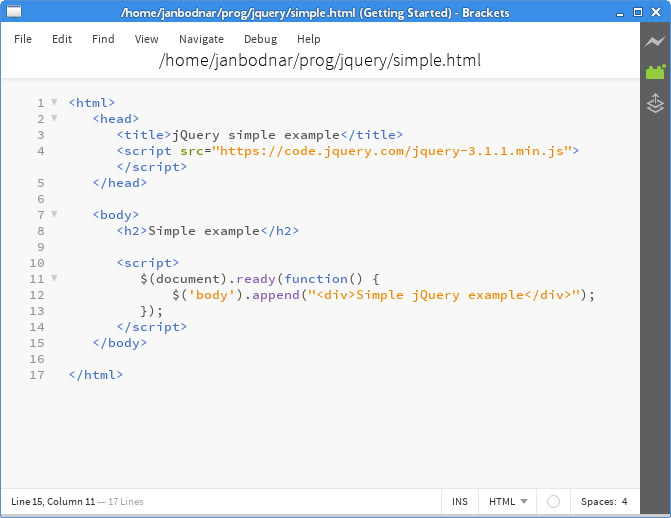
The above figure shows a small HTML document utilizing jQuery in a Brackets text editor. Brackets is a modern text editor for web development. It is written in JavaScript. It was specifically created for web designers and front-end developers.
When the Document is Ready
When the document is ready, that is, its DOM has been built and
it is safe to manipulate it, jQuery triggers a $(document).ready event.
We put our jQuery code in the handler of this event.
$(document).ready(function() {
    // jQuery code
});

$(function() {
    // jQuery code
});
These are document ready event handlers; both are equivalent. The second one is the recommended way to create a jQuery document ready event handler.
<html>
   <head>
      <title>jQuery simple example</title>
      <meta charset="utf-8">
      <script src="https://code.jquery.com/jquery-3.1.1.min.js"></script>
   </head>

   <body>
       <h2>Simple example</h2>

      <script>
         $(function() {
             $('body').append("<div>Simple jQuery example</div>");
         });
      </script>
   </body>

</html>
The example appends a <div> tag at the end of the <body> tag.
$('body').append("<div>Simple jQuery example</div>");
The $('body') selects the <body> tag in the document.
The append method appends a <div> tag at the end of
the <body> tag.
Testing and debugging
Browsers contain tools for developers to do testing and debugging. The developer console is started with Ctrl + Shift + I in Opera, Firefox, and Chrome.
In the console window, we can see error messages, output from the console.log method;
it can be used for evaluating JavaScript statements, inspecting and logging objects and properties.
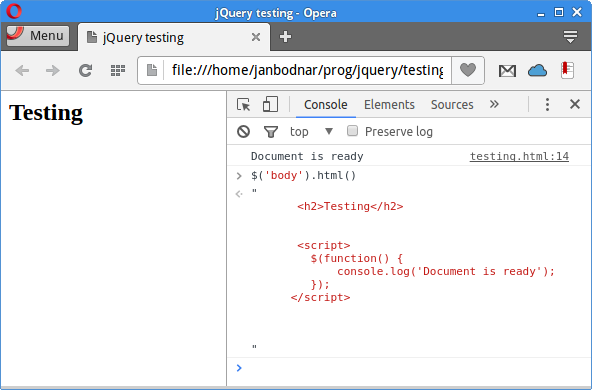
In the above figure, we can see the output of the jQuery html method, which gets the HTML code
of the <body> element. The output is shown in the console window.
<script>
    $(function() {
        console.log('Document is ready');
    });
</script>
The console.log method can be used for debugging output.
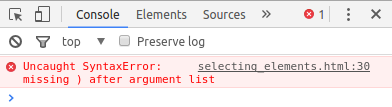
In the above picture we can see a jQuery syntax error being caught and shown on the developer console window.
jQuery selectors
jQuery selectors are used to select elements in an HTML document that meet certain criteria. The criteria can be their name, id, class name, attributes or a combination of them.
The following is a partial list of available selectors:
- $("*") — selects all elements
- $("#first") — selects the element with
id="first" - $(".intro") — selects all elements with
class="intro" - $("div") — selects all
<div>elements - $("h2, div, p") — selects all
<h2>, <div>, <p>elements - $("li:first") — selects the first
<li>element - $("li:last") — selects the last
<li>element - $("li:even") — selects all even
<li>elements - $("li:odd") — selects all odd
<li>elements - $(":empty") — selects all elements that are empty
- $(":focus") — selects the element that currently has focus
In the following example, we are going to work with the :root
selector, which selects the <html> tag.
<!DOCTYPE html>
<html>
   <head>
      <title>jQuery root selector example</title>
      <meta charset="utf-8">
      <style>
           .mycol { background-color: gray; border: 1px solid gray }
      </style>

      <script src="https://code.jquery.com/jquery-3.1.1.min.js"></script>

   </head>

   <body>
      <p>
          A paragraph.
      </p>

      <script>
         $(function() {

             $(":root").addClass("mycol");

         });
      </script>
   </body>

</html>
In the example, the background of the document is changed to gray colour.
$(":root").addClass("mycol");
With the :root selector, we select the root element of the document
and add a class to it with the addClass method.
<!DOCTYPE html>
<html>
    <head>
        <title>jQuery selecting elements</title>
        <meta charset="utf-8">
        <script src="https://code.jquery.com/jquery-3.1.1.min.js"></script>

    </head>

    <body>

        <p>Operating systems:</p>

        <ul id="mylist" style="width:150px">
            <li>Solaris</li>
            <li>FreeBSD</li>
            <li>Debian</li>
            <li>NetBSD</li>
            <li>Windows</li>
            <li>Mac OS X</li>
        </ul>

        <script>
            $(function() {

                $("#mylist").css("border", "1px dashed gray");
                $("li:odd").css("color", "blue");
            });
        </script>
    </body>

</html>
In this example, we have a list of operating systems. The list has a blue dotted border and its every odd element has a gray background.
$("#mylist").css("border", "1px dotted blue");
The $("#mylist") selector selects a tag with id equal to "mylist".
With the css method, we modify the look of the tag.
$("li:odd").css("background-color", "gray");
With the $("li:odd") selector, we select all odd <li> tags
and later modify them with the css method.
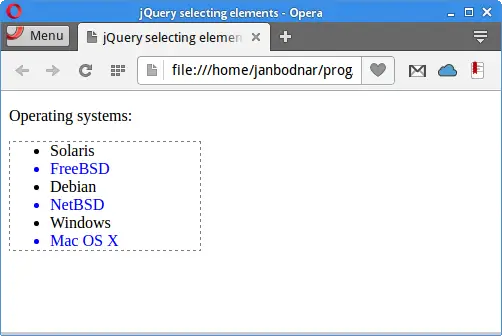
In the figure, we can see a dashed border around the list and a blue text colour of every second list element.
Chaining methods
jQuery allows to chain method calls. A chain of methods is a consecutive sequence of jQuery method calls on a jQuery object.
<!DOCTYPE html>
<html>
    <head>
        <title>jQuery chaining methods</title>
        <meta charset="utf-8">
        <script src="https://code.jquery.com/jquery-3.1.1.min.js"></script>

        <style>
            .mypanel { width:150px; height:100px; background-color:blue }
        </style>

    </head>

    <body>
        <div class="mypanel"></div>

        <script>
            $(function() {
                $(".mypanel").hide(1500).show(1500).hide(1500).show(1500);
            });
        </script>
    </body>
</html>
In the example, we have a panel which is shown and hidden twice.
A panel is shown with the show method and hidden
with the hide method.
$(".mypanel").hide(1500).show(1500).hide(1500).show(1500)
Here we see a chain of four method calls. Each of the calls returns a jQuery object on which we can call another method.
Getting and setting content
The text method gets the combined text contents of each
element in the set of matched elements, including their descendants,
or sets the text contents of the matched elements.
<html>
    <head>
        <title>jQuery getting, setting elements</title>
        <meta charset="utf-8">
        <script src="https://code.jquery.com/jquery-3.1.1.min.js"></script>
    </head>

    <body>
        <h2>Red car</h2>

        <h3></h3>

        <script>
            $(function() {
                var cont = $("h2").text();
                $("h3").text(cont);
            });
        </script>
   </body>
</html>
In the example, we get the content of the <h2> tag and
set it to the <h3> tag; in other words, we copy the content
from the first element to the second.
var cont = $("h2").text();
With the text method, we get the content of the
<h2> tag.
$("h3").text(cont);
In this line, we set the previously retrieved content to the
<h3> tag.
Binding events
The on method plugs an event handler function for one
or more events to the currently selected set of elements. An event
handler is triggered when an even, such as button click, is launched.
<!DOCTYPE html>
<html>
    <head>
        <title>jQuery event binding example</title>

        <script src="https://code.jquery.com/jquery-3.1.1.min.js"></script>

        <style>
            .mypanel { width:150px; height:100px; background-color:maroon }
        </style>

    </head>

    <body>

        <button id="btn">Toggle</button>
        <br>
        <br>

        <div class="mypanel"></div>

        <script>
             $(function() {

                 $("#btn").on('click', function() {

                     $(".mypanel").slideToggle(2000);
                 });
             });
        </script>
    </body>
</html>
In the example, we bind an event handler to a click event on a button element.
<button id="btn">Toggle</button>
This is the button that will trigger click events.
<script>
    $(function() {

        $("#btn").on('click', function() {

            $(".mypanel").slideToggle(2000);
        });
    });
</script>
We register a click event for the button element. The event
triggers a function which calls slideToggle method on
a <div> element. The slideToggle method
displays or hides the matched elements with a sliding motion.
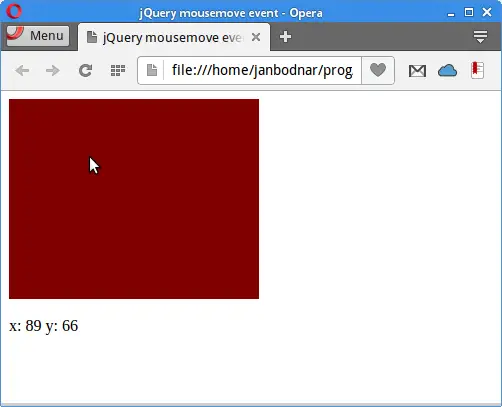
Mousemove events
A mouse move event is triggered when a mouse pointer moves over a document area. The event handler function receives an event object, which contains data related to the event type. In our case, it will contain x and y coordinates of the mouse pointer.
<!DOCTYPE html>
<html>
    <head>
        <title>jQuery mousemove event</title>

        <script src="https://code.jquery.com/jquery-3.1.1.min.js"></script>

        <style>
            .mypanel { width:250px; height:200px; background-color:maroon }
        </style>

    </head>

    <body>

        <div class="mypanel"></div>

        <br>
        <div id="log"></div>

        <script>
             $(function() {

                 $(".mypanel").mousemove(function(e) {

                     var msg = "x: " + e.pageX + " y: " + e.pageY;

                     $("#log").text(msg);
                 });
             });
        </script>
    </body>
</html>
The example shows the x and y coordinates of a mouse pointer if we
position it over the area of a <div> element.
<div class="mypanel"></div>
We will listen for mouse move events over the area of this element.
<div id="log"></div>
The coordinates will be displayed in this logging <div> element.
$(".mypanel").mousemove(function(e) {

    var msg = "x: " + e.pageX + " y: " + e.pageY;

    $("#log").text(msg);
});
We bind an event handler to the mouse move event. Inside the event handler,
we determine the x and y coordinates with the pageX and pageY
properties and update the logging element with the text method.
The mousemove method is a shortcut for the on("mousemove", handler) method.
Event source
An event source is the element that triggered an event. Inside the event handler,
we can refer to the event source with the $(this) syntax.
<!DOCTYPE html>
<html>
    <head>
        <title>jQuery event source example</title>

        <script src="https://code.jquery.com/jquery-3.1.1.min.js"></script>

        <style>
            .mybtn { }
        </style>

    </head>

    <body>

        <button class="mybtn">Button 1</button>
        <button class="mybtn">Button 2</button>
        <button class="mybtn">Button 3</button>
        <br>
        <br>

        <div class="messages"></div>

        <script>
            $(function() {

                $(".mybtn").on('click', function() {

                    var btn_lbl = $(this).text();

                    $(".messages").text(btn_lbl + " clicked");
                });
            });
        </script>
    </body>
</html>
In the example, we have three buttons. Each of the buttons is has the same event handler. When we click on a button, a message is shown; it tells which button was clicked.
<button class="mybtn">Button 1</button>
<button class="mybtn">Button 2</button>
<button class="mybtn">Button 3</button>
These three buttons have the same event handler.
<script>
    $(function() {

        $(".mybtn").on('click', function() {

            var btn_lbl = $(this).text();

            $(".messages").text(btn_lbl + " clicked");
        });
    });
</script>
A class selector $(".mybtn") chooses all the three buttons.
We attach a click event handler to the buttons. We refer to the event
source with the $(this) construct and determine its label
with the text method. The name of the button is used to
build a message, which is displayed in the <div> element
below.

In the figure, we can see which button was clicked in the message shown below the buttons.
Removing elements
The remove method removes the set of matched elements from the DOM.
<!DOCTYPE html>
<html>
    <head>
        <title>jQuery removing element</title>

        <script src="https://code.jquery.com/jquery-3.1.1.min.js"></script>

        <style>

            div { display: flex; align-items: center; justify-content: center;
                  width:150px; height:80px; margin:3px; border: 1px solid gray
            }

        </style>

    </head>

    <body>

        <button id="btnf">Remove first</button>
        <button id="btnl">Remove last</button>

        <div>Panel 1</div>
        <div>Panel 2</div>
        <div>Panel 3</div>
        <div>Panel 4</div>
        <div>Panel 5</div>
        <div>Panel 6</div>

        <script>
            $(function() {

                $('#btnf').click(function() {

                    $('div:first').remove();
                });

                $('#btnl').click(function() {

                    $('div:last').remove();
                });

            });
        </script>
    </body>
</html>
In the example, we have two buttons and six panels. The first button removes the first panel and the second button the last panel.
$('#btnf').click(function() {

    $('div:first').remove();
});
The div:first selector selects the first <div>
element and the remove method removes it from the DOM.
jQuery is() method
The is method checks the current matched set of elements against a selector,
element, or jQuery object and returns true if at least one of these elements
matches the given arguments.
<!DOCTYPE html>
<html>
    <head>
        <title>First jQuery example</title>

        <script src="https://code.jquery.com/jquery-3.1.1.min.js"></script>

        <style>
            div { display: flex; align-items: center; text-align: center; width:150px;
                    height:100px; margin:3px; border: 1px solid gray }
        </style>

    </head>

    <body>

        <div id="pnl1">Panel 1</div>

        <div id="pnl2">Panel 2</div>

        <div id="pnl3">Panel 3</div>

        <div id="pnl4">Panel 4</div>

        <script>
            $(function() { $("div").on('click', function() {

                    if ($(this).is('#pnl3')) {
                        console.log("Cannot hide panel 3");
                    } else {
                        $(this).hide(2000);
                    }
                });
            });
        </script>

    </body>
</html>
In the example, we have four panels. Clicking on the panel the panel starts to vanish. The third panel does not vanish.
<script>
    $(function() { $("div").on('click', function() {

            if ($(this).is('#pnl3')) {
                console.log("Cannot hide panel 3");
            } else {
                $(this).hide(2000);
            }
        });
    });
</script>
The $(this) syntax refers to the event source, that is, the panel
on which we have clicked.
With the is method we check if the element is Panel 3;
in case it is Panel 3, we print a message to the console and do
not hide it. Other panels are hidden with the hide method.
Effects
In this section, we are going to show some basic jQuery effects.
jQuery sliding effect
The slideUp method displays the matched elements with a sliding
motion upward and the slideDown method with a sliding down
motion. The first parameter of the methods is duration; it is a string
or a number determining how long the animation will run. The string can
be either 'slow' or 'fast'; the default value is 400 ms.
<!DOCTYPE html>
<html>
    <head>
        <title>jQuery sliding example</title>

        <script src="https://code.jquery.com/jquery-3.1.1.min.js"></script>

        <style>
            .mypanel { width:150px; margin-top:10px;
                height:100px; background-color:maroon }
        </style>

    </head>

    <body>

        <button id="btnSlideUp">Slide up</button>
        <button id="btnSlideDown">Slide down</button>

        <div class="mypanel"></div>

        <script>
            $(function() {

                $('#btnSlideUp').click(function() {

                    $('.mypanel').slideUp('show');
                });

                $('#btnSlideDown').click(function() {

                    $('.mypanel').slideDown('show');
                });
            });
        </script>
    </body>
</html>
In the example we have two button. One button will slide up a panel and the other one will slide down the panel.
$('#btnSlideUp').click(function() {

    $('.mypanel').slideUp('show');
});
The slideUp method animates the chosen element
in a sliding up motion; the element disappears from the window..
$('#btnSlideDown').click(function() {

    $('.mypanel').slideDown('show');
});
The slideDown method animates the element
in a sliding down motion, the element appears on the window.
The animate() method
The animate method performs a custom animation on a set
of CSS properties. The first parameter of the method is called properties;
it is an object of CSS properties and values that the animation
will move toward. The second parameter is duration.
<!DOCTYPE html>
<html>
    <head>
        <title>jQuery animation example</title>

        <script src="https://code.jquery.com/jquery-3.1.1.min.js"></script>

        <style>
              .mypanel { position: relative; width:150px; margin-top:10px;
                  height:100px; background-color:maroon }
        </style>

    </head>

    <body>
        <button id="leftBtn">«</button>
        <button id="rightBtn">»</button>

        <div class="mypanel"></div>

        <script>
            $(function() {

                $("#rightBtn").click(function() {
                    $(".mypanel").animate({ "left": "+=250px" }, "slow" );
                });

                $( "#leftBtn" ).click(function(){
                    $(".mypanel").animate({ "left": "-=250px" }, "slow" );
                });
            });
        </script>
    </body>
</html>
In the example we have two buttons. The first button moves the panel to the left and the second moves it to the right.
$("#rightBtn").click(function() {
    $(".mypanel").animate({ "left": "+=250px" }, "slow" );
});
This moves the panel slowly to the left by 250 px.
$( "#leftBtn" ).click(function(){
    $(".mypanel").animate({ "left": "-=250px" }, "slow" );
});
This moves the panel slowly to the right by 250 px.
jQuery fading effects
The fadeIn method displays the matched elements
by fading them to opaque. The fadeOut method
hides the matched elements by fading them to transparent.
<!DOCTYPE html>
<html>
    <head>
        <title>jQuery fading example</title>

        <script src="https://code.jquery.com/jquery-3.1.1.min.js"></script>

        <style>
            .mypanel { width:150px; margin-top:10px;
                height:100px; background-color:maroon }
        </style>

    </head>

    <body>

        <button id="fadeOutBtn">Fade out</button>
        <button id="fadeInBtn">Fade in</button>

        <div class="mypanel"></div>

        <script>
            $(function() {

                $('#fadeOutBtn').click(function() {

                    $('.mypanel').fadeOut('slow');
                });

                $('#fadeInBtn').click(function() {

                    $('.mypanel').fadeIn('slow');
                });
            });
        </script>
    </body>
</html>
In the example we have two buttons. One button fades in a panel; the second button fades out the panel.
$('#fadeOutBtn').click(function() {

    $('.mypanel').fadeOut('slow');
});
This function fades out the matched element with the fadeOut
method.
$('#fadeInBtn').click(function() {

    $('.mypanel').fadeIn('slow');
});
This function fades in the matched element with the fadeIn
method.
jQuery $.get() method
The $.get method requests data from a server with an
HTTP GET request. The request is an asynchronous GET request.
In this section, we create a Java web application. Clicking on a button an AJAX GET request is sent to a Java servlet, which responds with a message.
<!DOCTYPE html>
<html>
    <head>
        <title>jQuery GET message</title>
        <meta charset="UTF-8">
        <meta name="viewport" content="width=device-width, initial-scale=1.0">
        <script src="https://code.jquery.com/jquery-3.1.1.min.js"></script>
    </head>
    <body>

        <button id="btn">Get message</button>
        <span id="log"></span>

        <script>
            $(function () {
                $("#btn").click(function () {

                    $.get("MyServlet", function (data) {
                        $("#log").text(data);
                    });
                });
            });
        </script>
    </body>
</html>
We have a button which sends an asynchronous GET request upon being clicked.
$(function () {
    $("#btn").click(function () {

        $.get("MyServlet", function (data) {
            $("#log").text(data);
        });
    });
});
The first parameter of the $.get method is a URL string to
which the request is sent. The second parameter is a callback function which
is executed if the request succeeds. Inside the callback function, we set
the returned data to the logging element.
package com.zetcode.web;

import java.io.IOException;
import java.io.PrintWriter;
import java.util.Date;
import javax.servlet.ServletException;
import javax.servlet.annotation.WebServlet;
import javax.servlet.http.HttpServlet;
import javax.servlet.http.HttpServletRequest;
import javax.servlet.http.HttpServletResponse;

@WebServlet(name = "MyServlet", urlPatterns = {"/MyServlet"})
public class MyServlet extends HttpServlet {

    @Override
    protected void doGet(HttpServletRequest request, HttpServletResponse response)
            throws ServletException, IOException {

        response.setContentType("text/plain;charset=UTF-8");

        try (PrintWriter out = response.getWriter()) {

            Date date = new Date();
            out.printf("Message from MyServlet: %s", date);
        }
    }
}
This is a Java servlet that responds with a message. The message contains the current date.
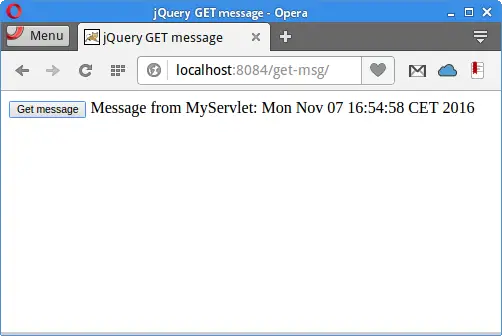
Clicking on a button a message is shown in the logging element next to the button.
jQuery when() method
The jQuery when method executes callback functions having
asynchronous events.
<!DOCTYPE html>
<html>
    <head>
        <title>jQuery showing/hiding elements</title>
        <meta charset="utf-8">
        <script src="https://code.jquery.com/jquery-3.1.1.min.js"></script>

        <style>
            div { display:flex; align-items:center; text-align:center; width:150px;
                    height:100px; margin:3px; border: 1px solid gray }
        </style>

    </head>

    <body>

        <button id="btn1">Hide all</button>

        <div id="pnl1">Panel 1</div>
        <div id="pnl2">Panel 2</div>
        <div id="pnl3">Panel 3</div>
        <div id="pnl4">Panel 4</div>

        <script>
            $(function() { $("#btn1").click(function() {

                    var task = $("div").toggle(3000);

                    $.when(task).done(function() {
                        if ($("#btn1").text().match("^Hide")) {
                            $("#btn1").text("Show all");
                        } else {
                            $("#btn1").text("Hide all");
                        }
                    });
                });
            });
        </script>
    </body>
</html>
In the example, we have a button to hide/show all four panels. The process of hiding/showing elements takes up some time. When the task is over, the label of the button changes accordingly: from Hide all to Show all and vice versa.
var task = $("div").toggle(3000);
A new task is created; it will take 3 s to complete.
The toggle method displays or hides the matched elements.
$.when(task).done(function() {
The function is called when the tasked has finished.
if ($("#btn1").text().match("^Hide")) {
    $("#btn1").text("Show all");
} else {
    $("#btn1").text("Hide all");
}
Now, using a regular expression, we change the label of the button.
In this tutorial, we have worked with the jQuery library.
You might also be interested in the following related tutorials: jQuery Autocomplete tutorial, Cheerio tutorial, Using jQuery DatePicker, and Pyquery tutorial.