JavaFX animation
last modified October 18, 2023
In this chapter, we work with animation in JavaFX. We create animations using
AnimationTimer, Transition, and Timeline.
Animation is a rapid succession of images which make an illusion of movement. Animation is not restricted to movement, however. Changing the background of a node over time is considered an animation too.
JavaFX provides three basic tools to create animation:
- AnimationTimer
- Transition
- Timeline
AnimationTimer is the most simple tool to create animation.
It is a basic timer; its handle method is called in every
frame of the animation. Transition is a basic high-level
framework to define animation. The animation is controlled with the
frac value of the interpolate method.
Timeline is the most complex tool for doing high-level animations.
Timeline animation is defined with KeyFrames, which
outline target values of a node at a specified point in time for a set of
variables that are interpolated along a Timeline. The animated
properties are defined with
KeyValues.
Animation class
Animation is the basic class in JavaFX to define high-level
animation. Both
Transition and Timeline extend Animation.
An animation is started with play or playFromStart
methods and ended with the stop method. An animation can be
paused by calling the pause method, and the next
play call resumes the animation from where it was paused. The
rate property defines the direction and speed at which the
animation is expected to be played. The delay property specifies
the amount of initial delay of the animation. An animation can run in cycles;
the number of cycles is defined in the cycleCount property, and the
cycleDuration
indicates the duration of a cycle. An animation can be reversed on alternating
cycles with the
autoReverseProperty.
JavaFX AnimationTimer
AnimationTimer allows to create a timer that is called in each
frame while it is active. It is an abstract class; therefore, we need to create
a custom class which extends it. Its handle method, which is
called in every frame, must be overridden. The AnimationTimer's
start method starts the timer and the stop
method stops it.
package com.zetcode;

import javafx.animation.AnimationTimer;
import javafx.application.Application;
import javafx.scene.Scene;
import javafx.scene.control.Label;
import javafx.scene.layout.StackPane;
import javafx.scene.text.Font;
import javafx.stage.Stage;

public class AnimationTimerEx extends Application {

    private double opacity = 1;
    private Label lbl;

    @Override
    public void start(Stage stage) {

        initUI(stage);
    }

    private void initUI(Stage stage) {

        var root = new StackPane();

        lbl = new Label("JavaFX");
        lbl.setFont(Font.font(48));
        root.getChildren().add(lbl);

        AnimationTimer timer = new MyTimer();
        timer.start();

        var scene = new Scene(root, 300, 250);

        stage.setTitle("AnimationTimer");
        stage.setScene(scene);
        stage.show();
    }

    private class MyTimer extends AnimationTimer {

        @Override
        public void handle(long now) {

            doHandle();
        }

        private void doHandle() {

            opacity -= 0.01;
            lbl.opacityProperty().set(opacity);

            if (opacity <= 0) {

                stop();
                System.out.println("Animation stopped");
            }
        }
    }

    public static void main(String[] args) {
        launch(args);
    }
}
The example uses the AnimationTimer to create a fade out effect on
a node.
lbl = new Label("JavaFX");
lbl.setFont(Font.font(48));
root.getChildren().add(lbl);
Our animation changes the property of this Label control.
AnimationTimer timer = new MyTimer();
timer.start();
An AnimationTimer is created and its start
method is called.
private class MyTimer extends AnimationTimer {

    @Override
    public void handle(long now) {

        doHandle();
    }
...
}
We create a concrete subclass of the AnimationTimer and
override its handle method.
private void doHandle() {

    opacity -= 0.01;
    lbl.opacityProperty().set(opacity);

    if (opacity <= 0) {

        stop();
        System.out.println("Animation stopped");
    }
}
In the doHandle method, we decrease the opacity
variable and update the opacityProperty. If the opacity
reaches its minimum value, the timer is stopped with its stop method.
JavaFX FadeTransition
Transition animation is best suited for a planned animation.
Transition has concrete classes that can be used to create various
animations that can be executed in parallel or sequentially; for instance
FadeTransition, PathTransition, RotateTransition, or
ScaleTransition.
FadeTransition creates a fade effect animation that spans its
duration. This is done by updating the opacity variable of the node
at regular interval.
package com.zetcode;

import javafx.animation.Animation;
import javafx.animation.FadeTransition;
import javafx.application.Application;
import javafx.event.EventHandler;
import javafx.scene.Group;
import javafx.scene.Scene;
import javafx.scene.input.MouseEvent;
import javafx.scene.shape.Rectangle;
import javafx.stage.Stage;
import javafx.util.Duration;

public class FadeTransitionEx extends Application {

    private FadeTransition ft;
    private Rectangle rect;

    @Override
    public void start(Stage stage) {

        initUI(stage);
    }

    private void initUI(Stage stage) {

        var root = new Group();

        rect = new Rectangle(20, 20, 150, 150);
        rect.setOnMouseClicked(new RectClickHandler());

        ft = new FadeTransition(Duration.millis(5000), rect);
        ft.setFromValue(1.0);
        ft.setToValue(0.0);

        root.getChildren().add(rect);

        var scene = new Scene(root, 300, 250);

        stage.setTitle("Fading transition");
        stage.setScene(scene);
        stage.show();
    }

    private class RectClickHandler implements EventHandler<MouseEvent> {

        @Override
        public void handle(MouseEvent event) {

            doHandle();
        }

        private void doHandle() {

            double opa = rect.getOpacity();

            if ((int) opa == 0) {
                return;
            }

            Animation.Status as = ft.getStatus();

            if (as == Animation.Status.RUNNING) {
                return;
            }

            if (as == Animation.Status.STOPPED) {
                ft.play();
            }
        }
    }

    public static void main(String[] args) {
        Application.launch(args);
    }
}
This example uses FadeTransition to create a fade out
effect on a rectangle. The animation is started after a mouse click inside
the area of the rectangle.
rect = new Rectangle(20, 20, 150, 150);
rect.setOnMouseClicked(new RectClickHandler());
A mouse clicked handler is set to the rectangle.
ft = new FadeTransition(Duration.millis(5000), rect);
A FadeTransition is created. Its first parameter is the duration
of the transition. The second parameter is the node whose opacity
parameter is updated.
ft.setFromValue(1.0);
ft.setToValue(0.0);
The setFromValue sets the start value of the opacity, and
the setToValue sets the ending opacity value.
double opa = rect.getOpacity();
The current opacity value is determined with the getOpacity
method.
if (opa.intValue() == 0) {
    return;
}
After the rectangle fades out, we dismiss the mouse click.
Animation.Status as = ft.getStatus();

if (as == Animation.Status.RUNNING) {
    return;
}

if (as == Animation.Status.STOPPED) {
    ft.play();
}
The getStatus method determines the transition's status.
If the status is Animation.Status.STOPPED, we start
the transition with the play method.
PathTransition
PathTransition creates an animation along a path. The
translation along the path is done by updating the translateX
and translateY variables of the node. Note that we must use a
node that supports absolute positioning of elements.
package com.zetcode;

import javafx.animation.PathTransition;
import javafx.application.Application;
import javafx.scene.Scene;
import javafx.scene.layout.Pane;
import javafx.scene.paint.Color;
import javafx.scene.shape.Circle;
import javafx.scene.shape.CubicCurveTo;
import javafx.scene.shape.MoveTo;
import javafx.scene.shape.Path;
import javafx.stage.Stage;
import javafx.util.Duration;

public class PathTransitionEx extends Application {

    @Override
    public void start(Stage stage) {

        initUI(stage);
    }

    private void initUI(Stage stage) {

        var root = new Pane();

        var path = new Path();
        path.getElements().add(new MoveTo(20, 120));
        path.getElements().add(new CubicCurveTo(180, 60, 250, 340, 420, 240));

        var circle = new Circle(20, 120, 10);
        circle.setFill(Color.CADETBLUE);

        var ptr = new PathTransition();

        ptr.setDuration(Duration.seconds(6));
        ptr.setDelay(Duration.seconds(2));
        ptr.setPath(path);
        ptr.setNode(circle);
        ptr.setCycleCount(2);
        ptr.setAutoReverse(true);
        ptr.play();

        root.getChildren().addAll(path, circle);

        var scene = new Scene(root, 450, 300);

        stage.setTitle("PathTransition");
        stage.setScene(scene);
        stage.show();
    }

    public static void main(String[] args) {
        launch(args);
    }
}
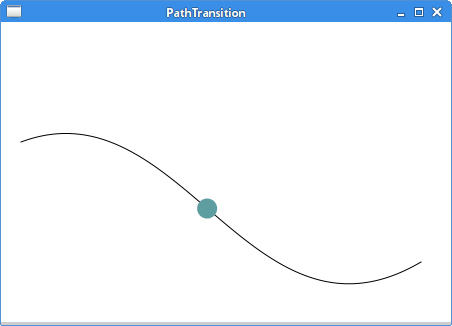
The example uses a PathTransition to move a circle along a
path. The animation starts after an initial delay of 2 seconds. It consists
of two cycles. The animation is reveresed; that is, the circle goes from
the starting point to the ending point and then it returns back.
var root = new Pane();
We use the Pane as our root node. It supports absolute positioning
that is needed for animation.
var path = new Path();
path.getElements().add(new MoveTo(20, 120));
path.getElements().add(new CubicCurveTo(180, 60, 250, 340, 420, 240));
Here we define the Path along which the animated object will be
moving.
var circle = new Circle(20, 120, 10);
circle.setFill(Color.CADETBLUE);
This circle is the moving object in our animation.
var ptr = new PathTransition();
A PathTransition object is created.
ptr.setDuration(Duration.seconds(6));
The setDuration method sets the duration of
the animation.
ptr.setDelay(Duration.seconds(2));
The setDelay method sets the initial delay of
the animation.
ptr.setPath(path);
ptr.setNode(circle);
The setPath method sets the path, and the setNode
sets the target node of the animation.
ptr.setCycleCount(2);
Our animation has two cycles. The number of cycles is set with the
setCycleCount method.
ptr.setAutoReverse(true);
With the setAutoReverse method, we reverse the direction of
the animation. The circle moves back to the starting position.
ptr.play();
Finally, the play method starts the plays the animation.
ParallelTransition
ParallelTransition plays a list of Animations
in parallel.
package com.zetcode;

import javafx.animation.FillTransition;
import javafx.animation.ParallelTransition;
import javafx.animation.RotateTransition;
import javafx.animation.ScaleTransition;
import javafx.application.Application;
import javafx.scene.Scene;
import javafx.scene.layout.Pane;
import javafx.scene.paint.Color;
import javafx.scene.shape.Rectangle;
import javafx.stage.Stage;
import javafx.util.Duration;


public class ParallelTransitionEx extends Application {

    @Override
    public void start(Stage stage) {

        initUI(stage);
    }

    private void initUI(Stage stage) {

        var root = new Pane();

        var rect = new Rectangle(50, 50, 30, 30);
        rect.setArcHeight(10);
        rect.setArcWidth(10);
        rect.setFill(Color.CADETBLUE);

        var rottr = new RotateTransition(Duration.millis(2000), rect);
        rottr.setByAngle(180);
        rottr.setCycleCount(2);
        rottr.setAutoReverse(true);

        var sctr = new ScaleTransition(Duration.millis(2000), rect);
        sctr.setByX(2);
        sctr.setByY(2);
        sctr.setCycleCount(2);
        sctr.setAutoReverse(true);

        var fltr = new FillTransition(Duration.millis(2000), rect,
                Color.CADETBLUE, Color.STEELBLUE);
        fltr.setCycleCount(2);
        fltr.setAutoReverse(true);

        root.getChildren().add(rect);

        var ptr = new ParallelTransition();
        ptr.getChildren().addAll(rottr, sctr, fltr);

        ptr.play();

        Scene scene = new Scene(root, 300, 250);

        stage.setTitle("ParallelTransition");
        stage.setScene(scene);
        stage.show();
    }

    public static void main(String[] args) {
        launch(args);
    }
}
The example plays three transitions in parallel. There is a rectangle object that is rotated, scaled, and its background colour changes.
var rottr = new RotateTransition(Duration.millis(2000), rect);
rottr.setByAngle(180);
rottr.setCycleCount(2);
rottr.setAutoReverse(true);
The RotateTransition rotates the rectangle by the specified angle.
The rotation happens in two cycles and is reversed.
var sctr = new ScaleTransition(Duration.millis(2000), rect);
sctr.setByX(2);
sctr.setByY(2);
The ScaleTransition scales the rectangle up and down by the
factor of 2.
var fltr = new FillTransition(Duration.millis(2000), rect,
    Color.CADETBLUE, Color.STEELBLUE);
The FillTransition changes the filling colour of
the rectangle from one colour value to another.
var ptr = new ParallelTransition();
ptr.getChildren().addAll(rottr, sctr, fltr);

ptr.play();
The three types of transitions are placed in the ParallelTransition,
which plays them in parallel, that is, at the same time.
SequentialTransition
SequentialTransition plays a list of Animations
in a sequential order.
package com.zetcode;

import javafx.animation.FillTransition;
import javafx.animation.RotateTransition;
import javafx.animation.ScaleTransition;
import javafx.animation.SequentialTransition;
import javafx.application.Application;
import javafx.scene.Scene;
import javafx.scene.layout.Pane;
import javafx.scene.paint.Color;
import javafx.scene.shape.Rectangle;
import javafx.stage.Stage;
import javafx.util.Duration;


public class SequentialTransitionEx extends Application {

    @Override
    public void start(Stage stage) {

        initUI(stage);
    }

    private void initUI(Stage stage) {

        var root = new Pane();

        var rect = new Rectangle(50, 50, 30, 30);
        rect.setArcHeight(10);
        rect.setArcWidth(10);
        rect.setFill(Color.CADETBLUE);

        var rottr = new RotateTransition(Duration.millis(2000), rect);
        rottr.setByAngle(180);
        rottr.setCycleCount(2);
        rottr.setAutoReverse(true);

        var sctr = new ScaleTransition(Duration.millis(2000), rect);
        sctr.setByX(2);
        sctr.setByY(2);
        sctr.setCycleCount(2);
        sctr.setAutoReverse(true);

        var fltr = new FillTransition(Duration.millis(2000), rect,
                Color.CADETBLUE, Color.STEELBLUE);
        fltr.setCycleCount(2);
        fltr.setAutoReverse(true);

        root.getChildren().add(rect);

        var str = new SequentialTransition();
        str.getChildren().addAll(rottr, sctr, fltr);

        str.play();

        var scene = new Scene(root, 300, 250);

        stage.setTitle("SequentialTransition");
        stage.setScene(scene);
        stage.show();
    }

    public static void main(String[] args) {
        launch(args);
    }
}
The example plays three transitions in a sequential order—one after another.
var str = new SequentialTransition();
str.getChildren().addAll(rottr, sctr, fltr);

str.play();
The three transitions are added to the SequentialTransition.
Timeline
Timeline is the most involved tool to create animation in JavaFX.
The animation is defined with KeyFrames which contain
the properties of nodes that change. These properties are encapsulated in
KeyValues. The Timeline interpolates the
changes of the properties.
package com.zetcode;

import javafx.animation.KeyFrame;
import javafx.animation.KeyValue;
import javafx.animation.Timeline;
import javafx.application.Application;
import javafx.scene.Scene;
import javafx.scene.effect.Lighting;
import javafx.scene.layout.Pane;
import javafx.scene.paint.Color;
import javafx.scene.shape.Rectangle;
import javafx.stage.Stage;
import javafx.util.Duration;


public class TimelineEx extends Application {

    @Override
    public void start(Stage stage) {

        initUI(stage);
    }

    private void initUI(Stage stage) {

        var root = new Pane();

        var rect = new Rectangle(20, 20, 60, 60);
        rect.setEffect(new Lighting());
        rect.setFill(Color.CADETBLUE);

        var tl = new Timeline();

        tl.setCycleCount(2);
        tl.setAutoReverse(true);

        var kv = new KeyValue(rect.translateXProperty(), 200);
        var kf = new KeyFrame(Duration.millis(2000), kv);
        tl.getKeyFrames().addAll(kf);

        tl.play();

        root.getChildren().addAll(rect);

        var scene = new Scene(root, 350, 250);

        stage.setTitle("Timeline");
        stage.setScene(scene);
        stage.show();
    }

    public static void main(String[] args) {
        launch(args);
    }
}
The example animates a rectangle with a Timeline.
var rect = new Rectangle(20, 20, 60, 60);
rect.setEffect(new Lighting());
rect.setFill(Color.CADETBLUE);
This rectangle is the moving object in the animation.
var tl = new Timeline();
A Timeline object is created.
tl.setCycleCount(2);
tl.setAutoReverse(true);
The animation consists of two cycles and is reversed. The rectangle moves forth and back.
var kv = new KeyValue(rect.translateXProperty(), 200);
The KeyValue contains the translateX property that
changes over time to 200.
var kf = new KeyFrame(Duration.millis(2000), kv);
A KeyFrame is instantiated. The first parameter is its
duration, the second is the KeyValue. The animation lasts
2 seconds, during which its translateX property changes to 200.
tl.getKeyFrames().addAll(kf);
The key frame is added to the list of frames.
Sequential Timeline animation
We do not define all the key frames in a timeline. We define some frames and the
remaining ones are interpolated. Key frames provide target values at a specified
point in time for a set of variables interpolated in a timeline.
In order to execute key frames sequentially, we utilize the
SequentialTransition class.
package com.zetcode;

import javafx.animation.KeyFrame;
import javafx.animation.KeyValue;
import javafx.animation.SequentialTransition;
import javafx.animation.Timeline;
import javafx.application.Application;
import javafx.scene.Scene;
import javafx.scene.layout.Pane;
import javafx.scene.paint.Color;
import javafx.scene.shape.Circle;
import javafx.stage.Stage;
import javafx.util.Duration;

public class SequentialTimelineEx extends Application {

    @Override
    public void start(Stage stage) {

        initUI(stage);
    }

    private void initUI(Stage stage) {

        var root = new Pane();

        var c = new Circle(50, 100, 10);
        c.setFill(Color.CADETBLUE);

        var kv1 = new KeyValue(c.scaleXProperty(), 4);
        var kv2 = new KeyValue(c.scaleYProperty(), 4);
        var kf1 = new KeyFrame(Duration.millis(3000), kv1, kv2);

        var scale = new Timeline();
        scale.getKeyFrames().add(kf1);

        var kv3 = new KeyValue(c.centerXProperty(), 250);
        var kf2 = new KeyFrame(Duration.millis(5000), kv3);

        var move = new Timeline();
        move.getKeyFrames().add(kf2);

        var kv4 = new KeyValue(c.scaleXProperty(), 1);
        var kv5 = new KeyValue(c.scaleYProperty(), 1);
        var kf3 = new KeyFrame(Duration.millis(3000), kv4, kv5);

        var scale2 = new Timeline();
        scale2.getKeyFrames().add(kf3);

        var seqtr = new SequentialTransition(scale, move, scale2);
        seqtr.play();

        root.getChildren().add(c);

        var scene = new Scene(root, 300, 250);

        stage.setTitle("Sequential Timeline animation");
        stage.setScene(scene);
        stage.show();
    }

    public static void main(String[] args) {
        launch(args);
    }
}
The example creates a sequential timeline animation. The animation
consists of three Timelines that are executed sequentially
with a SequentialTransition.
var c = new Circle(50, 100, 10);
c.setFill(Color.CADETBLUE);
The moving object in this animation is a Circle.
var kv1 = new KeyValue(c.scaleXProperty(), 4);
var kv2 = new KeyValue(c.scaleYProperty(), 4);
var kf1 = new KeyFrame(Duration.millis(3000), kv1, kv2);

var scale = new Timeline();
scale.getKeyFrames().add(kf1);
This is the first Timeline. It scales up the circle over the
time of three seconds.
var kv3 = new KeyValue(c.centerXProperty(), 250);
var kf2 = new KeyFrame(Duration.millis(5000), kv3);

var move = new Timeline();
move.getKeyFrames().add(kf2);
The second Timeline moves the circle forward. This part
of the animation lasts five seconds.
var kv4 = new KeyValue(c.scaleXProperty(), 1);
var kv5 = new KeyValue(c.scaleYProperty(), 1);
var kf3 = new KeyFrame(Duration.millis(3000), kv4, kv5);

var scale2 = new Timeline();
scale2.getKeyFrames().add(kf3);
The third Timeline scales down the circle.
var seqtr = new SequentialTransition(scale, move, scale2);
seqtr.play();
The three timelines are placed in a SequentialTransition.
The timelines are played sequentially, one after another.
In this chapter, we have covered JavaFX animations.