Introduction to Android development
last modified December 4, 2012
This is an introductory Android development tutorial. The purpose of this tutorial is to get you started with the development of applications in Android. The tutorial has been created and tested on Linux.
Android
Android is a Linux based operating system designed for mobile devices such as smartphones and tablet computers. It is also used for various networking equipment, smart TV systems, wrist watches and household appliances. Applications for Android are developed in a customised version of the Java programming language.
Android was developed in 2003 by a Californian company which was later purchased by Google. Google created the Android Open Source Project for maintaining and developing of the Android OS. Android is being developed quickly; new versions of Android are frequently being released. The Android code names are being choosed after some sweets, like Donut, Gingerbread, or Jelly Bean. Developers can publish their applications in an online Android market called Google Play. Before an application is published on a Google Play market, it must be prepared for release, properly versioned and digitally signed. Android users use a built-in application to search for applications on Android market and install them.
Android architecture
Android is based on a Linux kernel. The kernel is responsible for the device drivers, memory management, process management and networking. Above the kernel, there are core libraries and Android runtime. The libraries are C/C++ libraries that provide services such as data storage, screen display, multimedia and web browsing. These capabilities are exposed indirectly to developers through the Android application framework. The Android runtime consists of the Dalvik virtual machine and the core Java application libraries. Dalvik is a virtual machine specifically developed to run Java based applications on Android. It is different from the standard Java Virtual Machine (JVM). The next layer up is the application framework. It is a set of APIs to provide services to Android applications. It handles application life cycle through Activity Manager, notifications through Notification manager, resources through Resource Manager, a set of graphical widgets (called Views in Android), package management trough Package Manager and others. On top of it sits the applications layer. It is where our own applications are running. Android also has built-in applications which can provide additional services to our applications. We can have access to browser, SMS, calendars, maps or contacts.
Terms and concepts
Android application is an archive file with an .apk
suffix. Each Android application lives on its own in a security
sandbox. An activity is a single screen with a user interface.
An application can have one or more activities. Activities are
independent of each other. Activities are subclasses of the Activity
class. A service is an application component that runs in the
background. It does long running operations. It is a subclass of a
Service class. A content provider manages a shared set
of application data. It is used to access & modify data in the filesystem,
SQLite database or the web. It is a subclass of the ContentProvider
class. A broadcast receiver is a component that receives broadcast
notifications from the system or applications. A broadcast receiver is implemented
as a subclass of a BroadcastReceiver. Each broadcast is delivered as an
Intent object. An intent is an asynchronous message. It is an abstract description
of an operation to be performed. Intents are used to navigate through activities.
Activities, services and broadcast receivers are activated through intents.
A View class is a basic building block of a user interface. It is responsible
for drawing and event handling. A View is a base class for widgets, which are used
to create UI components like buttons or check boxes. A ViewGroup is an object
that holds other View (and ViewGroup) objects in order to
define the layout of the interface.
Each Android application must have an AndroidManifest.xml file
in the root directory. This file presents essential information about
the application to the Android system. The API level is an integer
value that uniquely identifies the framework API of the version of the
Android platform. Each new Android platform brings new modifications to
the Android application framework. An Emulator is a virtual mobile
device that runs on a computer. It is used to develop and test Android
applications without using a physical device. An Android Virtual Device (AVD)
is an emulator configuration that models an actual physical device such as
smartphone. We can create multiple AVDs and test our applications on different
hardware platforms that use Android OS.
Installation
To start developing for Android, we need to download the Android SDK (Software Development Toolkit). There are two options. An Eclipse ADT bundle or single SDK tools. We will go with the latter.
$ ls -sh android-sdk_r21-linux.tgz
88M android-sdk_r21-linux.tgz
Currently the file to download for Linux is android-sdk_r21-linux.tgz.
$ tar -xzvf android-sdk_r21-linux.tgz
We uncompress the zipped archive. The archive is extracted to the
android-sdk-linux directory.
$ pwd
/home/janbodnar/bin/android-sdk-linux
$ ls
add-ons  platforms  SDK Readme.txt  tools
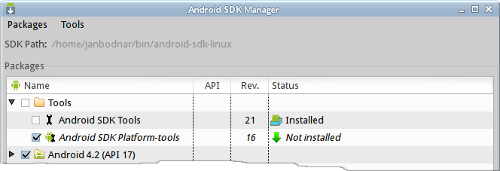
The Android SDK archive initially contains only the basic SDK tools.
We need to download additional tools with the SDK manager.
The Android SDK manager is launched with the android
command line tool.
$ ls
add-ons  platforms       samples         sources        temp
docs     platform-tools  SDK Readme.txt  system-images  tools
These are the contents of the android-sdk-linux directory after
installing additional tools.
export PATH=$PATH:~/bin/android-sdk-linux/tools
export PATH=$PATH:~/bin/android-sdk-linux/platform-tools
We add the tools and platform-tools directories to the PATH
variable.
Android AVD
The Android AVD (Android Virtual Device) is a is an emulator configuration that enables us to model an actual device by defining hardware and software options to be emulated by the Android Emulator.
$ android avd
The command starts the Android Virtual Device Manager.
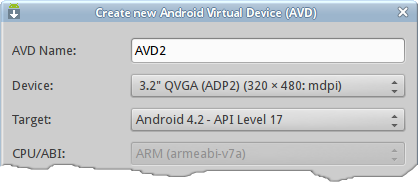
Clicking on the New button we start a dialog to create a new Android Virtual Device. In the dialog we give the AVD a name, select a hardware profile of the device, choose the API level of the target or a dedicated storage area on our development machine.
$ android list avd
Available Android Virtual Devices:
    Name: AVD3
    Path: /home/janbodnar/.android/avd/AVD3.avd
  Target: Android 4.2 (API level 17)
     ABI: armeabi-v7a
    Skin: 320x480
---------
    Name: AVD4
    Path: /home/janbodnar/.android/avd/AVD4.avd
  Target: Android 4.2 (API level 17)
     ABI: armeabi-v7a
    Skin: 240x320
The android list avd command shows all available Android Virtual Devices.
Android Emulator
The Android emulator is a virtual mobile device that runs on our computer. It lets us develop and test Android applications without using a physical device.
$ emulator -avd AVD1 &
We use the emulator command to start the emulator. We specify the name of the created Android Virtual Device.
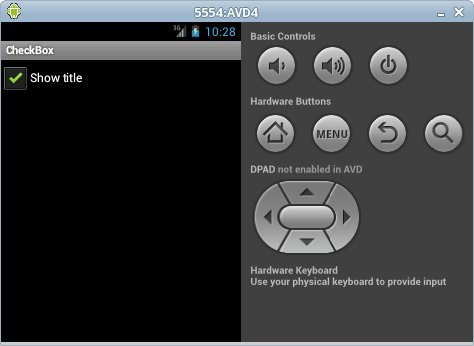
The emulator is unlocked using the F2 key. To list available applications, we click on the circle icon. An application is uninstalled by clicking on the menu hardware button and selecting Manage apps option. Then we click on the icon of the application to uninstall and click the Uninstall button.
This chapter was an introduction Android application development.