PyQt5 widgets II
last modified October 18, 2023
In this chapter we continue introducing PyQt5 widgets. We cover QPixmap,
QLineEdit, QSplitter, and QComboBox.
PyQt5 QPixmap
A QPixmap is one of the widgets used to work with images. It is
optimized for showing images on screen. In our code example, we use the
QPixmap to display an image on the window.
#!/usr/bin/python

"""
ZetCode PyQt5 tutorial

In this example, we display an image
on the window.

Author: Jan Bodnar
Website: zetcode.com
"""

from PyQt5.QtWidgets import (QWidget, QHBoxLayout,
                             QLabel, QApplication)
from PyQt5.QtGui import QPixmap
import sys


class Example(QWidget):

    def __init__(self):
        super().__init__()

        self.initUI()

    def initUI(self):
        hbox = QHBoxLayout(self)
        pixmap = QPixmap('sid.jpg')

        lbl = QLabel(self)
        lbl.setPixmap(pixmap)

        hbox.addWidget(lbl)
        self.setLayout(hbox)

        self.move(300, 200)
        self.setWindowTitle('Sid')
        self.show()


def main():
    app = QApplication(sys.argv)
    ex = Example()
    sys.exit(app.exec_())


if __name__ == '__main__':
    main()
In our example, we display an image on the window.
pixmap = QPixmap('sid.jpg')
We create a QPixmap object. It takes the name of the file
as a parameter.
lbl = QLabel(self)
lbl.setPixmap(pixmap)
We put the pixmap into the QLabel widget.
PyQt5 QLineEdit
QLineEdit is a widget that allows to enter and
edit a single line of plain text. There are undo and redo, cut and paste,
and drag & drop functions available for the widget.
#!/usr/bin/python

"""
ZetCode PyQt5 tutorial

This example shows text which
is entered in a QLineEdit
in a QLabel widget.

Author: Jan Bodnar
Website: zetcode.com
"""

import sys
from PyQt5.QtWidgets import (QWidget, QLabel,
                             QLineEdit, QApplication)


class Example(QWidget):

    def __init__(self):
        super().__init__()

        self.initUI()

    def initUI(self):
        self.lbl = QLabel(self)
        qle = QLineEdit(self)

        qle.move(60, 100)
        self.lbl.move(60, 40)

        qle.textChanged[str].connect(self.onChanged)

        self.setGeometry(300, 300, 350, 250)
        self.setWindowTitle('QLineEdit')
        self.show()

    def onChanged(self, text):
        self.lbl.setText(text)
        self.lbl.adjustSize()


def main():
    app = QApplication(sys.argv)
    ex = Example()
    sys.exit(app.exec_())


if __name__ == '__main__':
    main()
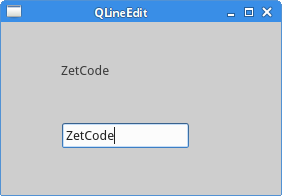
This example shows a line edit widget and a label. The text that we key in the line edit is displayed immediately in the label widget.
qle = QLineEdit(self)
The QLineEdit widget is created.
qle.textChanged[str].connect(self.onChanged)
If the text in the line edit widget changes, we call the onChanged
method.
def onChanged(self, text):

    self.lbl.setText(text)
    self.lbl.adjustSize()
Inside the onChanged method, we set the typed text to the label
widget. We call the adjustSize method to adjust the size of the
label to the length of the text.

PyQt5 QSplitter
QSplitter lets the user control the size of child widgets
by dragging the boundary between its children. In our example, we show three
QFrame widgets organized with two splitters.
#!/usr/bin/python

"""
ZetCode PyQt5 tutorial

This example shows
how to use QSplitter widget.

Author: Jan Bodnar
Website: zetcode.com
"""

import sys

from PyQt5.QtCore import Qt
from PyQt5.QtWidgets import (QWidget, QHBoxLayout, QFrame,
                             QSplitter, QApplication)


class Example(QWidget):

    def __init__(self):
        super().__init__()

        self.initUI()

    def initUI(self):

        hbox = QHBoxLayout(self)

        topleft = QFrame(self)
        topleft.setFrameShape(QFrame.StyledPanel)

        topright = QFrame(self)
        topright.setFrameShape(QFrame.StyledPanel)

        bottom = QFrame(self)
        bottom.setFrameShape(QFrame.StyledPanel)

        splitter1 = QSplitter(Qt.Horizontal)
        splitter1.addWidget(topleft)
        splitter1.addWidget(topright)

        splitter2 = QSplitter(Qt.Vertical)
        splitter2.addWidget(splitter1)
        splitter2.addWidget(bottom)

        hbox.addWidget(splitter2)
        self.setLayout(hbox)

        self.setGeometry(300, 300, 450, 400)
        self.setWindowTitle('QSplitter')
        self.show()


def main():
    app = QApplication(sys.argv)
    ex = Example()
    sys.exit(app.exec_())


if __name__ == '__main__':
    main()
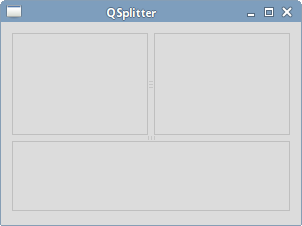
In our example, we have three frame widgets and two splitters. Note that under some themes, the splitters may not be visible very well.
topleft = QFrame(self)
topleft.setFrameShape(QFrame.StyledPanel)
We use a styled frame in order to see the boundaries between the
QFrame widgets.
splitter1 = QSplitter(Qt.Horizontal)
splitter1.addWidget(topleft)
splitter1.addWidget(topright)
We create a QSplitter widget and add two
frames into it.
splitter2 = QSplitter(Qt.Vertical)
splitter2.addWidget(splitter1)
We can also add a splitter to another splitter widget.

PyQt5 QComboBox
QComboBox is a widget that allows a user to choose from a list of
options.
#!/usr/bin/python

"""
ZetCode PyQt5 tutorial

This example shows how to use
a QComboBox widget.

Author: Jan Bodnar
Website: zetcode.com
"""

import sys

from PyQt5.QtWidgets import (QWidget, QLabel,
                             QComboBox, QApplication)


class Example(QWidget):

    def __init__(self):
        super().__init__()

        self.initUI()

    def initUI(self):

        self.lbl = QLabel('Ubuntu', self)

        combo = QComboBox(self)
        combo.addItem('Ubuntu')
        combo.addItem('Mandriva')
        combo.addItem('Fedora')
        combo.addItem('Arch')
        combo.addItem('Gentoo')

        combo.move(50, 50)
        self.lbl.move(50, 150)

        combo.activated[str].connect(self.onActivated)

        self.setGeometry(300, 300, 450, 400)
        self.setWindowTitle('QComboBox')
        self.show()

    def onActivated(self, text):
        self.lbl.setText(text)
        self.lbl.adjustSize()


def main():
    app = QApplication(sys.argv)
    ex = Example()
    sys.exit(app.exec_())


if __name__ == '__main__':
    main()
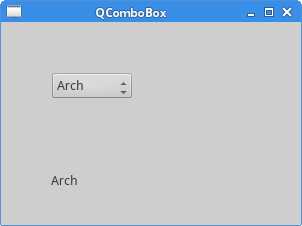
The example shows a QComboBox and a QLabel.
The combo box has a list of five options. These are the names of Linux distros.
The label widget displays the selected option from the combo box.
combo = QComboBox(self)
combo.addItem('Ubuntu')
combo.addItem('Mandriva')
combo.addItem('Fedora')
combo.addItem('Arch')
combo.addItem('Gentoo')
We create a QComboBox widget with five options.
combo.activated[str].connect(self.onActivated)
Upon an item selection, we call the onActivated method.
def onActivated(self, text):

    self.lbl.setText(text)
    self.lbl.adjustSize()
Inside the method, we set the text of the chosen item to the label widget. We adjust the size of the label.

In this part of the PyQt5 tutorial, we have covered QPixmap,
QLineEdit, QSplitter, and QComboBox.