First programs in PyQt4
last modified October 18, 2023
In this part of the PyQt4 tutorial we learn some basic functionality.
Simple example
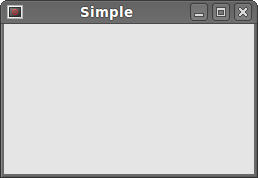
This is a simple example showing a small window. Yet we can do a lot with this window. We can resize it, maximise it, or minimise it. This requires a lot of coding. Someone already coded this functionality. Because it repeats in most applications, there is no need to code it over again. PyQt4 is a high level toolkit. If we would code in a lower level toolkit, the following code example could easily have hundreds of lines.
#!/usr/bin/python

"""
ZetCode PyQt4 tutorial

In this example, we create a simple
window in PyQt4.

author: Jan Bodnar
website: zetcode.com
"""

import sys
from PyQt4 import QtGui


def main():

    app = QtGui.QApplication(sys.argv)

    w = QtGui.QWidget()
    w.resize(250, 150)
    w.move(300, 300)
    w.setWindowTitle('Simple')
    w.show()

    sys.exit(app.exec_())


if __name__ == '__main__':
    main()
The above code shows a small window on the screen.
import sys
from PyQt4 import QtGui
Here we provide the necessary imports. The basic GUI widgets are
located in the QtGui module.
app = QtGui.QApplication(sys.argv)
Every PyQt4 application must create an application object.
The application object is located in the QtGui module.
The sys.argv parameter is a list
of arguments from the command line. Python scripts can be run from
the shell. It is a way how we can control the startup of our scripts.
w = QtGui.QWidget()
The QtGui.QWidget widget is the base class of all user
interface objects in PyQt4. We provide the default constructor for QtGui.QWidget.
The default constructor has no parent. A widget with no parent is called a window.
w.resize(250, 150)
The resize method resizes the widget.
It is 250px wide and 150px high.
w.move(300, 300)
The move method moves the widget to a position
on the screen at x=300 and y=300 coordinates.
w.setWindowTitle('Simple')
Here we set the title for our window. The title is shown in the titlebar.
w.show()
The show method displays the widget on the screen.
A widget is first created in memory and later shown on the screen.
sys.exit(app.exec_())
Finally, we enter the mainloop of the application. The event
handling starts from this point. The mainloop receives events from the
window system and dispatches them to the application widgets.
The mainloop ends if we call the exit
method or the main widget is destroyed.
The sys.exit method ensures a clean exit.
The environment will be informed how the application ended.
The exec_ method has an underscore. It is because
the exec is a Python keyword. And thus, exec_
was used instead.
An application icon
The application icon is a small image which is usually displayed in the top left corner of the titlebar. In the following example we will show how we do it in PyQt4. We also introduce some new methods.
#!/usr/bin/python

"""
ZetCode PyQt4 tutorial

This example shows an icon
in the titlebar of the window.

author: Jan Bodnar
website: zetcode.com
"""

import sys
from PyQt4 import QtGui


class Example(QtGui.QWidget):

    def __init__(self):
        super(Example, self).__init__()

        self.initUI()


    def initUI(self):

        self.setGeometry(300, 300, 250, 150)
        self.setWindowTitle('Icon')
        self.setWindowIcon(QtGui.QIcon('web.png'))

        self.show()


def main():

    app = QtGui.QApplication(sys.argv)
    ex = Example()
    sys.exit(app.exec_())


if __name__ == '__main__':
    main()
The previous example was coded in a procedural style. Python programming language supports both procedural and object oriented programming styles. Programming in PyQt4 means programming in OOP.
class Example(QtGui.QWidget):

    def __init__(self):
        super(Example, self).__init__()
        ...
The three most important things in object oriented programming are classes,
data, and methods. Here we create a new class called Example.
The Example class inherits from QtGui.QWidget class. This means
that we call two constructors: the first one for the Example
class and the second one for the inherited class. The super
method returns the parent object of the Example class and we call
its constructor. The __init__ method is a constructor method
in Python.
self.initUI()
The creation of the GUI is delegated to the initUI method.
self.setGeometry(300, 300, 250, 150)
self.setWindowTitle('Icon')
self.setWindowIcon(QtGui.QIcon('web.png'))
All three methods have been inherited from the QtGui.QWidget class.
The setGeometry does two things. It locates the window on the screen and sets
its size. The first two parameters are the x and y positions of the window. The third is the
width and the fourth is the height of the window. In fact, it combines the resize
and move methods in one method. The last method sets the application icon.
To do this, we have created a QtGui.QIcon object. The QtGui.QIcon
receives the path to our icon to be displayed.
def main():

    app = QtGui.QApplication(sys.argv)
    ex = Example()
    sys.exit(app.exec_())


if __name__ == '__main__':
    main()
The startup code has been placed in the main method. This is a Python
idiom.
Showing a tooltip
We can provide a balloon help for any of our widgets.
#!/usr/bin/python

"""
ZetCode PyQt4 tutorial

This example shows a tooltip on
a window and a button

author: Jan Bodnar
website: zetcode.com
"""

import sys
from PyQt4 import QtGui


class Example(QtGui.QWidget):

    def __init__(self):
        super(Example, self).__init__()

        self.initUI()

    def initUI(self):

        QtGui.QToolTip.setFont(QtGui.QFont('SansSerif', 10))

        self.setToolTip('This is a <b>QWidget</b> widget')

        btn = QtGui.QPushButton('Button', self)
        btn.setToolTip('This is a <b>QPushButton</b> widget')
        btn.resize(btn.sizeHint())
        btn.move(50, 50)

        self.setGeometry(300, 300, 250, 150)
        self.setWindowTitle('Tooltips')
        self.show()

def main():

    app = QtGui.QApplication(sys.argv)
    ex = Example()
    sys.exit(app.exec_())


if __name__ == '__main__':
    main()
In this example, we show a tooltip for two PyQt4 widgets.
QtGui.QToolTip.setFont(QtGui.QFont('SansSerif', 10))
This static method sets a font used to render tooltips. We use a 10pt SansSerif font.
self.setToolTip('This is a <b>QWidget</b> widget')
To create a tooltip, we call the setTooltip method. We can also
use rich text formatting.
btn = QtGui.QPushButton('Button', self)
btn.setToolTip('This is a <b>QPushButton</b> widget')
We create a button widget and set a tooltip for it.
btn.resize(btn.sizeHint())
btn.move(50, 50)
The button is being resized and moved on the window. The sizeHint
method gives a recommended size for the button.

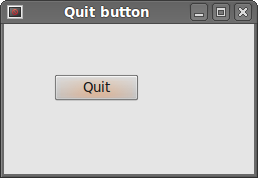
Closing a window
The obvious way to how to close a window is to click on the x mark on the titlebar. In the next example, we show how we can programatically close our window. We briefly touch signals and slots.
The following is the constructor of a QtGui.QPushButton that we use
in our example.
QPushButton(string text, QWidget parent = None)
The text parameter is a text that will be displayed on the button.
The parent is a widget on which we place our button.
In our case it will be a QtGui.QWidget.
#!/usr/bin/python

"""
ZetCode PyQt4 tutorial

This program creates a quit
button. When we press the button,
the application terminates.

author: Jan Bodnar
website: zetcode.com
"""

import sys
from PyQt4 import QtGui, QtCore


class Example(QtGui.QWidget):

    def __init__(self):
        super(Example, self).__init__()

        self.initUI()

    def initUI(self):

        qbtn = QtGui.QPushButton('Quit', self)
        qbtn.clicked.connect(QtCore.QCoreApplication.instance().quit)
        qbtn.resize(qbtn.sizeHint())
        qbtn.move(50, 50)

        self.setGeometry(300, 300, 250, 150)
        self.setWindowTitle('Quit button')
        self.show()

def main():

    app = QtGui.QApplication(sys.argv)
    ex = Example()
    sys.exit(app.exec_())


if __name__ == '__main__':
    main()
In this example, we create a quit button. Upon clicking on the button, the application terminates.
from PyQt4 import QtGui, QtCore
An object from the QtCore module will be needed. Therefore,
we import the module.
qbtn = QtGui.QPushButton('Quit', self)
We create a push button. The button is an instance of the QtGui.QPushButton
class. The first parameter of the constructor is the label of the button.
The second parameter is the parent widget. The parent widget is the
Example widget, which is a QtGui.QWidget by inheritance.
qbtn.clicked.connect(QtCore.QCoreApplication.instance().quit)
The event processing system in PyQt4 is built with the signal & slot mechanism.
If we click on the button, the signal clicked is emitted. The slot can be a
Qt slot or any Python callable. The QtCore.QCoreApplication contains the main event
loop. It processes and dispatches all events. The instance method gives
us its current instance. Note that QtCore.QCoreApplication is created with
the QtGui.QApplication. The clicked signal is connected to the quit
method which terminates the application. The communication is done between two objects:
the sender and the receiver. The sender is the push button, the receiver is the application object.
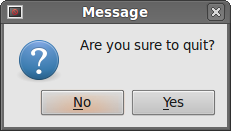
Message Box
By default, if we click on the x button on the titlebar,
the QtGui.QWidget is closed. Sometimes we want to modify
this default behaviour. For example, if we have a file opened in an editor
to which we did some changes. We show a message box to confirm the action.
#!/usr/bin/python

"""
ZetCode PyQt4 tutorial

This program shows a confirmation
message box when we click on the close
button of the application window.

author: Jan Bodnar
website: zetcode.com
"""

import sys
from PyQt4 import QtGui


class Example(QtGui.QWidget):

    def __init__(self):
        super(Example, self).__init__()

        self.initUI()


    def initUI(self):

        self.setGeometry(300, 300, 250, 150)
        self.setWindowTitle('Message box')
        self.show()


    def closeEvent(self, event):

        reply = QtGui.QMessageBox.question(self, 'Message',
            "Are you sure to quit?", QtGui.QMessageBox.Yes |
            QtGui.QMessageBox.No, QtGui.QMessageBox.No)

        if reply == QtGui.QMessageBox.Yes:
            event.accept()
        else:
            event.ignore()


def main():

    app = QtGui.QApplication(sys.argv)
    ex = Example()
    sys.exit(app.exec_())


if __name__ == '__main__':
    main()
If we close a QtGui.QWidget, a QtGui.QCloseEvent
is generated. To modify the widget behaviour we need to reimplement
the closeEvent event handler.
reply = QtGui.QMessageBox.question(self, 'Message',
    "Are you sure to quit?", QtGui.QMessageBox.Yes |
    QtGui.QMessageBox.No, QtGui.QMessageBox.No)
We show a message box with two buttons: Yes and No. The first string appears
on the titlebar. The second string is the message text displayed by the dialog.
The third argument specifies the combination of buttons appearing in the dialog.
The last parameter is the default button. It is the button which has initially
the keyboard focus. The return value is stored in the reply variable.
if reply == QtGui.QMessageBox.Yes:
    event.accept()
else:
    event.ignore()
Here we test the return value. If we click the Yes button, we accept the event which leads to the closure of the widget and to the termination of the application. Otherwise we ignore the close event.
Centering window on the screen
The following script shows how we can center a window on the desktop screen.
#!/usr/bin/python

"""
ZetCode PyQt4 tutorial

This program centers a window
on the screen.

author: Jan Bodnar
website: zetcode.com
"""

import sys
from PyQt4 import QtGui


class Example(QtGui.QWidget):

    def __init__(self):
        super(Example, self).__init__()

        self.initUI()

    def initUI(self):

        self.resize(250, 150)
        self.center()

        self.setWindowTitle('Center')
        self.show()

    def center(self):

        qr = self.frameGeometry()
        cp = QtGui.QDesktopWidget().availableGeometry().center()
        qr.moveCenter(cp)
        self.move(qr.topLeft())


def main():

    app = QtGui.QApplication(sys.argv)
    ex = Example()
    sys.exit(app.exec_())


if __name__ == '__main__':
    main()
The QtGui.QDesktopWidget class provides information about
the user's desktop, including the screen size.
self.center()
The code that will center the window is placed in the custom
center method.
qr = self.frameGeometry()
We get a rectangle specifying the geometry of the main window. This includes any window frame.
cp = QtGui.QDesktopWidget().availableGeometry().center()
We figure out the screen resolution of our monitor. And from this resolution, we get the center point.
qr.moveCenter(cp)
Our rectangle has already its width and height. Now we set the center of the rectangle to the center of the screen. The rectangle's size is unchanged.
self.move(qr.topLeft())
We move the top-left point of the application window to the top-left point of the qr rectangle, thus centering the window on our screen.
In this part of the PyQt4 tutorial, we covered some basics.