Custom widgets in PyQt4
last modified October 18, 2023
PyQt4 has a rich set of widgets. However, no toolkit can provide all widgets that programmers might need in their applications. Toolkits usually provide only the most common widgets like buttons, text widgets, or sliders. If there is a need for a more specialised widget, we must create it ourselves.
Custom widgets are created by using the drawing tools provided by the toolkit. There are two basic possibilities: a programmer can modify or enhance an existing widget or he can create a custom widget from scratch.
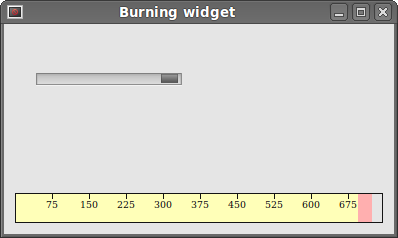
Burning widget
This is a widget that we can see in Nero, K3B, or other CD/DVD burning software.
#!/usr/bin/python

"""
ZetCode PyQt4 tutorial

In this example, we create a custom widget.

author: Jan Bodnar
website: zetcode.com
"""

import sys
from PyQt4 import QtGui, QtCore


class Communicate(QtCore.QObject):

    updateBW = QtCore.pyqtSignal(int)


class BurningWidget(QtGui.QWidget):

    def __init__(self):
        super(BurningWidget, self).__init__()

        self.initUI()

    def initUI(self):

        self.setMinimumSize(1, 30)
        self.value = 75
        self.num = [75, 150, 225, 300, 375, 450, 525, 600, 675]


    def setValue(self, value):

        self.value = value


    def paintEvent(self, e):

        qp = QtGui.QPainter()
        qp.begin(self)
        self.drawWidget(qp)
        qp.end()


    def drawWidget(self, qp):

        font = QtGui.QFont('Serif', 7, QtGui.QFont.Light)
        qp.setFont(font)

        size = self.size()
        w = size.width()
        h = size.height()

        step = int(round(w / 10.0))

        till = int(((w / 750.0) * self.value))
        full = int(((w / 750.0) * 700))

        if self.value >= 700:

            qp.setPen(QtGui.QColor(255, 255, 255))
            qp.setBrush(QtGui.QColor(255, 255, 184))
            qp.drawRect(0, 0, full, h)
            qp.setPen(QtGui.QColor(255, 175, 175))
            qp.setBrush(QtGui.QColor(255, 175, 175))
            qp.drawRect(full, 0, till-full, h)

        else:
            qp.setPen(QtGui.QColor(255, 255, 255))
            qp.setBrush(QtGui.QColor(255, 255, 184))
            qp.drawRect(0, 0, till, h)


        pen = QtGui.QPen(QtGui.QColor(20, 20, 20), 1,
            QtCore.Qt.SolidLine)

        qp.setPen(pen)
        qp.setBrush(QtCore.Qt.NoBrush)
        qp.drawRect(0, 0, w-1, h-1)

        j = 0

        for i in range(step, 10*step, step):

            qp.drawLine(i, 0, i, 5)
            metrics = qp.fontMetrics()
            fw = metrics.width(str(self.num[j]))
            qp.drawText(i-fw/2, h/2, str(self.num[j]))
            j = j + 1


class Example(QtGui.QWidget):

    def __init__(self):
        super(Example, self).__init__()

        self.initUI()

    def initUI(self):

        sld = QtGui.QSlider(QtCore.Qt.Horizontal, self)
        sld.setFocusPolicy(QtCore.Qt.NoFocus)
        sld.setRange(1, 750)
        sld.setValue(75)
        sld.setGeometry(30, 40, 150, 30)

        self.c = Communicate()
        self.wid = BurningWidget()
        self.c.updateBW[int].connect(self.wid.setValue)

        sld.valueChanged[int].connect(self.changeValue)
        hbox = QtGui.QHBoxLayout()
        hbox.addWidget(self.wid)
        vbox = QtGui.QVBoxLayout()
        vbox.addStretch(1)
        vbox.addLayout(hbox)
        self.setLayout(vbox)

        self.setGeometry(300, 300, 390, 210)
        self.setWindowTitle('Burning widget')
        self.show()

    def changeValue(self, value):

        self.c.updateBW.emit(value)
        self.wid.repaint()


def main():

    app = QtGui.QApplication(sys.argv)
    ex = Example()
    sys.exit(app.exec_())


if __name__ == '__main__':
    main()
In our example, we have a QtGui.QSlider and a custom widget.
A slider controls the custom widget. This widget shows graphically the total
capacity of a medium and the free space available to us. The minimum value of
our custom widget is 1, the maximum is 750.
If we reach value 700, we begin drawing in red colour. This normally
indicates overburning.
The burning widget is placed at the bottom of the window. This is
achieved using one QtGui.QHBoxLayout and one
QtGui.QVBoxLayout.
class BurningWidget(QtGui.QWidget):

    def __init__(self):
        super(BurningWidget, self).__init__()
The burning widget it based on the QtGui.QWidget widget.
self.setMinimumSize(1, 30)
We change the minimum size (height) of the widget. The default value is a bit small for us.
font = QtGui.QFont('Serif', 7, QtGui.QFont.Light)
qp.setFont(font)
We use a smaller font than the default one. This better suits our needs.
size = self.size()
w = size.width()
h = size.height()

step = int(round(w / 10.0))


till = int(((w / 750.0) * self.value))
full = int(((w / 750.0) * 700))
We draw the widget dynamically. The greater is the window, the greater is
the burning widget and vice versa. That is why we must calculate the
size of the widget onto which we draw the custom widget. The till
parameter determines the total size to be drawn. This value comes
from the slider widget. It is a proportion of the whole area. The
full parameter determines the point where we begin to draw in red
colour. Notice the use of floating point arithmetics to achieve greater precision
in drawing.
The actual drawing consists of three steps. We draw the yellow or the red and yellow rectangle. Then we draw the vertical lines which divide the widget into several parts. Finally, we draw the numbers which indicate the capacity of the medium.
metrics = qp.fontMetrics()
fw = metrics.width(str(self.num[j]))
qp.drawText(i-fw/2, h/2, str(self.num[j]))
We use font metrics to draw the text. We must know the width of the text in order to center it around the vertical line.
def changeValue(self, value):

    self.c.updateBW.emit(value)
    self.wid.repaint()
When we move the slider, the changeValue method is called.
Inside the method, we send a custom updateBW signal
with a parameter. The parameter is the current value of the slider.
The value is later used to calculate the capacity of the Burning widget
to be drawn. The custom widget is then repainted.
In this part of the PyQt4 tutorial, we created a custom widget.