First steps in GTK#
last modified October 18, 2023
In this part of the GTK# programming tutorial, we do our first steps in programming. We create simple programs.
Simple example
The first code example is a simple one that shows a centered window.
using Gtk;

class SharpApp : Window {

    public SharpApp() : base("Center")
    {
        SetDefaultSize(250, 200);
        SetPosition(WindowPosition.Center);

        DeleteEvent += delegate { Application.Quit(); };

        Show();
    }

    public static void Main()
    {
        Application.Init();
        new SharpApp();
        Application.Run();
    }
}
The code example shows a small window in the center of the screen.
$ gmcs -pkg:gtk-sharp-2.0 center.cs
Here is how we compile the code example.
using Gtk;
Now we can use the objects from the Gtk namespace directly. We can write
Window instead of Gtk.Window.
class SharpApp : Window {
Our application is based on the SharpApp class. This class inherits from
the Window class.
public SharpApp() : base("Center")
{
    ...
}
This is the constructor. It builds our application. It also calls
its parent constructor through the base keyword.
SetDefaultSize(250, 200);
This line sets a default size for our window.
SetPosition(WindowPosition.Center);
This line centers the window on the screen.
DeleteEvent += delegate { Application.Quit(); };
We plug a delegate to the DeleteEvent. This
event is triggered, when we click on the close button in the titlebar.
Or press Alt+F4. Our delegate quits the application for good.
Show();
Now we show the window. The window is not visible, until we call the
Show method.
public static void Main()
{
    Application.Init();
    new SharpApp();
    Application.Run();
}
The Main method is the entry point to the
application. It initiates and runs the program.
Icon
In the next example, we show the application icon. Most window managers display the icon in the left corner of the titlebar and also on the taskbar.
using Gtk;
using System;

class SharpApp : Window {

    public SharpApp() : base("Icon")
    {
        SetDefaultSize(250, 160);
        SetPosition(WindowPosition.Center);
        SetIconFromFile("web.png");

        DeleteEvent += new DeleteEventHandler(OnDelete);

        Show();
    }

    public static void Main()
    {
        Application.Init();
        new SharpApp();
        Application.Run();
    }

    void OnDelete(object obj, DeleteEventArgs args)
    {
        Application.Quit();
    }
}
The code example shows the application icon.
SetIconFromFile("web.png");
The SetIconFromFile method sets an icon for the window.
The image is loaded from disk in the current working directory.
DeleteEvent += new DeleteEventHandler(OnDelete);
This is another way, how we can plug an event handler to an event. It is just a bit more verbose.
void OnDelete(object obj, DeleteEventArgs args)
{
    Application.Quit();
}
This is an event handler for the delete event.
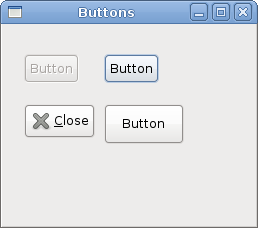
Buttons
In the next example, we further enhance our programming skills with the GTK# library.
using Gtk;

class SharpApp : Window
{

    public SharpApp() : base("Buttons")
    {
        SetDefaultSize(250, 200);
        SetPosition(WindowPosition.Center);

        DeleteEvent += delegate { Application.Quit(); };

        Fixed fix = new Fixed();

        Button btn1 = new Button("Button");
        btn1.Sensitive = false;
        Button btn2 = new Button("Button");
        Button btn3 = new Button(Stock.Close);
        Button btn4 = new Button("Button");
        btn4.SetSizeRequest(80, 40);

        fix.Put(btn1, 20, 30);
        fix.Put(btn2, 100, 30);
        fix.Put(btn3, 20, 80);
        fix.Put(btn4, 100, 80);

        Add(fix);
        ShowAll();
    }


    public static void Main()
    {
        Application.Init();
        new SharpApp();
        Application.Run();
    }
}
We show four different buttons on the window. We see a difference between container widgets and child widgets and will change some properties of child widgets.
Fixed fix = new Fixed();
Fixed widget is a non visible container widget.
Its purpose is to contain other child widgets.
Button btn1 = new Button("Button");
A Button is a child widget. Child widgets are placed inside
containers.
btn1.Sensitive = false;
We make this button insensitive. This means, we cannot click on it. Graphically the widget is grayed out.
Button btn3 = new Button(Stock.Close);
The third button shows an image inside its area. The GTK# library has a built-in stock of images that we can use.
btn4.SetSizeRequest(80, 40);
Here we change the size of the button.
fix.Put(btn1, 20, 30);
fix.Put(btn2, 100, 30);
...
Here we place button widgets inside fixed container widget.
Add(fix);
We set the Fixed container to be the main container for
our Window widget.
ShowAll();
We can either call ShowAll method, or we call Show
method on each of the widgets. Including containers.
In this chapter, we created first programs in GTK# programming library.