Working with Derby & Apache Tomcat
last modified July 6, 2020
In this chapter, we will show how we can put together Derby with Apache Tomcat web container.
Apache Tomcat is a web container for the Java programming language. It is used to
serve JSP pages and servlets. Apache Tomcat can be easily put together to work
with Derby. Derby has a derby.war file in its lib subdirectory.
This web archive is simply used to control the Derby database. Both Tomcat and Derby are projects
of the Apache Software foundation.
$ pwd
/home/janbodnar/bin/tomcat
$ ls lib/derby*
lib/derbyclient.jar  lib/derby.jar  lib/derbynet.jar
First we have to copy the derbyclient.jar, derby.jar
and derbynet.jar files into the lib subdirectory of
the Tomcat installation directory.
$ ls webapps
derby.war  docs  examples  host-manager  manager  ROOT
Then we have to copy the derby.war file into the webapps subdirectory
file of the Tomcat installation directory. When the Tomcat starts, the file is unpacked
and deployed.
$ export JAVA_OPTS=-Dderby.system.home=/home/janbodnar/programming/derby/dbs
When we start Derby via Tomcat, the DERBY_OPTS variable is not taken into account.
The derby.system.home must be set prior to starting the Tomcat and Derby servers.
We can set the Derby system directory in the JAVA_OPTS variable.
$ bin/startup.sh
Using CATALINA_BASE:   /home/janbodnar/bin/tomcat
Using CATALINA_HOME:   /home/janbodnar/bin/tomcat
Using CATALINA_TMPDIR: /home/janbodnar/bin/tomcat/temp
Using JRE_HOME:        /home/janbodnar/bin/jdk1.6.0_30
Using CLASSPATH:       /home/janbodnar/bin/tomcat/bin/bootstrap.jar:
/home/janbodnar/bin/tomcat/bin/tomcat-juli.jar
With the startup.sh script we start the Tomcat server.
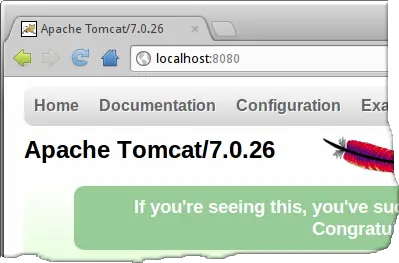
We see the Tomcat welcome page when we navigate to localhost:8080 which
is the default URL on which Tomcat listens.
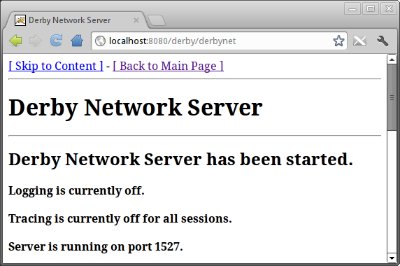
To start the Derby database, we navigate to localhost:8080/derby/derbynet.
This will start the Derby. We have several buttons which can be used to start/stop the server,
enable/disable logging or tracing.
<load-on-startup>0</load-on-startup>
We have to navigate to the above mentioned URL each time, we start the Tomcat server.
To automatically start Derby, we can add the above line inside the the
<servlet> tag of the web.xml file. The file is
located in webapps/derby/WEB-INF directory.
Creating the testdb database
For those, who did not follow the tutorial from the beginning, we will create
the testdb database again. We will add one table into the database.
You can skip the creation of the database and the table if it already exists.
$ cat cars.sql
CREATE SCHEMA USER12;
CREATE TABLE CARS(ID INT PRIMARY KEY, NAME VARCHAR(30), PRICE INT);
INSERT INTO CARS VALUES(1, 'Audi', 52642);
INSERT INTO CARS VALUES(2, 'Mercedes', 57127);
INSERT INTO CARS VALUES(3, 'Skoda', 9000);
INSERT INTO CARS VALUES(4, 'Volvo', 29000);
INSERT INTO CARS VALUES(5, 'Bentley', 350000);
INSERT INTO CARS VALUES(6, 'Citroen', 21000);
INSERT INTO CARS VALUES(7, 'Hummer', 41400);
INSERT INTO CARS VALUES(8, 'Volkswagen', 21600);
We will need this SQL file.
$ cat dbs/derby.properties
derby.stream.error.logSeverityLevel=0
derby.database.fullAccessUsers=user12
derby.database.defaultConnectionMode=readOnlyAccess
derby.connection.requireAuthentication=true
derby.user.user12=34klq*
derby.user.user13=33kl33
derby.user.user14=14kl14
derby.user.user15=35rr++
derby.authentication.provider=builtin
Inside the Derby system directory, we have the derby.properties file. In this file, we configure some options. We set the log severity level to 0 to report all possible problems. This is done in test environments. We enable authentication. We create four users with corresponding passwords. Only one of them, user12, has full access priviliges. The others have only readOnlyAccess.
$ java  -Dderby.system.home=/home/janbodnar/programming/derby/dbs \
-Dij.protocol=jdbc:derby: -jar $DERBY_HOME/lib/derbyrun.jar ij
ij version 10.8
ij>
We start the ij command line tool. We will use it to create a database and
a table. The Derby system directory is located at
/home/janbodnar/programming/derby/dbs.
ij> CONNECT 'jdbc:derby://localhost:1527/testdb;create=true;
user=user12;password=34klq*';
We create the testdb database and connect to it. We provide user credentials.
ij> run 'cars.sql';
We execute the cars.sql script, which creates a CARS table
and fills it with data.
ij> SELECT * FROM CARS;
ID         |NAME                          |PRICE
------------------------------------------------------
1          |Audi                          |52642
2          |Mercedes                      |57127
3          |Skoda                         |9000
4          |Volvo                         |29000
5          |Bentley                       |350000
6          |Citroen                       |21000
7          |Hummer                        |41400
8          |Volkswagen                    |21600

8 rows selected
This is our CARS table. Next we will create a Java servlet, which
will display these values in a web browser.
The project
We will create a simple web application that will connect to the Derby database.
One Java servlet will connect to the Derby and retrieve all data from
the CARS table.
$ tree
.
├── build.xml
├── context.xml
├── lib
│   └── servlet-api.jar
├── src
│   └── zetcode
│       └── SelectAllCars.java
└── web.xml

3 directories, 5 files
In our current working directory, we have an Ant build.xml file,
the context.xml configuration file, the web.xml
deployment descriptor file, and the src and lib subdirectories.
The build.xml file is the Ant build file, which describes the
tasks to build, deploy or clean the project. The web.xml defines
the structure of the web application. In the lib directory
we have the servlet-api.jar file, which is needed to compile the
source file. (It can be found in the lib subdirectory of the Tomcat installation
directory.) In the src directory, we have the Java source file.
The web.xml file defines the structure of the web application.
<?xml version="1.0" encoding="UTF8"?>

<web-app xmlns="http://java.sun.com/xml/ns/javaee"
  xmlns:xsi="http://www.w3.org/2001/XMLSchema-instance"
  xsi:schemaLocation="http://java.sun.com/xml/ns/javaee
                      http://java.sun.com/xml/ns/javaee/web-app_3_0.xsd"
  version="3.0"
  metadata-complete="true">

    <description>
      Servlet which connects to Derby
    </description>
    <display-name>Derby, Tomcat</display-name>

    <servlet>
        <servlet-name>SelectAllCars</servlet-name>
        <servlet-class>zetcode.SelectAllCars</servlet-class>
    </servlet>

    <servlet-mapping>
        <servlet-name>SelectAllCars</servlet-name>
        <url-pattern>/SelectAllCars</url-pattern>
    </servlet-mapping>

</web-app>
These are the contents of the the web.xml file. In this file, we register
the SelectAllCars servlet.
<?xml version="1.0" encoding="UTF-8"?>
<Context>
    <Resource name="jdbc/testdb"
              auth="Container"
              type="javax.sql.DataSource"
              username="user12"
              password="34klq*"
              driverClassName="org.apache.derby.jdbc.ClientDriver"
              url="jdbc:derby://localhost:1527/testdb"
              maxActive="10"
              maxIdle="4"/>

</Context>
In the context.xml file, we define the JDBC datasource. The
context.xml file can be defined for all web applications or for a single application.
The latter is our case.
We will show the Ant build file which will be used to build and deploy our tiny application.
<?xml version="1.0" ?>

<project name="allcars" default="deploy">

    <property name="src.dir" value="src"/>
    <property name="build.dir" value="build"/>
    <property name="dist.dir" value="dist"/>
    <property name="deploy.dir" value="/home/janbodnar/bin/tomcat/webapps"/>

    <echo>${ant.project.name}</echo>

    <target name="init">
        <mkdir dir="${build.dir}/classes" />
        <mkdir dir="${dist.dir}"/>
        <echo>Directories created.</echo>
    </target>

    <target name="compile" depends="init">
        <javac srcdir="${src.dir}" destdir="${build.dir}/classes"
               includeantruntime="false">
            <classpath path="lib/servlet-api.jar"/>
        </javac>
        <echo>Source files compiled.</echo>
    </target>

    <target name="archive" depends="compile">
        <war destfile="${dist.dir}/${ant.project.name}.war" webxml="web.xml">
            <classes dir="${build.dir}/classes"/>
            <metainf file="context.xml"/>
        </war>
        <echo>Archive created.</echo>
    </target>

    <target name="deploy" depends="archive">
        <copy file="${dist.dir}/${ant.project.name}.war" todir="${deploy.dir}"/>
        <echo>Project deployed.</echo>
    </target>

    <target name="clean">
        <delete dir="${dist.dir}"/>
        <delete dir="${build.dir}"/>
        <echo>Project cleaned.</echo>
    </target>

</project>
The build file comprises five tasks. The initialization task will create the necessary directories. The compile task will compile the source code. The archive task will create a web archive. The deploy task will deploy the archive to the Tomcat server. Finally, the clean task will do the cleaning.
The following is the SelectAllCars servlet.
package zetcode;

import java.io.IOException;
import java.io.PrintWriter;
import java.sql.Connection;
import java.sql.ResultSet;
import java.sql.SQLException;
import java.sql.Statement;
import java.util.logging.Level;
import java.util.logging.Logger;
import javax.naming.Context;
import javax.naming.InitialContext;
import javax.naming.NamingException;
import javax.servlet.ServletException;
import javax.servlet.http.HttpServlet;
import javax.servlet.http.HttpServletRequest;
import javax.servlet.http.HttpServletResponse;
import javax.sql.DataSource;


public class SelectAllCars extends HttpServlet {

    protected void processRequest(HttpServletRequest request,
            HttpServletResponse response)
            throws ServletException, IOException {

        response.setContentType("text/html;charset=UTF-8");

        PrintWriter out = null;
        Connection con = null;
        Statement st = null;
        ResultSet rs = null;

        try {

            out = response.getWriter();

            Context ctx = new InitialContext();
            DataSource ds = (DataSource) ctx.lookup("java:comp/env/jdbc/testdb");

            con = ds.getConnection();
            st = con.createStatement();

            out.println("<html>");
            out.println("<head>");
            out.println("<title>SimpleServlet</title>");
            out.println("</head>");
            out.println("<body>");

            rs = st.executeQuery("SELECT * FROM CARS");

            while (rs.next()) {
                out.print(rs.getInt(1));
                out.print(" ");
                out.print(rs.getString(2));
                out.print(" ");
                out.print(rs.getString(3));
                out.print("<br>");
            }

            out.println("</body>");
            out.println("</html>");

        } catch (NamingException | SQLException ex) {

            Logger lgr = Logger.getLogger(SelectAllCars.class.getName());
            lgr.log(Level.SEVERE, ex.getMessage(), ex);

        } finally {

            try {
                if (rs != null) {
                    rs.close();
                }

                if (con != null) {
                    con.close();
                }

                if (out != null) {
                    out.close();
                }

            } catch (SQLException ex) {
                Logger lgr = Logger.getLogger(SelectAllCars.class.getName());
                lgr.log(Level.WARNING, ex.getMessage(), ex);
            }
        }
    }

    @Override
    protected void doGet(HttpServletRequest request,
            HttpServletResponse response)
            throws ServletException, IOException {
        processRequest(request, response);
    }

    @Override
    protected void doPost(HttpServletRequest request,
            HttpServletResponse response)
            throws ServletException, IOException {
        processRequest(request, response);
    }
}
In the above servlet, we connect to the Derby testdb database and fetch all rows
from the CARS table.
Context ctx = new InitialContext();
DataSource ds = (DataSource) ctx.lookup("java:comp/env/jdbc/testdb");
We use the JNDI naming lookup to obtain the datasource. From the datasource, we create the connection object.
rs = st.executeQuery("SELECT * FROM CARS");

while (rs.next()) {
    out.print(rs.getInt(1));
    out.print(" ");
    out.print(rs.getString(2));
    out.print(" ");
    out.print(rs.getString(3));
    out.print("<br>");
}
We use the SQL statement to retrieve all data from the CARS table.
We print the data from the result set object.
$ ant
Buildfile: /home/janbodnar/programming/derby/servlet/build.xml
     [echo] allcars

init:
    [mkdir] Created dir: /home/janbodnar/programming/derby/servlet/build/classes
    [mkdir] Created dir: /home/janbodnar/programming/derby/servlet/dist
     [echo] Directories created.

compile:
    [javac] Compiling 1 source file to /home/janbodnar/programming/derby/
servlet/build/classes
     [echo] Source files compiled.

archive:
      [war] Building war: /home/janbodnar/programming/derby/servlet/dist/allcars.war
     [echo] Archive created.

deploy:
     [copy] Copying 1 file to /home/janbodnar/bin/tomcat/webapps
     [echo] Project deployed.

BUILD SUCCESSFUL
Total time: 1 second
We launch the ant to build and deploy the project.
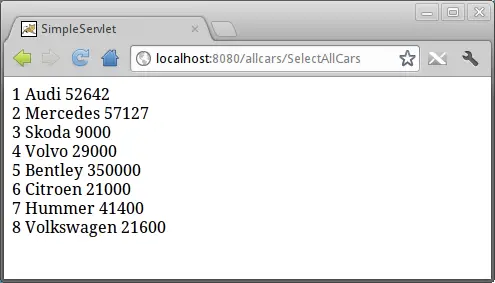
We navigate to the localhost:8080/allcars/SelectAllCars URL and receive the output.
In the chapter, we have worked with Derby and Apache Tomcat.