Swing layout management
last modified January 10, 2023
Java Swing has two kind of components: containers and children. The containers group children into suitable layouts. To create layouts, we use layout managers.
ZetCode offers a dedicated 196 pages e-book for the Swing layout management process: Java Swing layout management tutorial
Swing layout managers
Swing has plenty of layout managers available — both built-in and third-party. However, most of the managers are not suitable in modern UI creation.
There are three layout managers that can do the job properly:
- MigLayout
- GroupLayout
- FormLayout
MigLayout, GroupLayout, and FormLayout are
powerful, flexible layout managers that can cope with most layout requirements.
In this tutorial, we use GroupLayout manager to get design
the user interface.
The following layout managers are obsolete:
- FlowLayout
- GridLayout
- CardLayout
- BoxLayout
- GridBagLayout
These layout managers cannot fulfill requirements for a modern UI.
Problems with obsolete managers
Obsolete managers are either too simple (FlowLayout, GridLayout)
or unnecessary complex (GridBagLayout). All these managers
have a fundamental design error: they use fixed gaps between components.
Using rigid spaces between components is not portable: the user interface
is broken once the program is run on different screen resolution.
Obsolete managers try to fix their weaknesses by a technique called nesting. In nesting, developers use several different layout managers in multiple panels. While it is possible to create an UI with nesting, it brings additional unnecessary complexity to the code.
Obsolete managers
In this section, we are going to cover obsolete layout managers. These managers are not recommended to use. Only put some time to study them if we need to maintain some legacy code. Otherwise, their usage should be rejected.
FlowLayout manager
This is the simplest layout manager in the Java Swing toolkit. It is the
default layout manager for the JPanel component.
It is so simple that it cannot be used for any real layout. This manager is covered in many Java Swing tutorials and therefore, beginners try to use it in their projects not realizing that it cannot be used for anything serious.
When calculating its children size, a flow layout lets each component assume its natural (preferred) size. The manager puts components into a row. In the order, they were added. If they do not fit into one row, they go into the next one. The components can be added from the right to the left or vice versa. The manager allows to align the components. Implicitly, the components are centered and there is 5px space among components and components and the edges of the container.
FlowLayout()
FlowLayout(int align)
FlowLayout(int align, int hgap, int vgap)
There are three constructors available for the FlowLayout manager. The first one creates a manager with implicit values. Centered with 5px horizontal and vertical spaces. The others allow to specify those parameters.
package com.zetcode;

import javax.swing.JButton;
import javax.swing.JFrame;
import javax.swing.JPanel;
import javax.swing.JTextArea;
import javax.swing.JTree;
import java.awt.Dimension;
import java.awt.EventQueue;

public class FlowLayoutEx extends JFrame {

    public FlowLayoutEx() {

        initUI();
    }

    private void initUI() {

        var panel = new JPanel();

        var button = new JButton("button");
        panel.add(button);

        var tree = new JTree();
        panel.add(tree);

        var area = new JTextArea("text area");
        area.setPreferredSize(new Dimension(100, 100));

        panel.add(area);

        add(panel);

        pack();

        setTitle("FlowLayout example");
        setDefaultCloseOperation(JFrame.EXIT_ON_CLOSE);
        setLocationRelativeTo(null);
    }

    public static void main(String[] args) {

        EventQueue.invokeLater(() -> {
            var ex = new FlowLayoutEx();
            ex.setVisible(true);
        });
    }
}
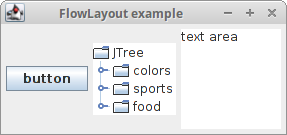
The example shows a button, a tree component, and a text area component in the window. If we create an empty tree component, there are some default values inside the component.
var panel = new JPanel();
The implicit layout manager of the JPanel component is
FlowLayout. We do not have to set it manually.
var area = new JTextArea("text area");
area.setPreferredSize(new Dimension(100, 100));
The flow layout manager sets a preferred size for its components. So in our case, the area component will be 100x100px. If we didn't set the preferred size, the component would have a size of its text. Without the text, the component would not be visible at all. Try to write or delete some text in the area component. The component will grow and shrink accordingly.
panel.add(area);
The component is placed inside a container with add().
GridLayout
The GridLayout layout manager lays out components in a
rectangular grid. The container is divided into equally sized rectangles. One
component is placed in each rectangle.
GridLayout is very simple and cannot be used for any real
layout.
package com.zetcode;

import javax.swing.BorderFactory;
import javax.swing.JButton;
import javax.swing.JFrame;
import javax.swing.JLabel;
import javax.swing.JPanel;
import java.awt.EventQueue;
import java.awt.GridLayout;

public class GridLayoutEx extends JFrame {

    public GridLayoutEx() {

        initUI();
    }

    private void initUI() {

        var panel = new JPanel();

        panel.setBorder(BorderFactory.createEmptyBorder(5, 5, 5, 5));
        panel.setLayout(new GridLayout(5, 4, 5, 5));

        String[] buttons = {
                "Cls", "Bck", "", "Close", "7", "8", "9", "/", "4",
                "5", "6", "*", "1", "2", "3", "-", "0", ".", "=", "+"
        };

        for (int i = 0; i < buttons.length; i++) {

            if (i == 2) {
                panel.add(new JLabel(buttons[i]));
            } else {
                panel.add(new JButton(buttons[i]));
            }
        }

        add(panel);

        setTitle("GridLayout");
        setSize(350, 300);
        setDefaultCloseOperation(JFrame.EXIT_ON_CLOSE);
        setLocationRelativeTo(null);
    }

    public static void main(String[] args) {

        EventQueue.invokeLater(() -> {
            var ex = new GridLayoutEx();
            ex.setVisible(true);
        });
    }
}
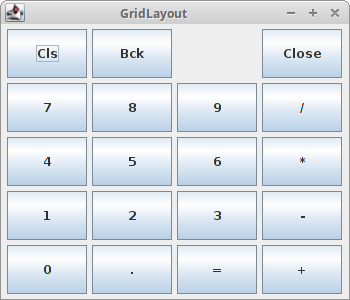
The example shows a skeleton of a simple calculator tool. We put nineteen buttons and one label into the manager. Notice that each button is of the same size.
panel.setLayout(new GridLayout(5, 4, 5, 5));
Here we set the grid layout manager for the panel component. The layout manager takes four parameters. The number of rows, the number of columns and the horizontal and vertical gaps between components.
BorderLayout
BorderLayout is a simple layout manager that can be
handy in certain layouts. It is a default layout manager for JFrame,
JWindow, JDialog, JInternalFrame,
and JApplet. It has a serious limitiation — it sets the gaps between its
children in pixels, thus creating rigid layouts. This leads to non-portable UI, and therefore,
its usage is not recommended.
BorderLayout divides the space into five regions: north, west, south, east,
and centre. Each region can have only one component.
If we need to put more components into a region, we have to put a panel there with a
manager of our choice. The components in N, W, S, E regions get their preferred size. The
component in the centre takes up the whole space left.
It does not look good if child components are too close to each other.
We must put some space among them. Each component in Swing toolkit can have
borders around its edges. To create a border, we either create a
new instance of an EmptyBorder class or we use a
BorderFactory.
package com.zetcode;

import javax.swing.JFrame;
import javax.swing.JPanel;
import javax.swing.border.EmptyBorder;
import java.awt.BorderLayout;
import java.awt.Color;
import java.awt.Dimension;
import java.awt.EventQueue;
import java.awt.Insets;

public class BorderLayoutEx extends JFrame {

    public BorderLayoutEx() {

        initUI();
    }

    private void initUI() {

        var bottomPanel = new JPanel(new BorderLayout());
        var topPanel = new JPanel();

        topPanel.setBackground(Color.gray);
        topPanel.setPreferredSize(new Dimension(250, 150));
        bottomPanel.add(topPanel);

        bottomPanel.setBorder(new EmptyBorder(new Insets(20, 20, 20, 20)));

        add(bottomPanel);

        pack();

        setTitle("BorderLayout");
        setDefaultCloseOperation(JFrame.EXIT_ON_CLOSE);
        setLocationRelativeTo(null);
    }

    public static void main(String[] args) {

        EventQueue.invokeLater(() -> {
            var ex = new BorderLayoutEx();
            ex.setVisible(true);
        });
    }
}
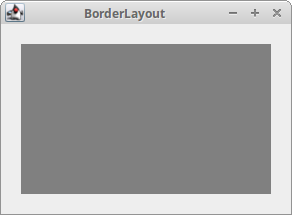
The example will display a gray panel and border around it.
var bottomPanel = new JPanel(new BorderLayout());
var topPanel = new JPanel();
We place a panel into a panel. The bottom panel has the
BorderLayout manager.
bottomPanel.add(topPanel);
Here we placed the top panel into the bottom panel component. More precisely,
we placed it into the center area of its BorderLayout manager.
bottomPanel.setBorder(new EmptyBorder(new Insets(20, 20, 20, 20)));
Here we created a 20px border around the bottom panel. The border values are as follows: top, left, bottom and right. Note that creating fixed insets (spaces) is not portable.
The next example shows a typical usage of the BorderLayout manager.
package com.zetcode;

import javax.swing.ImageIcon;
import javax.swing.JButton;
import javax.swing.JFrame;
import javax.swing.JLabel;
import javax.swing.JMenu;
import javax.swing.JMenuBar;
import javax.swing.JTextArea;
import javax.swing.JToolBar;
import javax.swing.border.EmptyBorder;
import java.awt.BorderLayout;
import java.awt.EventQueue;
import java.awt.Insets;

public class BorderLayoutEx2 extends JFrame {

    public BorderLayoutEx2() {

        initUI();
    }

    private void initUI() {

        var menubar = new JMenuBar();
        var fileMenu = new JMenu("File");

        menubar.add(fileMenu);
        setJMenuBar(menubar);

        var toolbar = new JToolBar();
        toolbar.setFloatable(false);

        var exitIcon = new ImageIcon("src/resources/exit.png");
        var exitBtn = new JButton(exitIcon);
        exitBtn.setBorder(new EmptyBorder(0, 0, 0, 0));
        toolbar.add(exitBtn);

        add(toolbar, BorderLayout.NORTH);

        var vertical = new JToolBar(JToolBar.VERTICAL);
        vertical.setFloatable(false);
        vertical.setMargin(new Insets(10, 5, 5, 5));

        var driveIcon = new ImageIcon("src/resources/drive.png");
        var compIcon = new ImageIcon("src/resources/computer.png");
        var printIcon = new ImageIcon("src/resources/printer.png");

        var driveBtn = new JButton(driveIcon);
        driveBtn.setBorder(new EmptyBorder(3, 0, 3, 0));

        var compBtn = new JButton(compIcon);
        compBtn.setBorder(new EmptyBorder(3, 0, 3, 0));
        var printBtn = new JButton(printIcon);
        printBtn.setBorder(new EmptyBorder(3, 0, 3, 0));

        vertical.add(driveBtn);
        vertical.add(compBtn);
        vertical.add(printBtn);

        add(vertical, BorderLayout.WEST);

        add(new JTextArea(), BorderLayout.CENTER);

        var statusbar = new JLabel(" Statusbar");
        add(statusbar, BorderLayout.SOUTH);

        setSize(400, 350);
        setTitle("BorderLayout");
        setDefaultCloseOperation(JFrame.EXIT_ON_CLOSE);
        setLocationRelativeTo(null);
    }

    public static void main(String[] args) {

        EventQueue.invokeLater(() -> {

            var ex = new BorderLayoutEx2();
            ex.setVisible(true);
        });
    }
}
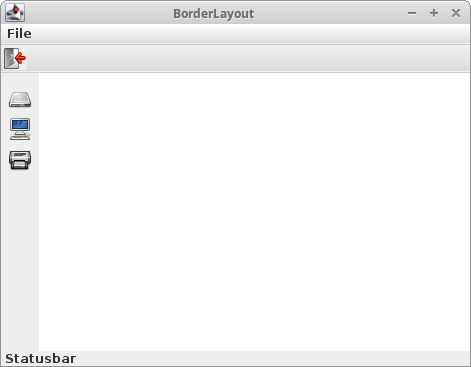
The example shows a typical application skeleton. We show a vertical and horizontal toolbars, a statusbar, and a central component (a text area).
BorderLayout is the default layout manager for the JFrame
container. So we do not have to set it explicitly.
add(toolbar, BorderLayout.NORTH);
We place the toolbar to the north of the layout.
var driveBtn = new JButton(driveIcon);
driveBtn.setBorder(new EmptyBorder(3, 0, 3, 0));
In order to put some empty space around the button, we
have to use EmptyBorder. This adds some fixed
space to the top and bottom of the button. When we add fixed
spaces, the UI is not portable. A 3 px space may look OK on
a 1280x720 screen but it is inappropriate on a 1920x1200 px screen.
add(vertical, BorderLayout.WEST);
We place the vertical toobar to the west.
add(new JTextArea(), BorderLayout.CENTER);
We place the text area into the center.
add(statusbar, BorderLayout.SOUTH);
The statusbar goes to the south area.
CardLayout
CardLayout is a simple layout manager that treats each component
as a card. The container is a stack of these cards. Only one component is
visible at a time; the rest is hidden. The first component added to the container
is visible by default when the container is initially displayed. This manager has
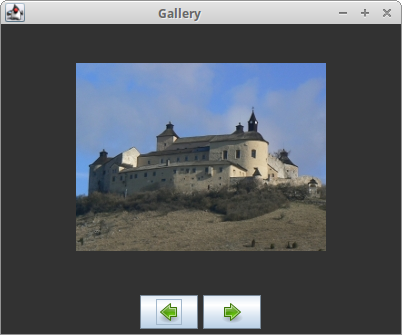
a limited practical use. It can be used to create a wizard or a tabbed pane.
The following example uses a CardLayout manager to create a gallery of images. We use four images of the Krasna Horka castle (before the fire in 2012).
package com.zetcode;

import java.awt.BorderLayout;
import java.awt.CardLayout;
import java.awt.Color;
import java.awt.EventQueue;
import javax.swing.BorderFactory;
import javax.swing.ImageIcon;
import javax.swing.JButton;
import javax.swing.JFrame;
import javax.swing.JLabel;
import javax.swing.JPanel;

public class CardLayoutEx extends JFrame {

    private ImageIcon horka1;
    private ImageIcon horka2;
    private ImageIcon horka3;
    private ImageIcon horka4;
    private ImageIcon previ;
    private ImageIcon nexti;

    private JPanel mainPanel;
    private CardLayout cardLayout;

    public CardLayoutEx() {

        initUI();
    }

    private void initUI() {

        mainPanel = new JPanel();
        mainPanel.setBackground(new Color(50, 50, 50));

        mainPanel.setBorder(
                BorderFactory.createEmptyBorder(5, 5, 5, 5)
        );

        cardLayout = new CardLayout();
        mainPanel.setLayout(cardLayout);

        horka1 = new ImageIcon("src/resources/horka1.jpg");
        horka2 = new ImageIcon("src/resources/horka2.jpg");
        horka3 = new ImageIcon("src/resources/horka3.jpg");
        horka4 = new ImageIcon("src/resources/horka4.jpg");

        previ = new ImageIcon("src/resources/previous.png");
        nexti = new ImageIcon("src/resources/next.png");

        var label1 = new JLabel(horka1);
        var label2 = new JLabel(horka2);
        var label3 = new JLabel(horka3);
        var label4 = new JLabel(horka4);

        mainPanel.add(label1);
        mainPanel.add(label2);
        mainPanel.add(label3);
        mainPanel.add(label4);

        add(mainPanel);

        var prevButton = new JButton(previ);
        prevButton.addActionListener((e) -> cardLayout.previous(mainPanel));

        var nextButton = new JButton(nexti);
        nextButton.addActionListener((e) -> cardLayout.next(mainPanel));

        var btnPanel = new JPanel();
        btnPanel.setBackground(new Color(50, 50, 50));
        btnPanel.add(prevButton);
        btnPanel.add(nextButton);

        add(btnPanel, BorderLayout.SOUTH);

        pack();

        setTitle("Gallery");
        setDefaultCloseOperation(JFrame.EXIT_ON_CLOSE);
        setLocationRelativeTo(null);
    }

    public static void main(String[] args) {

        EventQueue.invokeLater(() -> {

            var ex = new CardLayoutEx();
            ex.setVisible(true);
        });
    }
}
We create two buttons to navigate through the images.
mainPanel = new JPanel();
mainPanel.setBackground(new Color(50, 50, 50));

mainPanel.setBorder(
        BorderFactory.createEmptyBorder(5, 5, 5, 5)
);
We create the main panel component. We set its colour to dark gray. We put 5px around the panel so that its children are not too close to the border of the window.
cardLayout = new CardLayout();
mainPanel.setLayout(cardLayout);
The CardLayout manager is created and set to the main panel.
mainPanel.add(label1);
mainPanel.add(label2);
mainPanel.add(label3);
mainPanel.add(label4);
The label components displaying the images are added to the panel.
var prevButton = new JButton(previ);
prevButton.addActionListener((e) -> cardLayout.previous(mainPanel));
Clicking on the Previous button the previous() method of the
manager is called. It flips to the previous card of the specified container.
add(mainPanel);
We add the main panel to the center area of the border layout of the frame component. If we do not specify explicitly where we place the component, it is added to the center area.
var btnPanel = new JPanel();
btnPanel.setBackground(new Color(50, 50, 50));
btnPanel.add(prevButton);
btnPanel.add(nextButton);
The buttons are added to the button panel.
add(btnPanel, BorderLayout.SOUTH);
Finally, the panel with the buttons is placed into the south
area of the BorderLayout manager.
BoxLayout
BoxLayout manager is a simple layout manager that organizes components in
a column or a row. It can create quite sophisticated layouts with nesting. However, this
raises the complexity of the layout creation and uses additional resources, notably many
other JPanel components. BoxLayout is only able to create
fixed spaces; therefore, its layouts are not portable.
BoxLayout has the following constructor:
BoxLayout(Container target, int axis)
The constructor creates a layout manager that will lay out components along the
given axis. Unlike other layout managers, BoxLayout takes a container
instance as the first parameter in the constructor. The second parameter determines
the orientation of the manager. To create a horizontal box, we can use the
LINE_AXIS constant. To create a vertical box, we can use the
PAGE_AXIS constant.
The box layout manager is often used with the Box class.
This class creates several invisible components, which affect the final layout.
- glue
- strut
- rigid area
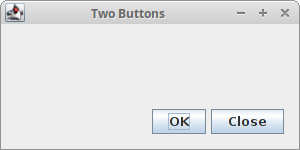
Let's say we want to put two buttons into the right bottom corner of the window.
package com.zetcode;

import javax.swing.Box;
import javax.swing.BoxLayout;
import javax.swing.JButton;
import javax.swing.JFrame;
import javax.swing.JPanel;
import java.awt.Dimension;
import java.awt.EventQueue;

public class BoxLayoutButtonsEx extends JFrame {

    public BoxLayoutButtonsEx() {

        initUI();
    }

    private void initUI() {

        var basePanel = new JPanel();
        basePanel.setLayout(new BoxLayout(basePanel, BoxLayout.Y_AXIS));
        add(basePanel);

        basePanel.add(Box.createVerticalGlue());

        var bottomPanel = new JPanel();
        bottomPanel.setAlignmentX(1f);
        bottomPanel.setLayout(new BoxLayout(bottomPanel, BoxLayout.X_AXIS));

        var okBtn = new JButton("OK");
        var closeBtn = new JButton("Close");

        bottomPanel.add(okBtn);
        bottomPanel.add(Box.createRigidArea(new Dimension(5, 0)));
        bottomPanel.add(closeBtn);
        bottomPanel.add(Box.createRigidArea(new Dimension(15, 0)));

        basePanel.add(bottomPanel);
        basePanel.add(Box.createRigidArea(new Dimension(0, 15)));

        setTitle("Two Buttons");
        setSize(300, 150);
        setDefaultCloseOperation(JFrame.EXIT_ON_CLOSE);
        setLocationRelativeTo(null);
    }

    public static void main(String[] args) {

        EventQueue.invokeLater(() -> {
            var ex = new BoxLayoutButtonsEx();
            ex.setVisible(true);
        });
    }
}
The following drawing illustrates the example.
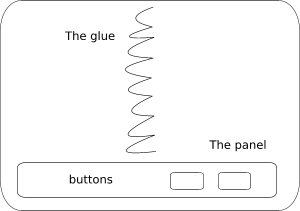
We create two panels. The base panel has a vertical box layout. The bottom panel has a horizontal one. We put a bottom panel into the base panel. The bottom panel is right aligned. The space between the top of the window and the bottom panel is expandable. This is achieved by the vertical glue.
basePanel.setLayout(new BoxLayout(basePanel, BoxLayout.Y_AXIS));
Here we create a base panel with the vertical BoxLayout.
var bottomPanel = new JPanel();
bottomPanel.setAlignmentX(1f);
bottomPanel.setLayout(new BoxLayout(bottomPanel, BoxLayout.X_AXIS));
The bottom panel is right aligned. This is done by the
setAlignmentX() method. The panel has a horizontal layout.
bottomPanel.add(Box.createRigidArea(new Dimension(5, 0)));
We put some rigid space between the buttons.
basePanel.add(bottomPanel);
Here we put the bottom panel with a horizontal box layout to the vertical base panel.
basePanel.add(Box.createRigidArea(new Dimension(0, 15)));
We also put some space between the bottom panel and the border of the window.
When we use a BoxLayout manager, we can set a
rigid area between our components.
package com.zetcode;

import javax.swing.Box;
import javax.swing.BoxLayout;
import javax.swing.JButton;
import javax.swing.JFrame;
import javax.swing.JPanel;
import javax.swing.border.EmptyBorder;
import java.awt.Dimension;
import java.awt.EventQueue;
import java.awt.Insets;

public class BoxLayoutRigidAreaEx extends JFrame {

    public BoxLayoutRigidAreaEx() {

        initUI();
    }

    private void initUI() {

        var basePanel = new JPanel();
        basePanel.setLayout(new BoxLayout(basePanel, BoxLayout.Y_AXIS));

        basePanel.setBorder(new EmptyBorder(new Insets(40, 60, 40, 60)));

        basePanel.add(new JButton("Button"));
        basePanel.add(Box.createRigidArea(new Dimension(0, 5)));
        basePanel.add(new JButton("Button"));
        basePanel.add(Box.createRigidArea(new Dimension(0, 5)));
        basePanel.add(new JButton("Button"));
        basePanel.add(Box.createRigidArea(new Dimension(0, 5)));
        basePanel.add(new JButton("Button"));

        add(basePanel);

        pack();

        setTitle("RigidArea");
        setDefaultCloseOperation(JFrame.EXIT_ON_CLOSE);
        setLocationRelativeTo(null);
    }

    public static void main(String[] args) {

        EventQueue.invokeLater(() -> {

            var ex = new BoxLayoutRigidAreaEx();
            ex.setVisible(true);
        });
    }
}
In this example, we display four buttons. By default, there is no space between the buttons. To put some space among them, we add some rigid area.
basePanel.setLayout(new BoxLayout(basePanel, BoxLayout.Y_AXIS));
We use a vertical BoxLayout manager for our panel.
basePanel.add(new JButton("Button"));
basePanel.add(Box.createRigidArea(new Dimension(0, 5)));
basePanel.add(new JButton("Button"));
We add buttons and create a rigid area in between them with
Box.createRigidArea().

Tip of the Day
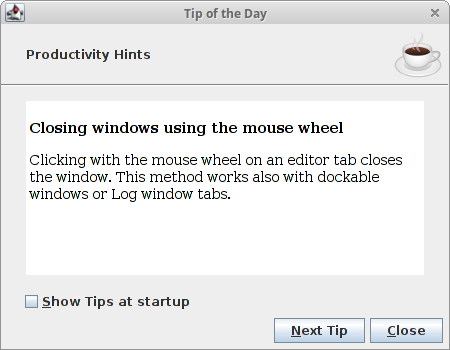
The next example creates a Tip of the Day window dialog. We use a combination of various layout managers.
package com.zetcode;

import javax.swing.BorderFactory;
import javax.swing.BoxLayout;
import javax.swing.ImageIcon;
import javax.swing.JButton;
import javax.swing.JCheckBox;
import javax.swing.JDialog;
import javax.swing.JLabel;
import javax.swing.JPanel;
import javax.swing.JSeparator;
import javax.swing.JTextPane;
import java.awt.BorderLayout;
import java.awt.Color;
import java.awt.Dimension;
import java.awt.EventQueue;
import java.awt.FlowLayout;
import java.awt.event.KeyEvent;


public class TipOfDayEx extends JDialog {

    public TipOfDayEx() {

        initUI();
    }

    private void initUI() {

        var basePanel = new JPanel();
        basePanel.setLayout(new BoxLayout(basePanel, BoxLayout.Y_AXIS));
        add(basePanel);

        var topPanel = new JPanel(new BorderLayout(0, 0));
        topPanel.setMaximumSize(new Dimension(450, 0));

        var hint = new JLabel("Productivity Hints");
        hint.setBorder(BorderFactory.createEmptyBorder(0, 25, 0, 0));
        topPanel.add(hint);

        var icon = new ImageIcon("src/resources/coffee2.png");
        var label = new JLabel(icon);
        label.setBorder(BorderFactory.createEmptyBorder(5, 5, 5, 5));
        topPanel.add(label, BorderLayout.EAST);

        var separator = new JSeparator();
        separator.setForeground(Color.gray);

        topPanel.add(separator, BorderLayout.SOUTH);

        basePanel.add(topPanel);

        var textPanel = new JPanel(new BorderLayout());
        textPanel.setBorder(BorderFactory.createEmptyBorder(15, 25, 15, 25));

        var pane = new JTextPane();
        pane.setContentType("text/html");
        var text = "<p><b>Closing windows using the mouse wheel</b></p>" +
             "<p>Clicking with the mouse wheel on an editor tab closes the window. " +
             "This method works also with dockable windows or Log window tabs.</p>";
        pane.setText(text);
        pane.setEditable(false);
        textPanel.add(pane);

        basePanel.add(textPanel);

        var boxPanel = new JPanel(new FlowLayout(FlowLayout.LEFT, 20, 0));

        var box = new JCheckBox("Show Tips at startup");
        box.setMnemonic(KeyEvent.VK_S);

        boxPanel.add(box);
        basePanel.add(boxPanel);

        var bottomPanel = new JPanel(new FlowLayout(FlowLayout.RIGHT));

        var tipBtn = new JButton("Next Tip");
        tipBtn.setMnemonic(KeyEvent.VK_N);

        var closeBtn = new JButton("Close");
        closeBtn.setMnemonic(KeyEvent.VK_C);

        bottomPanel.add(tipBtn);
        bottomPanel.add(closeBtn);
        basePanel.add(bottomPanel);

        bottomPanel.setMaximumSize(new Dimension(450, 0));

        setTitle("Tip of the Day");
        setSize(new Dimension(450, 350));
        setResizable(false);
        setDefaultCloseOperation(JDialog.DISPOSE_ON_CLOSE);
        setLocationRelativeTo(null);
    }


    public static void main(String[] args) {

        EventQueue.invokeLater(() -> {

            var ex = new TipOfDayEx();
            ex.setVisible(true);
        });
    }
}
The example uses a mix of layout managers. Simply we put four panels into the vertically organized basic panel.
var basePanel = new JPanel();
basePanel.setLayout(new BoxLayout(basePanel, BoxLayout.Y_AXIS));
add(basePanel);
This is the very bottom panel. It has a vertical box layout manager.
The basic panel is added to the default JDialog component.
This component has a border layout manager by default.
var topPanel = new JPanel(new BorderLayout(0, 0));
The topPanel panel has a border layout manager. We will put three components into it. Two labels and a separator.
topPanel.setMaximumSize(new Dimension(450, 0));
If we want to have a panel that is not greater than its components, we must set its maximum size. The zero value is ignored. The manager calculates the necessary heights.
var textPanel = new JPanel(new BorderLayout());
...
textPanel.add(pane);
The text pane component is added to the center area of the border layout manager. It takes all space left. Exactly, as we wanted.
var boxPanel = new JPanel(new FlowLayout(FlowLayout.LEFT, 20, 0));
The check box is shown in the boxPanel panel. It is left aligned. The flow layout manager has a 20px horizontal gap. Other components have 25px. Why is that? It is because the flow layout manager puts some space to between the component and the edge as well.
var bottomPanel = new JPanel(new FlowLayout(FlowLayout.RIGHT));
...
bottomPanel.setMaximumSize(new Dimension(450, 0));
The bottom panel displays two buttons. It has a right aligned flow layout manager. In order to show the buttons on the right edge of the dialog, the panel must stretch horizontally from the beginning to the end.
No manager
It is possible to go without a layout manager. There might be few situations where we might not need a layout manager. (Maybe positioning a few images at some irregular locations.) But in most cases to create truly portable, complex applications, we need layout managers.
Without layout manager, we position components using absolute values.
package com.zetcode;
import javax.swing.JButton;
import javax.swing.JFrame;
import java.awt.EventQueue;
public class AbsoluteLayoutEx extends JFrame {
public AbsoluteLayoutEx() {
initUI();
}
private void initUI() {
setLayout(null);
var okBtn = new JButton("OK");
okBtn.setBounds(50, 50, 80, 25);
var closeBtn = new JButton("Close");
closeBtn.setBounds(150, 50, 80, 25);
add(okBtn);
add(closeBtn);
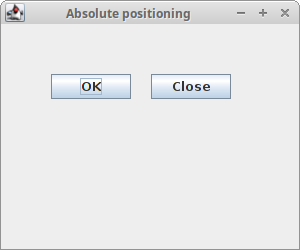
setTitle("Absolute positioning");
setSize(300, 250);
setDefaultCloseOperation(JFrame.EXIT_ON_CLOSE);
setLocationRelativeTo(null);
}
public static void main(String[] args) {
EventQueue.invokeLater(() -> {
var ex = new AbsoluteLayoutEx();
ex.setVisible(true);
});
}
}
This simple example shows two buttons.
setLayout(null);
We use absolute positioning by providing null to the
setLayout() method. (The JFrame component
has a default layout manager, the BorderLayout.)
okBtn.setBounds(50, 50, 80, 25);
The setBounds() method positions the Ok button.
The parameters are the x and y coordinates and the width and height
of the component.
In this chapter, we have mentioned layout management in Swing.