Android menus
last modified November 26, 2012
In this chapter of the Android development tutorial we will work with menus. Menus group available commands of an application. In traditional desktop applications menus are part of a menubar which is located mostly in the top area of the application. Context or popup menus are special cases of menus.
There are three kinds of menus in Android: options menu, context menu, and popup menu.
The options menu is the primary collection of menu items for an activity. In the
options menu we should have commands that have global impact on the applications. For example
a Settings menu. It is displayed either at the top or at the bottom of the activity.
The context menu shows menu items in a specific context.
For example for ListView items. It is shown when the user performs a long-click
on an element. A popup menu displays a list of items in a vertical list that's
anchored to the view that invoked the menu. It appears below the anchor view if there is room,
or above the view otherwise. It should relate to regions of content in the activity.
Menus can be created manually by coding or they can be defined in an XML file.
If we define our menus in an XML file we use the MenuInflater object to
create menus from the XML file.
Options menu
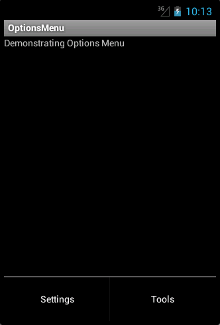
Our options menu will have two menu items. When we select a menu item a
Toast window is shown with the name of the selected menu item.
The options menu is displayed after we click on the menu button.
The manifest file is not modified in this example.

<?xml version="1.0" encoding="utf-8"?>
<LinearLayout xmlns:android="http://schemas.android.com/apk/res/android"
    android:orientation="vertical"
    android:layout_width="fill_parent"
    android:layout_height="fill_parent"
    >

  <TextView
      android:layout_width="fill_parent"
      android:layout_height="wrap_content"
      android:text="@string/message" />

</LinearLayout>
In the main.xml layout file, we have one TextView widget.
It will display a welcome message.
<?xml version="1.0" encoding="utf-8"?>
<resources>
    <string name="app_name">OptionsMenu</string>
    <string name="message">Demonstrating Options Menu</string>
    <string name="om1">Settings</string>
    <string name="om2">Tools</string>
</resources>
This is strings.xml file.
<?xml version="1.0" encoding="utf-8"?>
<menu xmlns:android="http://schemas.android.com/apk/res/android">
  <item android:id="@+id/settings"
    android:title="@string/om1" />
  <item android:id="@+id/tools"
    android:title="@string/om2" />
</menu>
This is options_menu.xml file. It defines two menu items. The file
is located in the res/menu/ subdirectory.
package com.zetcode.opmenu;

import android.app.Activity;
import android.os.Bundle;
import android.view.Menu;
import android.view.MenuInflater;
import android.view.MenuItem;
import android.widget.Toast;

public class MainActivity extends Activity
{
    @Override
    public void onCreate(Bundle savedInstanceState)
    {
        super.onCreate(savedInstanceState);
        setContentView(R.layout.main);
    }

    @Override
    public boolean onCreateOptionsMenu(Menu menu)
    {
        MenuInflater inflater = getMenuInflater();
        inflater.inflate(R.menu.options_menu, menu);
        return true;
    }

    @Override
    public boolean onOptionsItemSelected(MenuItem item)
    {
        switch (item.getItemId())
        {
            case R.id.settings:
                Toast.makeText(MainActivity.this, "Settings menu selected.",
                    Toast.LENGTH_SHORT).show();
                return true;

            case R.id.tools:
                Toast.makeText(MainActivity.this, "Tools menu selected.",
                    Toast.LENGTH_SHORT).show();
                return true;

            default:
                return super.onOptionsItemSelected(item);
        }
    }
}
To enable an options menu in an activity, we need to override the
onCreateOptionsMenu() and the onOptionsItemSelected() methods.
@Override
public boolean onCreateOptionsMenu(Menu menu)
{
    MenuInflater inflater = getMenuInflater();
    inflater.inflate(R.menu.options_menu, menu);
    return true;
}
Inside the onCreateOptionsMenu() method, we build the options menu from
the options_menu.xml file. We use the MenuInflater class to do the job.
@Override
public boolean onOptionsItemSelected(MenuItem item)
{
...
}
The onOptionsItemSelected() method handles the click events on the
menu items.
case R.id.settings:
    Toast.makeText(MainActivity.this, "Settings menu selected.",
        Toast.LENGTH_SHORT).show();
    return true;
In case of the selection of the Settings menu item we show a Toast window with "Settings menu selected" message.

Context menu
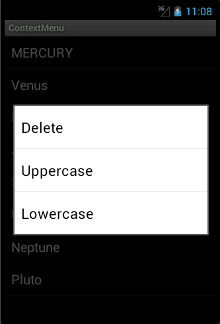
We have a ListView with the names of our planets. A long-click on an element
will show a context menu with tree options: Delete, Uppercase, and Lowercase.
The manifest file is not modified.
<?xml version="1.0" encoding="utf-8"?>
<LinearLayout xmlns:android="http://schemas.android.com/apk/res/android"
    android:orientation="vertical"
    android:layout_width="fill_parent"
    android:layout_height="fill_parent"
    >

    <ListView
      android:id="@+id/lvId"
      android:layout_width="fill_parent"
      android:layout_height="fill_parent" />

</LinearLayout>
This is main.xml file. It contains a ListView widget.
<?xml version="1.0" encoding="utf-8"?>
<resources>
    <string name="app_name">ContextMenu</string>
    <string-array name="planets">
        <item>Mercury</item>
        <item>Venus</item>
        <item>Earth</item>
        <item>Mars</item>
        <item>Jupiter</item>
        <item>Saturn</item>
        <item>Uranus</item>
        <item>Neptune</item>
        <item>Pluto</item>
    </string-array>
</resources>
This is the strings.xml resource file.
<?xml version="1.0" encoding="utf-8"?>
<TextView xmlns:android="http://schemas.android.com/apk/res/android"
    android:layout_width="fill_parent"
    android:layout_height="fill_parent"
    android:padding="10dp"
    android:textSize="20sp">
</TextView>
This is the row.xml resource file. Each row of a ListView consists of
a single TextView.
package com.zetcode.conmenu;

import android.app.Activity;
import android.os.Bundle;
import android.widget.ArrayAdapter;
import android.widget.ListView;
import android.view.View;
import android.view.Menu;
import android.view.MenuInflater;
import android.view.MenuItem;
import android.view.ContextMenu;
import android.view.ContextMenu.ContextMenuInfo;
import android.widget.AdapterView.AdapterContextMenuInfo;

import java.util.Arrays;
import java.util.ArrayList;


public class MainActivity extends Activity
{
    private ListView lv;
    private ArrayAdapter<String> la;

    @Override
    public void onCreate(Bundle savedInstanceState)
    {
        super.onCreate(savedInstanceState);
        setContentView(R.layout.main);

        setupUI();
    }

    public void setupUI()
    {
        lv = (ListView) findViewById(R.id.lvId);
        String[] planets = getResources().getStringArray(R.array.planets);
        ArrayList<String> lst = new ArrayList<String>();
        lst.addAll(Arrays.asList(planets));

        la = new ArrayAdapter<String>(this, R.layout.row, lst);
        lv.setAdapter(la);
        registerForContextMenu(lv);
    }

    @Override
    public void onCreateContextMenu(ContextMenu menu, View v,
        ContextMenuInfo menuInfo)
    {
        super.onCreateContextMenu(menu, v, menuInfo);
        MenuInflater inflater = getMenuInflater();
        inflater.inflate(R.menu.context_menu, menu);
    }

    @Override
    public boolean onContextItemSelected(MenuItem item)
    {
        AdapterContextMenuInfo info = (AdapterContextMenuInfo) item.getMenuInfo();

        int pos = info.position;
        String i = la.getItem(pos);

        switch (item.getItemId())
        {
            case R.id.delId:
                la.remove(i);
                return true;

            case R.id.upId:
                String upln = i.toUpperCase();
                la.remove(i);
                la.insert(upln, pos);
                return true;

            case R.id.loId:
                String lpln = i.toLowerCase();
                la.remove(i);
                la.insert(lpln, pos);
                return true;

            default:
                return super.onContextItemSelected(item);
        }
    }
}
In order to implement the context menu, we have to override the onCreateContextMenu() and
the onContextItemSelected() methods. We also need to call the
registerForContextMenu() method for a specific view.
String[] planets = getResources().getStringArray(R.array.planets);
ArrayList<String> lst = new ArrayList<String>();
lst.addAll(Arrays.asList(planets));
We will be deleting items of the ListView. Therefore, we need to use
an ArrayList. Otherwise the list would be read-only.
registerForContextMenu(lv);
The context menu is registered for the ListView widget.
@Override
public void onCreateContextMenu(ContextMenu menu, View v,
    ContextMenuInfo menuInfo)
{
    super.onCreateContextMenu(menu, v, menuInfo);
    MenuInflater inflater = getMenuInflater();
    inflater.inflate(R.menu.context_menu, menu);
}
In the onCreateContextMenu() method we build
the context menu from the context_menu.xml file.
@Override
public boolean onContextItemSelected(MenuItem item)
{
...
}
The onContextItemSelected() reacts to list item selection events.
AdapterContextMenuInfo info = (AdapterContextMenuInfo) item.getMenuInfo();

int pos = info.position;
String i = la.getItem(pos);
To find out more about the selected item, we use the AdapterContextMenuInfo class.
We get the position and the text of the selected item.
case R.id.delId:
    la.remove(i);
    return true;
If we select the Delete context menu option, we remove the item
from the ArrayAdapter.
case R.id.upId:
    String upln = i.toUpperCase();
    la.remove(i);
    la.insert(upln, pos);
    return true;
For the Uppercase option, we modify the string, remove the original one and insert a new one.

Popup menu
The example shows a PopupMenu after clicking on a button.
The manifest file is not modified.
<?xml version="1.0" encoding="utf-8"?>
<LinearLayout xmlns:android="http://schemas.android.com/apk/res/android"
    android:orientation="vertical"
    android:layout_width="fill_parent"
    android:layout_height="fill_parent"
    >

  <Button
      android:id="@+id/btnId"
      android:layout_height="wrap_content"
      android:layout_width="wrap_content"
      android:layout_marginTop="10dip"
      android:text="@string/btn_label"
      android:onClick="onClick" />

  <TextView
      android:id="@+id/tvId"
      android:layout_width="fill_parent"
      android:layout_height="wrap_content"
      android:layout_marginTop="10dip" />

</LinearLayout>
This is main.xml file. We have a Button widget and a
TextView widget. The button will show a PopupMenu.
<?xml version="1.0" encoding="utf-8"?>
<resources>
    <string name="app_name">PopupMenu</string>
    <string name="btn_label">Show menu</string>
    <string name="pm1">Item 1</string>
    <string name="pm2">Item 2</string>
</resources>
This is the strings.xml resource file.
<?xml version="1.0" encoding="utf-8"?>
<menu xmlns:android="http://schemas.android.com/apk/res/android">
  <item android:id="@+id/settings"
    android:title="@string/pm1" />
  <item android:id="@+id/tools"
    android:title="@string/pm2" />
</menu>
This is popup_menu.xml file. It defines two menu items. The file
is located in the res/menu/ subdirectory.
package com.zetcode.popmenu;

import android.app.Activity;
import android.os.Bundle;
import android.view.View;
import android.view.MenuItem;
import android.widget.TextView;
import android.widget.PopupMenu;
import android.widget.PopupMenu.OnMenuItemClickListener;

public class MainActivity extends Activity
    implements OnMenuItemClickListener
{
    private TextView tv;

    @Override
    public void onCreate(Bundle savedInstanceState)
    {
        super.onCreate(savedInstanceState);
        setContentView(R.layout.main);

        tv = (TextView) findViewById(R.id.tvId);
    }

   public void onClick(View v)
   {
       showPopupMenu(v);
   }

   public void showPopupMenu(View v)
   {
       PopupMenu pm = new PopupMenu(MainActivity.this, v);
       pm.getMenuInflater().inflate(R.menu.popup_menu, pm.getMenu());
       pm.setOnMenuItemClickListener(this);
       pm.show();
   }

   @Override
   public boolean onMenuItemClick(MenuItem item)
   {
      tv.setText(item.toString() + " selected");
      return true;
   }
}
A PopupMenu is displayed after clicking on the button widget.
public void onClick(View v)
{
    showPopupMenu(v);
}
This method is a callback to the button click. The relation is set in the
main.xml file via an attribute. The method calls the
showPopupMenu() method.
public void showPopupMenu(View v)
{
    PopupMenu pm = new PopupMenu(MainActivity.this, v);
    pm.getMenuInflater().inflate(R.menu.popup_menu, pm.getMenu());
    pm.setOnMenuItemClickListener(this);
    pm.show();
}
We create an instance of the PopupMenu class. It builds the
menu, sets the OnMenuItemClickListener and shows the PopupMenu.
@Override
public boolean onMenuItemClick(MenuItem item)
{
    tv.setText(item.toString() + " selected");
    return true;
}
After selecting a menu item the onMenuItemClick() method is called.
It sets the item's title to the TextView widget.
In this chapter of the Android development tutorial, we have worked with menus.